One of my favorite demonstrations for creating a toolbar, and one I use often in class, was shown to me by a couple of Microsoft programmers. Here it is:
Sub AddNewCB()
   Dim CBar As CommandBar, CBarCtl As CommandBarControl
   On Error GoTo AddNewCB_Err

   ' Create a new floating toolbar and make it visible.
   Set CBar = CommandBars.Add(Name:="Sample Toolbar", Position:= _
      msoBarFloating)
   CBar.Visible = True

   ' Create a button with text on the bar and set some properties.
   Set CBarCtl = CBar.Controls.Add(Type:=msoControlButton)
   With CBarCtl
      .Caption = "Button"
      .Style = msoButtonCaption
      .TooltipText = "Display Message Box"
      .OnAction = "=MsgBox(""You pressed a toolbar button!"")"
   End With

   ' Create a button with an image on the bar and set some
   ' properties.
   Set CBarCtl = CBar.Controls.Add(Type:=msoControlButton)
   With CBarCtl
      .FaceId = 1000
      .Caption = "Toggle Button"
      .TooltipText = "Toggle First Button"
      .OnAction = "=ToggleButton()"
   End With

   ' Create a combo box control on the bar and set some properties.
   Set CBarCtl = CBar.Controls.Add(msoControlComboBox)
   With CBarCtl
      .Caption = "Drop Down"
      .Width = 100
      .AddItem "Create Button", 1
      .AddItem "Remove Button", 2
      .DropDownWidth = 100
      .OnAction = "=AddRemoveButton()"

   End With
   Exit Sub
   AddNewCB_Err:
   MsgBox "Error " & Err.Number & vbCr & Err.Description
   Exit Sub
End Sub

'****************************************************************
' This procedure is called from a button on the toolbar.
' It toggles the Visible property of another button on the bar.
'****************************************************************
Function ToggleButton()
   Dim CBButton As CommandBarControl
   On Error GoTo ToggleButton_Err
   Set CBButton = CommandBars("Sample Toolbar").Controls(1)
   CBButton.Visible = Not CBButton.Visible
   Exit Function
   ToggleButton_Err:
   MsgBox "Error " & Err.Number & vbCr & Err.Description
   Exit Function
End Function

'****************************************************************
'This procedure is called from a combo box on the toolbar
'It adds a button to the bar or removes it
'****************************************************************
Function AddRemoveButton()
   Dim CBar As CommandBar, CBCombo As CommandBarComboBox
   Dim CBNewButton As CommandBarButton
   On Error GoTo AddRemoveButton_Err
   Set CBar = CommandBars("Sample Toolbar")
   Set CBCombo = CBar.Controls(3)
   Select Case CBCombo.ListIndex
      ' If Create Button is selected, create a button on the bar
      Case 1
         Set CBNewButton = CBar.Controls.Add(Type:=msoControlButton)
         With CBNewButton
            .Caption = "New Button"
            .Style = msoButtonCaption
            .BeginGroup = True
            .Tag = "New Button"
            .OnAction = "=MsgBox(""This is a new button!"")"
         End With
      ' Find and remove the new button if it exists.
      Case 2
         Set CBNewButton = CBar.FindControl(Tag:="New Button")
         CBNewButton.Delete
   End Select
   Exit Function
   AddRemoveButton_Err:
   ' If the button does not exist.
   If Err.Number = 91 Then
      MsgBox "Cannot remove button that does not exist!"
      Exit Function
   Else
     MsgBox "Error " & Err.Number & vbCr & Err.Description
     Exit Function
   End If
End Function
I know this seems like a lot of code, but it ties many concepts together that we will discuss. However, before you analyze it, let’s try running it. Make sure you are in the original sub procedure adNewCB. Once you run it, a floating toolbar like the one shown here should appear:
If you click on each of the buttons, you will see various responses. Spend a few minutes and play with it.
Let’s take a look at some of the code that was used. Near the beginning of the AddNewCB procedure, we have the following code:
Set CBar = CommandBars.Add(Name:="Sample Toolbar", Position:= _
      msoBarFloating)
   CBar.Visible = True
Notice that the code sets the object reference variable CBar (which represents the CommandBar object) to reference the value returned by the Add method of the CommandBars collection. Remember, the CommandBars collection is within the Application object and includes all the toolbars, menu bars, and shortcut menus. The Add method creates a new command bar, adds it to the collection, and returns a reference to it. In the call to the Add method, you give the command bar a name and declare that you want its position to be floating. It is also necessary to set its visibility to true. If not, you would need to turn it on manually.
You can tell that the new toolbar has been added to the collection by going into the Database window and selecting Tools | Customize. If you select the Toolbars tab and scroll to the end, you will see the customized toolbar added to the collection, as Figure 14-2 shows.
The next section of code adds a button to the toolbar:
Set CBarCtl = CBar.Controls.Add(Type:=msoControlButton)
   With CBarCtl
      .Caption = "Button"
      .Style = msoButtonCaption
      .TooltipText = "Display Message Box"
      .OnAction = "=MsgBox(""You pressed a toolbar button!"")"
   End With
CBarCtl is a command bar control object. You are adding it to the controls on the command bar (CBar) and making it a control of type msoControlButton, or a command button.
The caption is the text within the button, and the normal style of the caption is the property msoButtonCaption.
TooltipText is the tag that is shown when you roll the mouse over the button.
Finally, the onAction method defines what happens when the button is pressed. It returns a message box like this one:

The following block of code then adds a second control to the toolbar:
Set CBarCtl = CBar.Controls.Add(Type:=msoControlButton)
   With CBarCtl
      .FaceId = 1000
      .Caption = "Toggle Button"
      .TooltipText = "Toggle First Button"
      .OnAction = "=ToggleButton()"
   End With
Like before, you add the button to the command bar. However, there is one thing that is a little different. You will notice that you now use the FaceId property.
The FaceId property dictates the look, not the function, of a command bar button. A complete listing of these FaceId numbers is beyond the scope of this book. However, you can easily find this list within the Microsoft Access help screens.
This time, onAction calls the ToggleButton procedure, which is also defined in our code. If you study the code of that procedure, it simply toggles on and off the visibility of the first button that you added.
The next control that you add to the command bar is a combo box:
Set CBarCtl = CBar.Controls.Add(msoControlComboBox)
   With CBarCtl
      .Caption = "Drop Down"
      .Width = 100
      .AddItem "Create Button", 1
      .AddItem "Remove Button", 2
      .DropDownWidth = 100
      .OnAction = "=AddRemoveButton()"
   End With
Each of the items populating this combo box must be added with the AddItem method. You also give each item an Index reference in addition to the text. You will notice that the onAction method calls the AddRemoveButton procedure, which has also been supplied in the code.
Let’s take a look at a section of this AddRemoveButton procedure:
Set CBCombo = CBar.Controls(3)
   Select Case CBCombo.ListIndex
      ' If Create Button is selected, create a button on the bar
      Case 1
         Set CBNewButton = CBar.Controls.Add(Type:=msoControlButton)
         With CBNewButton
            .Caption = "New Button"
            .Style = msoButtonCaption
            .BeginGroup = True
            .Tag = "New Button"
            .OnAction = "=MsgBox(""This is a new button!"")"
         End With
      ' Find and remove the new button if it exists.
      Case 2
         Set CBNewButton = CBar.FindControl(Tag:="New Button")
         CBNewButton.Delete
   End Select
Since this is the third control on the command bar, you set up a reference to it with CBar.Controls(3). Once that CBCombo object reference is set up, you use the ListIndex property to determine the index value of the item selected in the combo box.
You then send that to a Select Case structure that handles each of the possible combo box options. Notice that the FindControl method is used to find the next instance of the “New Button” tag and delete it.
Admittedly, this was only a light examination of the code. However, I think you should have enough information here to build sophisticated toolbars that will cover a variety of situations.
Note, if you try to run this code a second time, you will end up with the following error message:
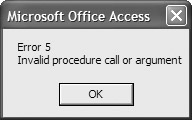
You would need to delete the toolbar using the Tools | Customize box in the Database window, or by using the following simple procedure.
Sub cmdBarDelete()
   CommandBars("sample toolbar").Delete
End Sub
