| I l@ve RuBoard |
|
11.4 Layout ManagersBeyond these specialty panes with their dedicated layout managers, the Swing package also includes some general layout managers you can use with your own code. You can use the new BoxLayout to make things like toolbars and OverlayLayout to make things like layered labels. The BoxLayout class is a manager that gives you one row or column to put everything in. It's great for toolbars and button ribbons. It also comes with its very own convenience container called Box. The Box class is a lightweight container that requires a BoxLayout manager. While you can certainly use the BoxLayout class to control your own panel, frame, or other container, the Box class provides several shortcuts for dealing with components in a boxed layout. You'll often find that using a Box is easier than creating a panel or frame that you control with a BoxLayout manager. 11.4.1 The Box ClassLet's start with a look at the convenience container that puts the BoxLayout manager to use. The Box class is a lightweight container object whose primary purpose is to let you add components to a horizontal or vertical box without having to think about getting the constraints right. (As of SDK 1.4, Box extends JComponent.) You use the normal Container.add( ) method to place components in the box. Components are placed left to right (or top to bottom) in the order you add them. 11.4.1.1 PropertiesTable 11-11 shows the properties of the Box class. You are not allowed to change a box's layout manager, so the setLayout accessor always throws an AWTError.
11.4.1.2 Constructor
11.4.1.3 Creation methodTwo convenience routines exist for creating boxes. You can create your own using the constructor, but these are sometimes easier.
11.4.1.4 Spacing and resizing methodsThe Box class provides several static helper components for spacing and resizing controls. You can add these components as you would add any other component to the box.
11.4.2 The Box.Filler ClassThe struts and glue components used in the various create methods above use a public inner class called Filler. The Filler inner class extends Component and provides mechanisms to specify fixed or variable widths and heights. It has no visual presence, but as you saw in the above examples, it can play a role in the layout process for a container. While this class is public and can be used directly, the static convenience methods found in the Box class are probably easier to use. 11.4.2.1 PropertiesTable 11-12 shows the properties found in the Filler class. The size properties all store their values in protected fields inherited from Component. Glue components are created by putting zeros in the minimum and preferred sizes, and Short.MAX_VALUE in the maximum sizes. Strut (and rigid area) components are created by putting exactly the same value in each of the three size categories.
11.4.2.2 Constructor
11.4.2.3 Shape methodThe Filler class has only one other method beyond those required to support accessibility:
11.4.3 The BoxLayout ClassIf you want only the layout manager for your own container, this is the class you need. The BoxLayout class implements the LayoutManager2 interface from the java.awt package. This class and its predecessor, LayoutManager, are discussed in detail in John Zukowski's Java AWT Reference (O'Reilly), which provides an excellent background on layout managers in general. Although it is no longer in print, you can download a copy in PDF format from this book's web site, http://www.oreilly.com/catalog/jswing2/. Figure 11-12 shows an example of a simple form that allows individual rows to be as tall as they need to be. Notice that we pad the top and bottom rows with glue, which keeps the form vertically centered on the tab. Figure 11-12. A BoxLayout attached to a normal JPanel (and active JTabbedPane tooltips)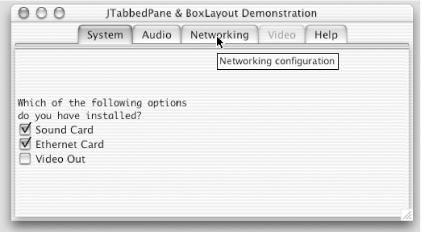 Here's the code for this example: // SysConfig.java
// A demonstration of the JTabbedPane class for displaying and manipulating
// configuration information. The BoxLayout class is used to lay out the first tab
// quickly.
//
import java.awt.*;
import java.awt.event.*;
import javax.swing.*;
import javax.swing.event.*;
public class SysConfig extends JFrame {
JTabbedPane config = new JTabbedPane( );
public SysConfig( ) {
super("JTabbedPane & BoxLayout Demonstration");
setSize(500,300);
setDefaultCloseOperation(EXIT_ON_CLOSE);
JPanel configPane = new JPanel( );
configPane.setLayout(new BoxLayout(configPane, BoxLayout.Y_AXIS));
JTextArea question = new JTextArea("Which of the following options\n" +
"do you have installed?");
// Now configure the text area to show up properly inside the box. This is part
// of the "high art" of Swing.
question.setEditable(false);
question.setMaximumSize(new Dimension(300,50));
question.setAlignmentX(0.0f);
question.setBackground(configPane.getBackground( ));
JCheckBox audioCB = new JCheckBox("Sound Card", true);
JCheckBox nicCB = new JCheckBox("Ethernet Card", true);
JCheckBox tvCB = new JCheckBox("Video Out", false);
configPane.add(Box.createVerticalGlue( ));
configPane.add(question);
configPane.add(audioCB);
configPane.add(nicCB);
configPane.add(tvCB);
configPane.add(Box.createVerticalGlue( ));
JLabel audioPane = new JLabel("Audio stuff");
JLabel nicPane = new JLabel("Networking stuff");
JLabel tvPane = new JLabel("Video stuff");
JLabel helpPane = new JLabel("Help information");
audioCB.addItemListener(new TabManager(audioPane));
nicCB.addItemListener(new TabManager(nicPane));
tvCB.addItemListener(new TabManager(tvPane));
config.addTab("System", null, configPane, "Choose Installed Options");
config.addTab("Audio", null, audioPane, "Audio system configuration");
config.addTab("Networking", null, nicPane, "Networking configuration");
config.addTab("Video", null, tvPane, "Video system configuration");
config.addTab("Help", null, helpPane, "How Do I...");
getContentPane( ).add(config, BorderLayout.CENTER);
}
class TabManager implements ItemListener {
Component tab;
public TabManager(Component tabToManage) {
tab = tabToManage;
}
public void itemStateChanged(ItemEvent ie) {
int index = config.indexOfComponent(tab);
if (index != -1) {
config.setEnabledAt(index, ie.getStateChange( ) == ItemEvent.SELECTED);
}
SysConfig.this.repaint( );
}
}
public static void main(String args[]) {
SysConfig sc = new SysConfig( );
sc.setVisible(true);
}
}
11.4.3.1 ConstantsThe BoxLayout class contains the two constants listed in Table 11-13.
11.4.3.2 Constructor
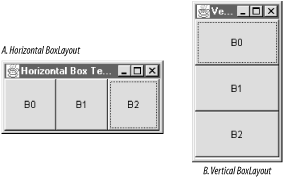
Here's a look at the code to generate the horizontal box. (You need to change the axis you use in the constructor to get the vertical box. That example is online as VBox.java.) // HBox.java
// A quick test of the BoxLayout manager using the Box utility class
//
import java.awt.*;
import java.awt.event.*;
import javax.swing.*;
public class HBox extends JFrame {
public HBox( ) {
super("Horizontal Box Test Frame");
setSize(200, 100);
Panel box = new Panel( );
// Use BoxLayout.Y_AXIS if you want a vertical box.
box.setLayout(new BoxLayout(box, BoxLayout.X_AXIS));
setContentPane(box);
for (int i = 0; i < 3; i++) {
Button b = new Button("B" + i);
box.add(b);
}
setDefaultCloseOperation(EXIT_ON_CLOSE);
setVisible(true);
}
public static void main(String args[]) {
HBox bt = new HBox( );
}
}
Well, maybe that's not really exciting since you can do the same thing with a well-constructed grid-layout manager. But the BoxLayout class does allow for components to be different sizes, unlike the GridLayout class. Recall from Figure 11-13 that we had a two-line text area as well as several checkbox components. The text area is somewhat taller than the checkboxes, but that doesn't bother the BoxLayout manager. Figure 11-14 shows the same application with altered background for the components. You can see the actual size of each component with respect to the layout manager. Figure 11-14. The BoxLayout manager with components of varying heights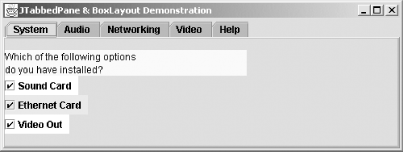 11.4.3.3 Box alignmentsOne other thing to note about the BoxLayout class is the off-axis alignment of the components, dictated by the alignmentX and alignmentY properties of the Component class. For example, in a vertical box, the alignmentX property of the first component is used to determine the horizontal position of a component relative to the other components. Likewise, the alignmentY property dictates the vertical alignment of components in a horizontal BoxLayout. The default alignments for the various components can throw things off. In the code example for Figure 11-13, we set the alignmentX property of the JTextArea to 0.0 to keep everything left-aligned. Without that manual adjustment, the text area tries to center itself on the screen. The checkboxes that follow then line up with their left edges on the same imaginary line as the center of the text area. Sometimes that's exactly what you want, but sometimes it isn't. Just be aware that some components occasionally need tweaking. 11.4.4 The OverlayLayout ClassAnother layout manager in the Swing package is the OverlayLayout class. This layout manager is more of a facilitating manager for some of the Swing components, such as JMenuItem and AbstractButton. The purpose of this layout manager is to place components on top of each other based on some alignment points. This allows things like buttons and menu items to manage icons and text in the same visual area. Recall that a "center" alignment for a button with both an icon and a text label places the text directly over the icon. OverlayLayout understands how to arrange components that overlap. The alignment points are values between 0.0 and 1.0 for both the horizontal and vertical axes. (For the horizontal axis, 0.0 is the left side of the component, 1.0 is the right side. The vertical axis runs from 0.0 at the top to 1.0 at the bottom.) You assign a horizontal and vertical pair of points to each component in the container. OverlayLayout then arranges the components so that their alignment points all occupy the same spot. To accomplish the previous icon and text example, you would set the alignments for the icon to 0.5 horizontal and 0.5 vertical. You would do the same for the text. However, if you wanted the text to show up underneath the icon but still centered horizontally, you would set the icon's alignments to 0.5 horizontal and 1.0 vertical. The text would use 0.5 horizontal and 0.0 vertical. Figure 11-15 illustrates these two scenarios. As noted for BoxLayout, the OverlayLayout class implements the LayoutManager2 interface from the java.awt package. Again, you can find out more about layout managers in Java AWT Reference by John Zukowski (O'Reilly). 11.4.4.1 ConstructorOne constructor does exist for creating an OverlayLayout manager:
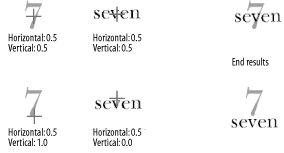
11.4.5 An OverlayLayout ExampleRather than contrive an example using the OverlayLayout manager, Figure 11-16 shows a simple program that lets you play with three buttons inside a panel, with an OverlayLayout manager running. You can type in the X- and Y-alignment values between 0.0 and 1.0 into text fields along the bottom. The text fields are organized as X and Y alignments for each of the three buttons (B1, B2, and B3 respectively). Click the Update button. The buttons in the floating panel rearrange themselves according to the values you enter. The gridlines show the bounds of the panel and its center. Try changing several of the values; this will give you an idea of how this layout manager might be used. In Figure 11-16, you can see we placed B2 above and to the right of B1. We gave B3 centered alignment (0.5) for both axes. You can see how its center corresponds to the origin created by the polar opposite constraints of the other buttons�not the center of the container. Admittedly, you probably won't be lining up buttons using this layout manager, but imagine controlling a multiline, multiicon label. This layout manager could prove useful in such situations. Figure 11-16. A demonstration of the OverlayLayout manager on three components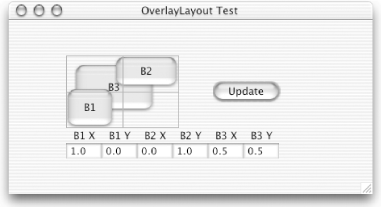 Here's the code that produced this example. As with many of the examples, this one is more fun if you compile and run the program itself. // OverlayTest.java
//
import java.awt.*;
import java.awt.event.*;
import javax.swing.*;
public class OverlayTest extends JFrame {
public OverlayTest( ) {
super("OverlayLayout Test");
setSize(500, 300);
setDefaultCloseOperation(EXIT_ON_CLOSE);
final Container c = getContentPane( );
c.setLayout(new GridBagLayout( ));
final JPanel p1 = new GridPanel( );
final OverlayLayout overlay = new OverlayLayout(p1);
p1.setLayout(overlay);
final JButton jb1 = new JButton("B1");
final JButton jb2 = new JButton("B2");
final JButton jb3 = new JButton("B3");
Dimension b1 = new Dimension(60, 50);
Dimension b2 = new Dimension(80, 40);
Dimension b3 = new Dimension(100, 60);
jb1.setMinimumSize(b1);
jb1.setMaximumSize(b1);
jb1.setPreferredSize(b1);
jb2.setMinimumSize(b2);
jb2.setMaximumSize(b2);
jb2.setPreferredSize(b2);
jb3.setMinimumSize(b3);
jb3.setMaximumSize(b3);
jb3.setPreferredSize(b3);
SimpleReporter reporter = new SimpleReporter( );
jb1.addActionListener(reporter);
jb2.addActionListener(reporter);
jb3.addActionListener(reporter);
p1.add(jb1);
p1.add(jb2);
p1.add(jb3);
JPanel p2 = new JPanel( );
p2.setLayout(new GridLayout(2,6));
p2.add(new JLabel("B1 X", JLabel.CENTER));
p2.add(new JLabel("B1 Y", JLabel.CENTER));
p2.add(new JLabel("B2 X", JLabel.CENTER));
p2.add(new JLabel("B2 Y", JLabel.CENTER));
p2.add(new JLabel("B3 X", JLabel.CENTER));
p2.add(new JLabel("B3 Y", JLabel.CENTER));
p2.add(new JLabel(""));
final JTextField x1 = new JTextField("0.0", 4); // B1 x alignment
final JTextField y1 = new JTextField("0.0", 4); // B1 y alignment
final JTextField x2 = new JTextField("0.0", 4);
final JTextField y2 = new JTextField("0.0", 4);
final JTextField x3 = new JTextField("0.0", 4);
final JTextField y3 = new JTextField("0.0", 4);
p2.add(x1);
p2.add(y1);
p2.add(x2);
p2.add(y2);
p2.add(x3);
p2.add(y3);
GridBagConstraints constraints = new GridBagConstraints( );
c.add(p1, constraints);
constraints.gridx = 1;
JButton updateButton = new JButton("Update");
updateButton.addActionListener(new ActionListener( ) {
public void actionPerformed(ActionEvent ae) {
jb1.setAlignmentX(Float.valueOf(x1.getText( ).trim( )).floatValue( ));
jb1.setAlignmentY(Float.valueOf(y1.getText( ).trim( )).floatValue( ));
jb2.setAlignmentX(Float.valueOf(x2.getText( ).trim( )).floatValue( ));
jb2.setAlignmentY(Float.valueOf(y2.getText( ).trim( )).floatValue( ));
jb3.setAlignmentX(Float.valueOf(x3.getText( ).trim( )).floatValue( ));
jb3.setAlignmentY(Float.valueOf(y3.getText( ).trim( )).floatValue( ));
p1.revalidate( );
}
});
c.add(updateButton, constraints);
constraints.gridx = 0;
constraints.gridy = 1;
constraints.gridwidth = 2;
c.add(p2, constraints);
}
public static void main(String args[]) {
OverlayTest ot = new OverlayTest( );
ot.setVisible(true);
}
public class SimpleReporter implements ActionListener {
public void actionPerformed(ActionEvent ae) {
System.out.println(ae.getActionCommand( ));
}
}
public class GridPanel extends JPanel {
public void paint(Graphics g) {
super.paint(g);
int w = getSize( ).width;
int h = getSize( ).height;
g.setColor(Color.red);
g.drawRect(0,0,w-1,h-1);
g.drawLine(w/2,0,w/2,h);
g.drawLine(0,h/2,w,h/2);
}
}
}
When the user clicks Update, we receive an ActionEvent. The listener for this event does all the real work. We then query all the text fields, convert their contents into numbers, and set the alignment values. To make the new alignments take effect, we invalidate the layout and tell our panel to redo its layout. 11.4.6 The SizeRequirements ClassLaying out all of these components for the different layout managers involves a lot of calculations that can be quite similar. The layout manager needs to end up with a list of (x,y) coordinates for each component as well as a list of widths and heights. The SizeRequirements class provides several convenience methods for doing exactly these kinds of calculations. Layout managers generally need two types of calculations: aligned and tiled. You can see both of these kinds of calculations in action with the FlowLayout manager. If you place two buttons and a list on a panel managed by FlowLayout, you get the components laid out left to right, each vertically centered relative to the others. The left-to-right x coordinates and widths for each component are an example of tiled requirements. The y coordinates and heights are an example of aligned requirements. You can perform both types of calculations with the static methods of this class. One thing to remember when using SizeRequirements, however, is that it calculates only one axis at a time�you can't make one call to get both the (x, y) and (width, height) lists. It's not really a big hassle though; just make one call for the x and width values and another for the y and height values. 11.4.6.1 Fields
11.4.6.2 Constructors
11.4.6.3 Methods
|
| I l@ve RuBoard |
|