| I l@ve RuBoard |
|
14.7 Selectable Menu ItemsSo far, we've covered traditional menu items that produce a simple, text-oriented label associated with an action. But that's not the only type of item to which users are accustomed. Swing provides for two selectable menu items: the checkbox menu item and the radio button menu item. 14.7.1 The JCheckBoxMenuItem ClassCheckbox menu items are represented by the JCheckBoxMenuItem class. As you might have guessed, this object behaves similarly to the JCheckBox object. By clicking on a checkbox menu item, you can toggle a UI-defined checkmark that generally appears to the left of the menu item's label. There is no mutual exclusion between adjoining JCheckBoxMenuItem objects— the user can check any item without affecting the state of the others. Figure 14-14 shows the class diagram for the JCheckBoxMenuItem component. Figure 14-14. JCheckBoxMenuItem class diagram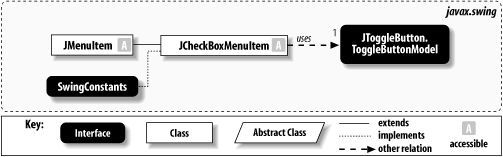 14.7.1.1 PropertiesTable 14-9 shows the properties of the JCheckBoxMenuItem class. JCheckBoxMenuItem inherits the JMenuItem model (ButtonModel) and its accessors. The JCheckBoxMenuItem class also contains two additional component properties. The state property has the value true if the menu item is currently in the checked state, and false if it is not. The selectedObjects property contains an Object array of size one, consisting of the text of the menu item if it is currently in the checked state. If it is not, getSelectedObjects( ) returns null. The getSelectedObjects( ) method exists for compatibility with AWT's ItemSelectable interface.
14.7.1.2 Constructors
14.7.1.3 Miscellaneous
14.7.2 Using Checkbox Menu ItemsHere's a program using the JCheckBoxMenuItem class. It is similar to the JMenu example, except that each menu item now has a checkmark next to it. We've done nothing to make the items mutually exclusive; that comes next. We have, however, reworked the code to use more-portable keyboard accelerators rather than mnemonics. Note that we used M (middle) as the accelerator for the Center option because C is generally reserved for Copy. Figure 14-15 shows the result. // CheckBoxMenuItemExample.java
//
import java.awt.*;
import java.awt.event.*;
import javax.swing.*;
import javax.swing.border.*;
public class CheckBoxMenuItemExample extends JPanel {
public JTextPane pane;
public JMenuBar menuBar;
public JToolBar toolBar;
public CheckBoxMenuItemExample( ) {
menuBar = new JMenuBar( );
JMenu justifyMenu = new JMenu("Justify");
ActionListener actionPrinter = new ActionListener( ) {
public void actionPerformed(ActionEvent e) {
try { pane.getStyledDocument( ).insertString(0 ,
"Action ["+e.getActionCommand( )+"] performed!\n", null);
} catch (Exception ex) { ex.printStackTrace( ); }
}
};
JCheckBoxMenuItem leftJustify = new
JCheckBoxMenuItem("Left", new ImageIcon("left.gif"));
leftJustify.setHorizontalTextPosition(JMenuItem.RIGHT);
leftJustify.setAccelerator(KeyStroke.getKeyStroke('L',
Toolkit.getDefaultToolkit( ).getMenuShortcutKeyMask( )));
leftJustify.addActionListener(actionPrinter);
JCheckBoxMenuItem rightJustify = new
JCheckBoxMenuItem("Right", new ImageIcon("right.gif"));
rightJustify.setHorizontalTextPosition(JMenuItem.RIGHT);
rightJustify.setAccelerator(KeyStroke.getKeyStroke('R',
Toolkit.getDefaultToolkit( ).getMenuShortcutKeyMask( )));
rightJustify.addActionListener(actionPrinter);
JCheckBoxMenuItem centerJustify = new
JCheckBoxMenuItem("Center", new ImageIcon("center.gif"));
centerJustify.setHorizontalTextPosition(JMenuItem.RIGHT);
centerJustify.setAccelerator(KeyStroke.getKeyStroke('M',
Toolkit.getDefaultToolkit( ).getMenuShortcutKeyMask( )));
centerJustify.addActionListener(actionPrinter);
JCheckBoxMenuItem fullJustify = new
JCheckBoxMenuItem("Full", new ImageIcon("full.gif"));
fullJustify.setHorizontalTextPosition(JMenuItem.RIGHT);
fullJustify.setAccelerator(KeyStroke.getKeyStroke('F',
Toolkit.getDefaultToolkit( ).getMenuShortcutKeyMask( )));
fullJustify.addActionListener(actionPrinter);
justifyMenu.add(leftJustify);
justifyMenu.add(rightJustify);
justifyMenu.add(centerJustify);
justifyMenu.add(fullJustify);
menuBar.add(justifyMenu);
menuBar.setBorder(new BevelBorder(BevelBorder.RAISED));
}
public static void main(String s[]) {
CheckBoxMenuItemExample example = new CheckBoxMenuItemExample( );
example.pane = new JTextPane( );
example.pane.setPreferredSize(new Dimension(250, 250));
example.pane.setBorder(new BevelBorder(BevelBorder.LOWERED));
JFrame frame = new JFrame("Menu Example");
frame.setDefaultCloseOperation(JFrame.EXIT_ON_CLOSE);
frame.setJMenuBar(example.menuBar);
frame.getContentPane( ).add(example.pane, BorderLayout.CENTER);
frame.pack( );
frame.setVisible(true);
}
}
Figure 14-15. A series of checkbox menu items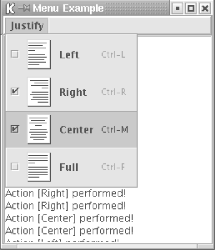 14.7.3 The JRadioButtonMenuItem ClassSwing implements radio button menu items with the JRadioButtonMenuItem class. As you might expect, it shares the characteristics of the JRadioButton class and is intended to represent a group of mutually exclusive choices. Some L&Fs indicate this exclusivity visually by showing circular "buttons" to the left of the selectable choices.
Although you might expect otherwise, radio button menu items don't enforce mutual exclusion by themselves. Instead, you need to use a ButtonGroup object to limit the user to a single selection. Figure 14-16 shows the class diagram for the JRadioButtonMenuItem component. Figure 14-16. Radio button menu item class diagram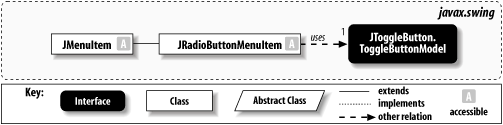 14.7.3.1 PropertiesTable 14-10 shows the properties of the JRadioButtonMenuItem class. Unlike JCheckBoxMenuItem, there is no state property that indicates the current selection state of the menu item. Instead, you typically use this class in conjunction with a ButtonGroup, which contains a getSelected( ) method for extracting the correct object.
14.7.3.2 Constructor
14.7.3.3 Miscellaneous
14.7.4 Enforcing Mutual ExclusionThe following program shows how to implement the mutually exclusive nature of radio button menu items: // RadioButtonMenuItemExample.java
//
import java.awt.*;
import java.awt.event.*;
import javax.swing.*;
import javax.swing.border.*;
public class RadioButtonMenuItemExample extends JPanel {
public JTextPane pane;
public JMenuBar menuBar;
public JToolBar toolBar;
public RadioButtonMenuItemExample( ) {
menuBar = new JMenuBar( );
JMenu justifyMenu = new JMenu("Justify");
ActionListener actionPrinter = new ActionListener( ) {
public void actionPerformed(ActionEvent e) {
try { pane.getStyledDocument( ).insertString(0 ,
"Action ["+e.getActionCommand( )+"] performed!\n", null);
} catch (Exception ex) { ex.printStackTrace( ); }
}
};
JRadioButtonMenuItem leftJustify = new
JRadioButtonMenuItem("Left", new ImageIcon("left.gif"));
leftJustify.setHorizontalTextPosition(JMenuItem.RIGHT);
leftJustify.setAccelerator(KeyStroke.getKeyStroke('L',
Toolkit.getDefaultToolkit( ).getMenuShortcutKeyMask( )));
leftJustify.addActionListener(actionPrinter);
JRadioButtonMenuItem rightJustify = new
JRadioButtonMenuItem("Right", new ImageIcon("right.gif"));
rightJustify.setHorizontalTextPosition(JMenuItem.RIGHT);
rightJustify.setAccelerator(KeyStroke.getKeyStroke('R',
Toolkit.getDefaultToolkit( ).getMenuShortcutKeyMask( )));
rightJustify.addActionListener(actionPrinter);
JRadioButtonMenuItem centerJustify = new
JRadioButtonMenuItem("Center", new ImageIcon("center.gif"));
centerJustify.setHorizontalTextPosition(JMenuItem.RIGHT);
centerJustify.setAccelerator(KeyStroke.getKeyStroke('M',
Toolkit.getDefaultToolkit( ).getMenuShortcutKeyMask( )));
centerJustify.addActionListener(actionPrinter);
JRadioButtonMenuItem fullJustify = new
JRadioButtonMenuItem("Full", new ImageIcon("full.gif"));
fullJustify.setHorizontalTextPosition(JMenuItem.RIGHT);
fullJustify.setAccelerator(KeyStroke.getKeyStroke('F',
Toolkit.getDefaultToolkit( ).getMenuShortcutKeyMask( )));
fullJustify.addActionListener(actionPrinter);
ButtonGroup group = new ButtonGroup( );
group.add(leftJustify);
group.add(rightJustify);
group.add(centerJustify);
group.add(fullJustify);
justifyMenu.add(leftJustify);
justifyMenu.add(rightJustify);
justifyMenu.add(centerJustify);
justifyMenu.add(fullJustify);
menuBar.add(justifyMenu);
menuBar.setBorder(new BevelBorder(BevelBorder.RAISED));
}
public static void main(String s[]) {
RadioButtonMenuItemExample example = new
RadioButtonMenuItemExample( );
example.pane = new JTextPane( );
example.pane.setPreferredSize(new Dimension(250, 250));
example.pane.setBorder(new BevelBorder(BevelBorder.LOWERED));
JFrame frame = new JFrame("Menu Example");
frame.setDefaultCloseOperation(JFrame.EXIT_ON_CLOSE);
frame.setJMenuBar(example.menuBar);
frame.getContentPane( ).add(example.pane, BorderLayout.CENTER);
frame.pack( );
frame.setVisible(true);
}
}
Figure 14-17 shows the result. We use a ButtonGroup object to make our JRadioButtonMenuItems mutually exclusive. Selecting any of the menu items deselects the others. Since text justification is mutually exclusive, this example shows how you would implement a real justification menu. Figure 14-17. An example of radio button menu items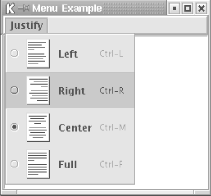 14.7.5 The JSeparator ClassYou may have noticed that both JMenu and JPopupMenu contain addSeparator( ) methods to add separators to menus. In doing so, each class instantiates a JSeparator object and positions it in the menu. However, JSeparator exists as a component unto itself outside of menus, and, because it extends JComponent, it can be positioned inside a container like any other Swing component. JSeparator is a simple component that provides separation between logical groups of menu items. In some L&Fs it shows up as a horizontal line drawn across its entire width; in others, it is invisible and just adds a little extra space between elements. It has no model, only a delegate. 14.7.5.1 PropertiesTable 14-11 shows the properties of JSeparator.
14.7.5.2 Constructor
14.7.5.3 Miscellaneous
14.7.6 Using a Separator Outside of a MenuWe've already seen how a separator can be used in menus to highlight the grouping of menu items. However, separators are components in themselves and can be used for a variety of tasks. Here is a program that adds a separator between a series of buttons: // SeparatorExample.java
//
import java.awt.*;
import java.awt.event.*;
import javax.swing.*;
import javax.swing.border.*;
public class SeparatorExample extends JPanel {
public SeparatorExample( ) {
super(true);
setLayout(new BoxLayout(this, BoxLayout.Y_AXIS));
Box box1 = new Box(BoxLayout.X_AXIS);
Box box2 = new Box(BoxLayout.X_AXIS);
Box box3 = new Box(BoxLayout.X_AXIS);
box1.add(new JButton("Press Me"));
box1.add(new JButton("No Me!"));
box1.add(new JButton("Ignore Them!"));
box2.add(new JSeparator( ));
box3.add(new JButton("I'm the Button!"));
box3.add(new JButton("It's me!"));
box3.add(new JButton("Go Away!"));
add(box1);
add(box2);
add(box3);
}
public static void main(String s[]) {
SeparatorExample example = new SeparatorExample( );
JFrame frame = new JFrame("Separator Example");
frame.setDefaultCloseOperation(JFrame.EXIT_ON_CLOSE);
frame.setContentPane(example);
frame.pack( );
frame.setVisible(true);
}
}
This code yields the interface shown in Figure 14-18. Note that on platforms where separators are invisible, they are difficult or impossible to notice when used in this unorthodox way. (Even in this example, in which the separator has a visual representation, it's pretty hard to see!) Figure 14-18. A standalone separator between two groups of buttons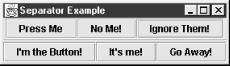 14.7.7 The MenuElement InterfaceAs we saw in the previous examples, one nice feature of Swing menus is that we are not constrained to using text for menu items. However, the possibilities don't have to stop with icons, either. In fact, with a little work you can create or extend any Java component to serve as a menu item. There is one catch: your new menu item must implement the MenuElement interface. Swing declares five methods in the MenuElement interface; these methods are called by Swing's internal MenuSelectionManager when various actions take place. Why is this necessary? Let's look at the traditional menu item, such as the Paste item in the Edit menu. When the user raises the Edit menu, and the mouse passes over the Paste menu item, the menu item typically highlights itself, usually by changing color. This tells the user that releasing (or clicking, depending on the L&F) the mouse button chooses the Paste option. When the mouse leaves the menu item, it returns to its normal color. However, what if we wanted to make the text bold instead of highlighting it? What if we wanted to substitute another icon image in the menu item when the mouse passed over it? By calling the methods of this interface, menus allow menu items to define their own unique behavior. 14.7.7.1 Methods
14.7.8 Making Arbitrary Components into Menu ElementsIt is relatively easy to convert any Swing component into a menu element and drop it in a menu. Here is a program that places a JSlider inside a pop-up menu and uses it as a hidden control for an underlying component. // MenuElementExample.java
//
import java.awt.*;
import java.awt.event.*;
import javax.swing.*;
import javax.swing.border.*;
import javax.swing.event.*;
public class MenuElementExample extends JPanel {
public JPopupMenu popup;
SliderMenuItem slider;
int theValue = 0;
public MenuElementExample( ) {
popup = new JPopupMenu( );
slider = new SliderMenuItem( );
popup.add(slider);
popup.add(new JSeparator( ));
JMenuItem ticks = new JCheckBoxMenuItem("Slider Tick Marks");
ticks.addActionListener(new ActionListener( ) {
public void actionPerformed(ActionEvent event) {
slider.setPaintTicks(!slider.getPaintTicks( ));
}
});
JMenuItem labels = new JCheckBoxMenuItem("Slider Labels");
labels.addActionListener(new ActionListener( ) {
public void actionPerformed(ActionEvent event) {
slider.setPaintLabels(!slider.getPaintLabels( ));
}
});
popup.add(ticks);
popup.add(labels);
popup.addPopupMenuListener(new PopupPrintListener( ));
addMouseListener(new MousePopupListener( ));
}
// Inner class to check whether mouse events are the pop-up trigger
class MousePopupListener extends MouseAdapter {
public void mousePressed(MouseEvent e) { checkPopup(e); }
public void mouseClicked(MouseEvent e) { checkPopup(e); }
public void mouseReleased(MouseEvent e) { checkPopup(e); }
private void checkPopup(MouseEvent e) {
if (e.isPopupTrigger( )) {
popup.show(MenuElementExample.this, e.getX( ), e.getY( ));
}
}
}
// Inner class to print information in response to pop-up events
class PopupPrintListener implements PopupMenuListener {
public void popupMenuWillBecomeVisible(PopupMenuEvent e) { }
public void popupMenuWillBecomeInvisible(PopupMenuEvent e) {
theValue = slider.getValue( );
System.out.println("The value is now " + theValue);
}
public void popupMenuCanceled(PopupMenuEvent e) {
System.out.println("Popup menu is hidden!");
}
}
public static void main(String s[]) {
JFrame frame = new JFrame("Menu Element Example");
frame.setDefaultCloseOperation(JFrame.EXIT_ON_CLOSE);
frame.setContentPane(new MenuElementExample( ));
frame.setSize(300, 300);
frame.setVisible(true);
}
// Inner class that defines our special slider menu item
class SliderMenuItem extends JSlider implements MenuElement {
public SliderMenuItem( ) {
setBorder(new CompoundBorder(new TitledBorder("Control"),
new EmptyBorder(10, 10, 10, 10)));
setMajorTickSpacing(20);
setMinorTickSpacing(10);
}
public void processMouseEvent(MouseEvent e, MenuElement path[],
MenuSelectionManager manager) {}
public void processKeyEvent(KeyEvent e, MenuElement path[],
MenuSelectionManager manager) {}
public void menuSelectionChanged(boolean isIncluded) {}
public MenuElement[] getSubElements( ) {return new MenuElement[0];}
public Component getComponent( ) {return this;}
}
}
As with our previous pop-up example, PopupMenuExample, we implement MouseListener and check incoming mouse events to see whether to show the pop up. The inner class SliderMenuItem implements the MenuElement interface, and is the focus of our example. In this case, it's fairly easy. Our menu slider never has subelements, doesn't have a concept of a selection, and doesn't need to do anything special with mouse or key events. The interface resulting from our example is shown in Figure 14-19. We provide a JSlider object, a separator, and two JCheckBoxMenuItem objects, which control the state of the slider. The slider is also surrounded by a titled border. When the user adjusts the slider and dismisses the pop up, we print the current value of the slider to the standard output. With a little bit of imagination, you can do just about anything with a pop-up menu. Of course, if it's something unexpected, you should carefully consider whether it is likely to confuse or confound your users. Figure 14-19. A JSlider masquerading as a pop-up menu element in two L&Fs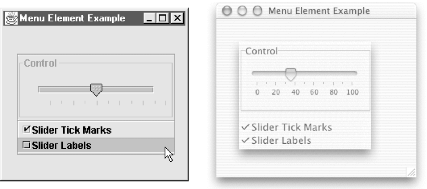 |
| I l@ve RuBoard |
|
