| I l@ve RuBoard |
|
17.1 A Simple TreeBefore we look at the models supporting the JTree class, let's look at a very simple example of a tree built with some of the various L&Fs (Figure 17-1). The javax.swing.DefaultMutableTreeNode class serves as our node class. You don't have to worry about specifically making a node a leaf. If the node has no references to other nodes by the time you display it, it's a leaf. Figure 17-1. A simple JTree in the Metal, Motif, and Mac L&Fs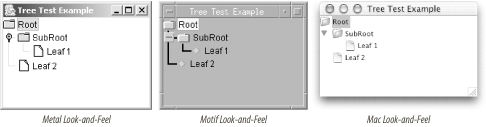 This example works by building up a series of unconnected nodes (using the DefaultMutableTreeNode class) and then connecting them. As long as we stick to the default classes provided with the tree package, we can build a regular model out of our nodes quite quickly. In this example, we build the model based on an empty root node, and then populate the tree by attaching the other nodes to the root or to each other. You can also build the tree first, and then create the model from the root node. Both methods have the same result. With a valid tree model in place, we can make a real JTree object and display it. // TestTree.java
// A simple test to see how we can build a tree and populate it
//
import java.awt.*;
import java.awt.event.*;
import javax.swing.*;
import javax.swing.tree.*;
public class TestTree extends JFrame {
JTree tree;
DefaultTreeModel treeModel;
public TestTree( ) {
super("Tree Test Example");
setSize(400, 300);
setDefaultCloseOperation(EXIT_ON_CLOSE);
}
public void init( ) {
// Build up a bunch of TreeNodes. We use DefaultMutableTreeNode because the
// DefaultTreeModel can use it to build a complete tree.
DefaultMutableTreeNode root = new DefaultMutableTreeNode("Root");
DefaultMutableTreeNode subroot = new DefaultMutableTreeNode("SubRoot");
DefaultMutableTreeNode leaf1 = new DefaultMutableTreeNode("Leaf 1");
DefaultMutableTreeNode leaf2 = new DefaultMutableTreeNode("Leaf 2");
// Build our tree model starting at the root node, and then make a JTree out
// of it.
treeModel = new DefaultTreeModel(root);
tree = new JTree(treeModel);
// Build the tree up from the nodes we created.
treeModel.insertNodeInto(subroot, root, 0);
// Or, more succinctly:
subroot.add(leaf1);
root.add(leaf2);
// Display it.
getContentPane( ).add(tree, BorderLayout.CENTER);
}
public static void main(String args[]) {
TestTree tt = new TestTree( );
tt.init( );
tt.setVisible(true);
}
}
As you can see, the action happens in the init( ) method. We create several nodes using the DefaultMutableTreeNode class. The DefaultTreeModel class provides us with a basis for working with the tree, and we add our nodes to that model. All the trees in this chapter follow the same basic steps — gathering nodes, creating a tree, and populating the tree — though again, not necessarily in that order. We also look at other things you can do with trees, including how to catch selection events and how to change the presentation of the nodes and leaves. And just to prove that it's not hard to listen to selections from a tree, Figure 17-2 shows an expanded example that displays the most recently selected item in a JLabel at the bottom of the application. Figure 17-2. The TestTree program with an active TreeSelectionListener label To make this work, we add a listener directly to the JTree object. The listener responds much like a ListSelectionListener, but is slightly modified to handle the specifics of tree selections. (For example, selection intervals may have to cross over an expanded node, and all the nodes under the expanded entry must also be selected.) Even though we allow multiple entries to be selected, we show only the lead entry of the selection to keep output simple. Here's the chunk of code we need to add to the init( ) method in the TestTree class: // Create and add our message label for the selection output.
final JLabel messageLabel = new JLabel("Nothing selected.");
add(messageLabel, BorderLayout.SOUTH);
// Add our selection listener and have it report to
// our messageLabel.
tree.addTreeSelectionListener(new TreeSelectionListener( ) {
public void valueChanged(TreeSelectionEvent tse) {
TreePath tp = tse.getNewLeadSelectionPath( );
messageLabel.setText("Selected: " + tp.getLastPathComponent( ));
}
});
Of course, you should be sure to import javax.swing.event.* to access the TreeSelectionListener and TreeSelectionEvent classes. 17.1.1 Tree TerminologyLet's look at a simple tree made up of the letters A-Z, shown in Figure 17-3. Figure 17-3. A simple tree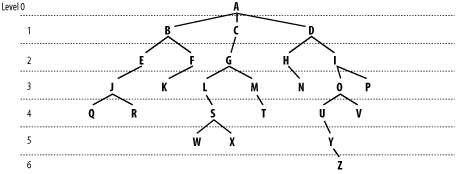 Here are a few definitions of terms used with trees:
As a quick overview, Figure 17-4 details how the various tree classes work together to display a tree. We'll look at each of these classes in detail. JTrees use TreeCellRenderers to graphically display a tree represented by a TreeModel. TreeModels encode a tree using TreeNodes that contain an Object (your data for that node) and possibly references to other TreeNodes. Once displayed, the nodes of the tree can be selected according to the rules of a TreeSelectionModel. If supported, you can edit any one of the nodes in the tree using a TreeCellEditor. Figure 17-4. JTree class diagram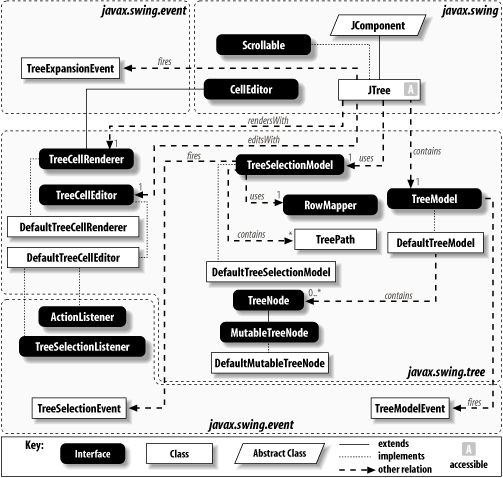 |
| I l@ve RuBoard |
|