Working with the Worksheet ObjectThe Worksheet object represents a worksheet inside an Excel workbook. The Worksheet has a Name property that returns the name of the worksheet (for example "Sheet1"). Worksheet ManagementThe Worksheet object has an Index property that gives a 1-based tab position for the worksheet in the tabbed worksheet tabs shown at the lower-left corner of a workbook window. You can move a worksheet to a different tab position by using the Move method. The Move method takes two optional parameters: a Before parameter that you can pass the sheet you want to move the worksheet before, and an After parameter that you can pass the sheet that you want to come after the moved worksheet. If you omit both optional parameters, Excel creates a new workbook and moves the worksheet to the new workbook. It is also possible to make a copy of a worksheet using the Copy method. Like the Move method, it takes two optional parameters: a Before and After parameter that specify where the copied worksheet should go relative to other sheets. You can specify either Before or After, but not both parameters. If you omit both optional parameters, Excel creates a new workbook and copies the worksheet to the new workbook. To activate a particular worksheet, use the Activate method. This method activates the sheet by making the first window associated with the worksheet the active window. It also selects the tab corresponding to the worksheet and displays that worksheet in the active window. The equivalent of right-clicking a worksheet tab and choosing Delete from the pop-up menu is provided by the Delete method. When you use this method, Excel shows a warning dialog. You can prevent this warning dialog from appearing by using the Application object's DisplayAlerts property, which is discussed in the section "Controlling the Dialogs and Alerts that Excel Displays" earlier in this chapter. You can hide a worksheet so that its tab is not shown at all by using the Visible property. The Visible property is of type XlSheetVisibility and can be set to xlSheetVisible, xlSheetHidden, and the xlSheetVeryHidden. The last value hides the worksheet so that it can only be shown again by setting the Visible property to xlSheetVisible. Setting the Visible property to xlSheetHidden hides the sheet, but the user can still unhide the sheet by going to the Format menu and choosing Sheet and then Unhide. Sometimes a sheet is hidden using the Visible property so that the sheet can be used to store additional data that an application uses in a "scratch" worksheet that the user will not see. A better way to do this is provided by VSTO's cached data feature, described in Chapter 18. It has the added benefit that you can manipulate your hidden data in the Excel spreadsheet without starting up Excel. This lets you prefill an Excel worksheet with custom data on the server. Note that a workbook must contain at least one visible worksheet. So when using the Delete method and the Visible property, you must keep this restriction in mind. If your code tries to hide or delete the last visible sheet in a workbook, an exception is thrown. Listing 5-23 illustrates the usage of several of these properties and methods. Listing 5-23. A VSTO Customization That Works with the Worksheets Collection
private void ThisWorkbook_Startup(object sender, EventArgs e)
{
  Excel.Worksheet sheetA = this.Worksheets.Add(
    missing, missing, missing, missing) as Excel.Worksheet;
  sheetA.Name = "SheetA";

  Excel.Worksheet sheetB = this.Worksheets.Add(
    missing, missing, missing, missing) as Excel.Worksheet;
  sheetB.Name = "SheetB";

  Excel.Worksheet sheetC = this.Worksheets.Add(
    missing, missing, missing, missing) as Excel.Worksheet;
  sheetC.Name = "SheetC";

  // Tab indexes
  string msg = "{0} is at tab index {1}";
  MessageBox.Show(String.Format(msg, sheetA.Name, sheetA.Index));
  MessageBox.Show(String.Format(msg, sheetB.Name, sheetB.Index));
  MessageBox.Show(String.Format(msg, sheetC.Name, sheetC.Index));

  sheetC.Move(sheetA, missing);
  MessageBox.Show("Moved SheetC in front of SheetA");

  // Tab indexes
  MessageBox.Show(String.Format(msg, sheetA.Name, sheetA.Index));
  MessageBox.Show(String.Format(msg, sheetB.Name, sheetB.Index));
  MessageBox.Show(String.Format(msg, sheetC.Name, sheetC.Index));

  sheetB.Copy(sheetA, missing);
  Excel.Worksheet sheetD = this.Worksheets.get_Item(
    sheetA.Index - 1) as Excel.Worksheet;

  ((Excel._Worksheet)sheetA).Activate();

  MessageBox.Show(String.Format(
    "Copied SheetB to create {0} at tab index {1}",
    sheetD.Name, sheetD.Index));

  sheetD.Delete();
  sheetA.Visible = Excel.XlSheetVisibility.xlSheetHidden;
  MessageBox.Show("Deleted SheetD and hid SheetA.");
}
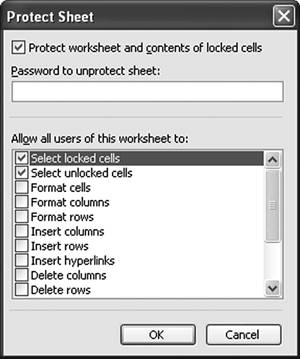
Working with NamesAs previously discussed, you can define named ranges at the workbook level by using Workbook.Names. You can also define named ranges that are scoped to a particular worksheet by using the Names property associated with a Worksheet object. The Names property returns a Names collection with only the names that are scoped to the Worksheet. For more information on the Names collection, see the section "Working with the Names Collection and the Name Object" earlier in this chapter. Working with Worksheet Custom PropertiesYou can add custom properties that have a name and a value to the worksheet. Custom properties are a convenient way to associate additional hidden information with a worksheet that you do not want to put in a cell. Custom properties are not shown anywhere in the Excel user interface, unlike the document properties associated with a workbook. Custom properties at the worksheet level do not have the 256-character limit that document properties have for their value. You can store much larger chunks of data in a worksheet custom property. The CustomProperties property returns a collection of custom properties associated with the worksheet. You can add a custom property by using the CustomProperties collection's Add method and passing a string for the name of the custom property you want to create and an object for the value you want to associate with the custom property. To get to a particular custom property, use the CustomProperties.Item method and pass the index of the property you want to get. Unfortunately, the Item method only takes a 1-based index and not the name of a custom property you have added. Therefore, you must iterate over the collection and check each returned CustomProperty object's Name property to determine whether you have found the custom property you want. Listing 5-24 shows an example of creating a custom property, then accessing it again. Listing 5-24. A VSTO Customization That Accesses Custom DocumentProperty Objectsprivate void ThisWorkbook_Startup(object sender, EventArgs e) { Excel.Worksheet sheet = this.Worksheets.Add(missing, missing, missing, missing) as Excel.Worksheet; // Add a custom property Excel.CustomProperties props = sheet.CustomProperties; props.Add("myProperty", "Some random value"); props.Add("otherProperty", 1); // Now, enumerate the collection to find myProperty again. foreach (Excel.CustomProperty prop in props) { if (prop.Name == "myProperty") { MessageBox.Show(String.Format( "{0} property is set to {1}.", prop.Name, prop.Value)); break; } } } If you are using VSTO to associate code with a workbook, it is usually better to use cached data rather than custom properties. The cached data feature lets you put data sets and any XML serializable type into a data island in the document. This data island can also be accessed on the server without starting Excel. For more information on the cached data feature of VSTO, see Chapter 18. Protecting a WorksheetThe Protect method protects the worksheet so that users cannot modify the worksheet. When a worksheet is protected using the Protect method, all the cells in the workbook are automatically locked. The Protect method corresponds to the Protect Sheet dialog shown in Figure 5-3. You can access this dialog by choosing Tools > Protection > Protect Sheet. Figure 5-3. The Protect Sheet dialog.
A number of optional parameters passed to the Protect method control exactly what can be modified, as shown in Table 5-14. Many of these options correspond to the checked list shown in Figure 5-3.
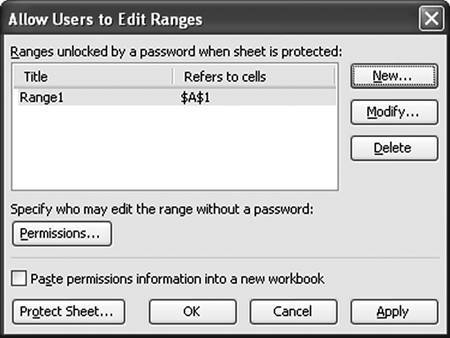
You have two ways to exclude certain ranges of cells from being locked when the worksheet is protected. The first way is to add exclusions to protection using the AllowEditRanges collection that is returned from Worksheet.Protection.AllowEdit-Ranges. The AllowEditRanges collection corresponds to the Allow Users to Edit Ranges dialog shown in Figure 5-4. You can access this dialog by choosing Tools > Protection > Allow Users to Edit Ranges. Figure 5-4. The Allow Users to Edit Ranges dialog.
Exclusions you make using the AllowEditRanges collection must be made before you use the Protect method to protect the worksheet. After you have protected the worksheet, no changes can be made to the AllowEditRanges collection until you unprotect the worksheet again. Exclusions you make in this way can be given a title and will display in the Allow Users to Edit Range dialog. A Range that is excluded from protection in this way will return TRue from its Range.AllowEdit property. Listing 5-25 shows a VSTO customization that creates two exclusions to protection using AllowEditRanges and then protects the worksheet using the Protect method. Listing 5-25. A VSTO Customization That Adds Exclusions to Protection Using AllowEditRanges
private void ThisWorkbook_Startup(object sender, EventArgs e)
{
  Excel.Worksheet sheet = this.Worksheets.Add(missing,
    missing, missing, missing) as Excel.Worksheet;

  Excel.AllowEditRanges allowEdits = sheet.Protection.
    AllowEditRanges;

  allowEdits.Add("Editable Cell",
    sheet.get_Range("A1", missing), missing);

  sheet.Protect(missing, missing, missing, missing,
    missing, missing, missing, missing, missing,
    missing, missing, missing, missing, missing,
    missing, missing);

  Excel.Range protectedRange = sheet.get_Range("A2", missing);


  MessageBox.Show(String.Format(
    "A2's Locked is set to {0}", protectedRange.Locked));

  MessageBox.Show(String.Format(
    "A2's AllowEdit is set to {0}", protectedRange.AllowEdit));

  try
  {
    protectedRange.Value2 = "Should fail";
  }
  catch (Exception ex)
  {
    MessageBox.Show(ex.Message);
  }

  try
  {
    allowEdits.Add("This should fail",
      sheet.get_Range("A2", missing), missing);
  }
  catch (Exception ex)
  {
    // You can't add to the AllowEditRanges collection
    // when the worksheet is protected
    MessageBox.Show(ex.Message);
  }

  Excel.Range allowEditRange = sheet.get_Range("A1", missing);

  MessageBox.Show(String.Format(
    "A1's Locked is set to {0}", allowEditRange.Locked));

  MessageBox.Show(String.Format(
    "A1's AllowEdit is set to {0}", allowEditRange.AllowEdit));

  allowEditRange.Value2 = "Should succeed";
}
The second way to exclude certain ranges of cells from being locked when the worksheet is protected is by using the Range.Locked property. Cells you exclude in this way do not show up in the Allow Users to Edit Ranges dialog. Listing 5-26 shows adding exclusions to protection using the Range.Locked property. Listing 5-26. A VSTO Customization That Adds Exclusions to Protection Using Range.Locked
private void ThisWorkbook_Startup(object sender, EventArgs e)
{
  Excel.Worksheet sheet = this.Worksheets.Add(missing,
    missing, missing, missing) as Excel.Worksheet;

  Excel.Range range1 = sheet.get_Range("A2", missing);
  range1.Locked = false;

  sheet.Protect(missing, missing, missing, missing,
    missing, missing, missing, missing, missing,
    missing, missing, missing, missing, missing,
    missing, missing);

  MessageBox.Show(String.Format(
    "A2's Locked is set to {0}", range1.Locked));

  MessageBox.Show(String.Format(
    "A2's AllowEdit is set to {0}", range1.AllowEdit));

  range1.Value2 = "Should succeed";
}
After a worksheet is protected, a number of properties let you examine the protection settings of the document and further modify protection options, as shown in Table 5-15.
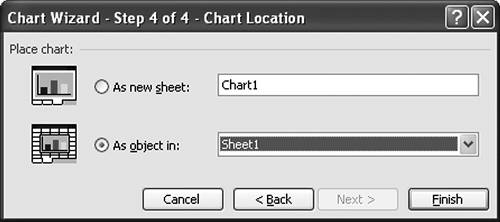
Working with OLEObjectsIn addition to containing cells, a worksheet can contain embedded objects from other programs (such as an embedded Word document) and ActiveX controls. To work with these objects, you can use the OLEObjects method on the Worksheet object. The OLEObjects method takes an optional Index parameter of type object that you can pass the name of the OLEObject or the 1-based index of the OLEObject in the collection. The OLEObjects method also doubles as a way to get to the OLEObjects collection, which can be quite confusing. If you pass it a string that represents as a name or a 1-based index as an int, it returns the specified OLEObject. If you pass it Type.Missing, it returns the OLEObjects collection. Any time you add an OLEObject to a worksheet, Excel also includes that object in the Shapes collection that is returned from the Shapes property on the Worksheet object. To get to the properties unique to an OLEObject, you use the Shape.OLEFormat property. It is possible to write C# code that adds ActiveX controls to a worksheet and talks to them through casting OLEObject.Object or Shape.OLEFormat.Object to the appropriate type. You have to add a reference in your C# project for the COM library associated with the ActiveX control you want to use. Doing so causes Visual Studio to generate an interop assembly and add it to your project. Alternatively, if a primary interop assembly is registered for the COM library, Visual Studio automatically adds a reference to the pre-generated primary interop assembly. You can then cast OLEObject.Object or Shape.OLEFormat.Object to the correct type added by Visual Studio for the COM library object corresponding to the ActiveX control. VSTO enables you to add Windows Forms controls to the worksheeta much more powerful and .NET-centric way of working with controls. For this reason, we do not consider using ActiveX controls in any more detail in this book. For more information on VSTO's support for Windows Forms controls, see Chapter 14, "Using Windows Forms in VSTO." Working with ShapesThe Shapes property returns a Shapes collectiona collection of Shape objects. A Shape object represents various objects that can be inserted into an Excel spreadsheet, including a drawing, an AutoShape, WordArt, an embedded object or ActiveX control, or a picture. The Shapes collection has a Count property to determine how many shapes are in the Worksheet. It also has an Item method that takes a 1-based index to get a particular Shape out of the collection. You can also enumerate over the Shapes collection using foreach. Several methods on the Shapes collection let you add various objects that can be represented as a Shape. These methods include AddCallout, AddConnector, AddCurve, AddDiagram, AddLabel, AddLine, AddOLEObject, AddPicture, AddPolyline, AddShape, AddTextbox, and AddTextEffect. The Shape object has properties and methods to position the Shape on the worksheet. It also has properties and methods that let you format and modify the Shape object. Some of the objects returned by properties on the Shape object were shown in Figure 3-20. Working with ChartObjectsIn this book, we have used the phrase chart sheet when referring to a chart that is a sheet in the workbook. Figure 5-5 shows the last page of the Chart Wizard that is shown when you insert a new chart. Excel enables you to insert a chart as a new sheetwhat we have called a chart sheetand it allows you to add a chart as an object in a sheet. The object model calls a chart that is added as an object in a sheet a ChartObject. Figure 5-5. The Chart Location step of the Chart Wizard.
What complicates the matter is that the object in the object model for a chart sheet is a Chart, but a ChartObject also has a property that returns a Chart. A ChartObject has its own set of properties that control the placement of the chart in a worksheet. But the properties and methods to actually manipulate the chart contents are found on the Chart object returned by the ChartObject.Chart property. To work with ChartObjects, you can use the ChartObjects method on the Worksheet object. The ChartObjects method takes an optional Index parameter of type object that you can pass the name of the ChartObject or the 1-based index of the ChartObject in the collection. The ChartObjects method also doubles as a way to get to the ChartObjects collection, which can be quite confusing. If you pass it a string that represents as a name or a 1-based index, it returns the specified ChartObject. If you pass it Type.Missing, it returns the ChartObjects collection. To add a ChartObject to a worksheet, you use the ChartObjects.Add method, which takes Left, Top, Width, and Height as double values in points. Any time you add a ChartObject to a worksheet, Excel also includes that object in the Shapes collection that is returned from the Shapes property on the Worksheet object. Working with ListsExcel 2003 introduced the ability to create a list from a range of cells. Just select a range of cells, right-click the selection, and choose Create List. A list has column headers with drop-down options that make it easy for the user to sort and apply filters to the data in the list. It has a totals row that can automatically sum and perform other operations on a column of data. It has an insert row marked with an asterisk at the bottom of the list that allows users to add additional rows to the list. Figure 5-6 shows an example of a list in Excel. Figure 5-6. A list in Excel.
You can access the lists in a worksheet by using the ListObjects property. The ListObjects property returns the ListObjects collection. The ListObjects collection has a Count property to determine how many lists are in the Worksheet. It also has an Item method that takes a 1-based index or the name of the list object as a string to get a ListObject object out of the collection. You can also enumerate over the ListObjects collection using foreach. Table 5-16 shows some of the most commonly used properties for the ListObject object. You will read more about ListObject in the discussion of VSTO's support for data in Chapter 17, "VSTO Data Programming."
|