Form Events, Properties, and MethodsData source events prove very useful for ensuring that data constraints are maintained and taking action when the user makes changes to data. InfoPath also provides a form object model that you can use to further customize the behavior of your form. Some of the scenarios the form object model enables are as follows:
The remainder of this chapter examines the form object model and discusses how to create a custom task pane for a form. The InfoPath forms object model contains many events, properties, and methods. This book discusses only some of the most commonly used parts of the InfoPath forms object model. Button Events and View SwitchingA view is a surface on which you insert controls and form content in the designer; it is what the user looks at while filling out the form. Lengthy forms are often composed of multiple views. In addition, data being edited can be displayed in multiple viewsfor example, you might have a timecard that can be viewed in a less-detailed view for someone who wants to quickly enter information. A more detailed view might also be available for a manager trying to generate end of pay-period reports. You can find a list of available views for the data being edited in InfoPath's View menu. A user can switch between various views at will. Switching between views might not be the desired behavior, especially if your views are supposed to be sequential or have dependencies. While designing your form, you have an option to remove the name of a view from the View menu and to prevent users from choosing a particular view. The code behind the form can then switch views programmatically by using the XDocument.View.SwitchView method. Suppose you have a mortgage application with two views. The first view allows the user to fill out contact information: name, phone numbers, and so on. When all the required contact information is filled out, the user can click Go to Mortgage Details button. You can add a button to the form by selecting the Controls task pane in the InfoPath form design view and dragging a button onto the form designer. If you right-click the button and choose Properties, you can then open the Properties dialog shown in Figure 12-10. Figure 12-10. Creating a button with the Form Designer.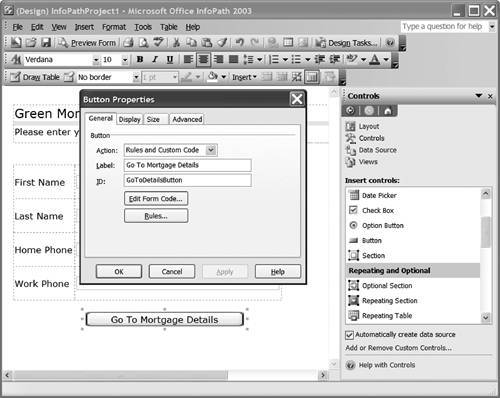 We want this button to switch to another view to display the mortgage details, but only if the first and last name text boxes are filled on the contact information view. We can do this by clicking the Edit Form Code button in the Properties dialog shown in Figure 12-10, which causes Visual Studio to emit an event handler for the OnClick event raised by the button. Listing 12-7 shows code for the OnClick event handler that switches the view. Because this is not a data event but rather a forms event, the event argument object DocActionsEvent does not refer to the data nodes that we are interested in checking before we switch the view. The code gets to the data nodes by querying the XML data source using an XPATH query, and then verifies that the strings that come back are valid before changing views. Listing 12-7 uses the XDocument object's DOM property to access an IXMLDOMDocument object. It then uses the IXMDOMDocument object's selectSingleNode method to get a node by passing the XPATH query strings to get to FirstName and LastName. Finally, it examines the retrieved node's text property to see whether the FirstName and LastName fields have been filled in. Listing 12-7 also uses two other methods from XDocument. The XDocument object's UI property returns a UI object. The UI object's Alert method displays a simple message box within InfoPath. The XDocument object's View property returns a View object. The View object represents the currently active view in the form. Listing 12-7 use the View object's SwitchView method to change to another view if the FirstName and LastName data nodes have been entered. Listing 12-7. An OnClick Event Handler for a Button That Switches the View
[InfoPathEventHandler(MatchPath="GoToDetailsButton",
  EventType=InfoPathEventType.OnClick)]
public void GoToDetailsButton_OnClick(DocActionEvent e)
{
  const string FirstNameXPath = "/my:myFields/my:FirstName";
  const string LastNameXPath = "/my:myFields/my:LastName";
  IXMLDOMDocument mainData = thisXDocument.DOM;
  if (string.IsNullOrEmpty(
    mainData.selectSingleNode(FirstNameXPath).text) ||
    string.IsNullOrEmpty(
    mainData.selectSingleNode(LastNameXPath).text))
  {
    thisXDocument.UI.Alert("Please fill in first and last name.");
  }
  else
  {
    thisXDocument.View.SwitchView("Mortgage Details");
  }
}
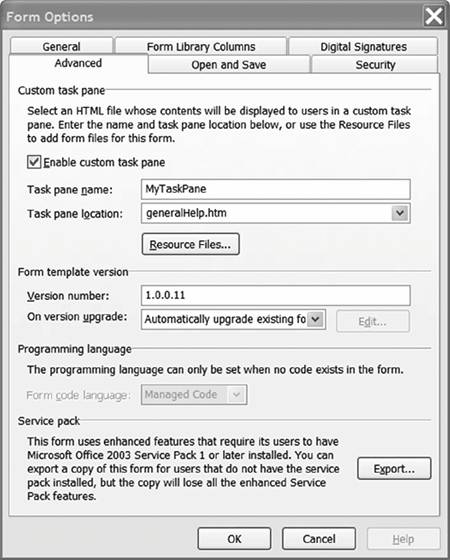
The OnContextChange Event and the Custom Task PaneAnother way to write code to handle form changes is to use the XDocument object's OnContextChange event. What exactly do we mean by "context"? The user can only be interacting with one control at a time; mouse clicks or key presses are handled by the control that has the focus. The context of a form is the data source node bound to the control that presently has the focus. Consider the example of a contact information form. Each text box is bound to a particular node in the data source. As the user filling out the form uses the mouse or keyboard to move the focus from one control to the next on the form, context changes to a different data node, and the XDocument object's OnContextChange event is raised. You could have more than one control bound to the same data node. In that case, if the user were to change the focus from one control to another bound to the same data node, the context change event would not raise because context has not changed. In a repeating control, the OnContextChange event is raised when focus is changed from row to row. However, the OnContextChange event does not indicate the new row position. Creating a Custom Task PaneA common way to use OnContextChange event is to integrate a dynamic help system into a form. By detecting when the form is editing a different data node, we can provide help for the data node being edited in the task pane. The first thing we need to do is enable the custom task pane for this form. Choose Form Options from the Tools menu of the InfoPath designer and select the Advanced tab, as shown in Figure 12-11. Figure 12-11. Enabling and adding resources to the custom task pane.
Using the Advanced tab of the Form Options dialog, you can enable the custom task pane and add HTML files as resource files that can be displayed in the task pane. Click the Resource Files button to bring up the Resource Files dialog box. Click the Add button to add HTML files as resources to the InfoPath form. For this example, we add three HTML files: one named GeneralHelp.htm, a second named NameHelp.htm, and a third named PhoneHelp.htm. Note that as you add the HTML files they display in the Solution Explorer in Visual Studio. After you have added several HTML files to the form, you can handle the OnContextChange event to display the appropriate HTML file in the task pane for a particular context. To generate a handler for the OnContextChange event, choose the On Context Change Event command from the Programming menu in the Tools menu of the InfoPath designer. Listing 12-8 shows an OnContextChange event handler that switches between GeneralHelp.htm, NameHelp.htm, and PhoneHelp.htm in the task pane depending on the current data node. Listing 12-8. An OnContextChange Event Handler That Switches the HTML Shown in the Task Pane
[InfoPathEventHandler(EventType=InfoPathEventType.OnContextChange)]
public void OnContextChange(DocContextChangeEvent e)
{
  if (e.Type == "ContextNode")
  {
    HTMLTaskPane helpTaskPane =
     (HTMLTaskPane)thisXDocument.View.Window.TaskPanes[0];
    string navigateTo = "GeneralHelp.htm";
    string thisNodeName = e.Context.nodeName;

    if (thisNodeName == "my:FirstName")
      navigateTo = "NameHelp.htm";
    else if (thisNodeName == "my:LastName")
      navigateTo = "NameHelp.htm";
    else if (thisNodeName == "my:HomePhone")
      navigateTo = "PhoneHelp.htm";
    else if (thisNodeName == "my:WorkPhone")
      navigateTo = "PhoneHelp.htm";

    helpTaskPane.Navigate(navigateTo);
  }
}
If you preview this form, you will see that as you select different text boxes the task pane displays the appropriate HTML files. Figure 12-12. The custom task pane at runtime.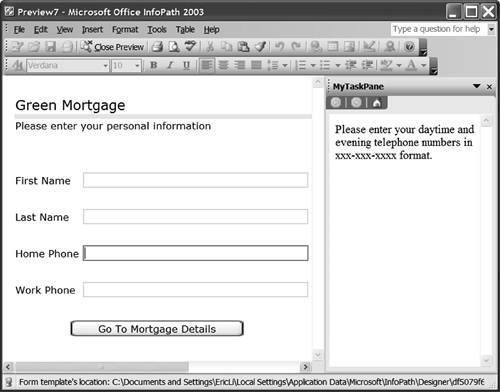 The code in Listing 12-8 checks the DocContextChangeEvent object's Type property to verify it is "ContextNode". InfoPath only supports a type of "ContextNode" as of Service Pack 1 but other values may be introduced in future versions of InfoPath. As a result, the check for "ContextNode" is recommended for forward-compatibility reasons. You probably noticed that the Infopath object model exposes an array of task panes. The custom task pane is always located at index 0. Other indices reference built-in task panes available while filling out a form. For example, index 4 is the Help task pane.
Focus Versus SelectionWhat if you want to determine the current context in some event handler other than an OnContextChange handler? The XDocument's View property returns a View object. The View object has a GetContextNodes method that can be called from any event handler. It returns a collection of all the XML nodes that are in context: not just the node bound to the control with the focus, but all of its parent nodes in the data source tree as well. The View object also provides a GetSelectedNodes method that returns the collection of XML nodes bound to the currently selected controls. This is a subtle distinction: Only one control can have the focus at any one time, but a user can select multiple controls. You might be tempted to use the GetSelectedNodes or GetContextNodes methods in a button click handler. Unfortunately, this does not work; as soon as the user clicks the button, the focus and selection change to the button itself.
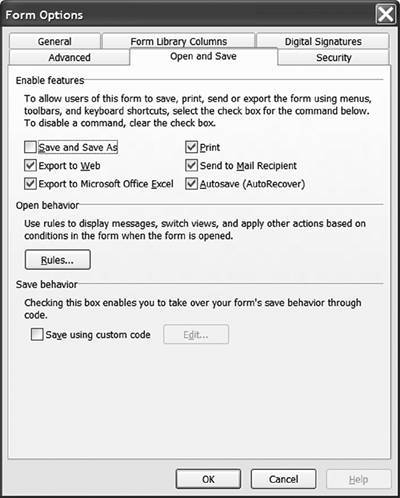
Setting SelectionTwo other useful methods on the View object are the SelectNodes and SelectText methods. SelectText takes a single IXMLDOMNode, and SelectNodes takes two IXMLDOMNodes (to define the start and end of a range) to determine what to select. For example, consider the earlier example in which we wrote an OnClick event handler for a button to ensure that the FirstName and LastName fields were not blank before switching views. You could use the SelectText method to select the text box that was blank so that the user could simply start typing into the blank text box to fix the error. Overriding Submit, Confirm, and SaveSo far you have seen how to use data source and form events to ensure that data entered by users is valid, reacts to users navigating around the form, and so on. This chapter has not yet discussed what happens to the data in the form when all the information is entered and validated. Somehow, the data must be saved to disk or submitted to a server somewhere. Suppose you want to prevent the user from specifying a destination for the saved data. Rather, when the user is done with the form, you want to ensure that the data is always saved to a particular shared directory on your intranet. You can accomplish this by handling the OnSubmitRequest event and writing code to force the data to be saved to that location. The first thing you need to do is to disallow users from saving. Go to the Tools menu in the InfoPath designer, then Form Options, and then click the Open and Save tab. Uncheck the Save and Save As check box, as shown in Figure 12-13. Figure 12-13. Disabling Save and Save As for a form.
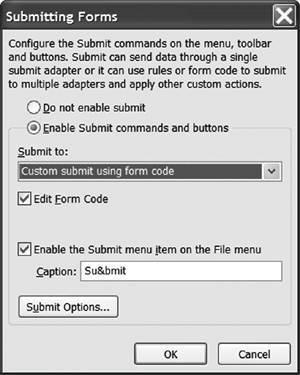
The next step is to handle the OnSubmitRequest event. This event is raised when the Submit action is invoked when filling out the form. To handle this event, choose Submitting Forms from the InfoPath Tools menu. Select the Enable Submit commands and buttons radio button, and then pick Custom submit using form code from the Submit to: drop-down, as shown in Figure 12-14. Figure 12-14. Creating a custom event handler for the OnSubmitRequest event.
When you click the OK button, an event handler is generated for you in Visual Studio. In the OnSubmitRequest event, use the XDocument object's SaveAs method to save the form to a specific network share and filename. In Listing 12-9, the code saves the form to the network share \\myShare and names the file using the user's first and last name. Listing 12-9 also uses the XDocument object's UI object. It calls the UI object's Confirm method to ask users whether they are sure want to save. It also uses the Application object's Window object and calls the Window object's Close method to close the window associated with the form after the form is saved. Listing 12-9. An OnSubmitRequest Event Handler That Forces the Form to be Saved to a Particular Network Share
[InfoPathEventHandler(EventType=InfoPathEventType.OnSubmitRequest)]
public void OnSubmitRequest(DocReturnEvent e)
{
  XdConfirmChoice submitChoice;
  if (thisXDocument.Errors.Count > 0)
  {
    submitChoice = thisXDocument.UI.Confirm(
      "Errors exist on the form. Continue submitting?",
      XdConfirmButtons.xdYesNo);
  }
  else
  {
    submitChoice = thisXDocument.UI.Confirm(
      "Are you sure you want to submit?", XdConfirmButtons.xdYesNo);
  }

  if (submitChoice == XdConfirmChoice.xdYes)
  {
    string firstName = thisXDocument.DOM.selectSingleNode(
      "/my:myFields/my:FirstName").text;
    string lastName = thisXDocument.DOM.selectSingleNode(
      "/my:myFields/my:LastName").text;
    string fileName = firstName + "_" + lastName + ".XML";
    thisXDocument.SaveAs(@"\\myShare\forms$\" + fileName);
    thisXDocument.UI.Alert("Thank you, " +
      firstName + "! You will be contacted shortly.");
    thisApplication.ActiveWindow.Close(true /*force*/);
    // No need to set ReturnStatus because InfoPath closes
  }
  else
    e.ReturnStatus = false;
}
InfoPath uses the ReturnStatus flag to determine whether the OnSubmitRequest event succeeded. It is not necessary to set the ReturnStatus flag to true in this example when closing the form window because the runtime is immediately shut down when the form window is closed.
|