Creating Application-Level Smart TagsVSTO's document-level Smart Tags are great when you want to recognize a term in a particular document or a class of document created from a template. What are your options when you want to recognize a term in all open documents? You can control the text that Word or Excel recognizes at an application level and the actions made available for that text by creating a Smart Tag DLL. A Smart Tag DLL contains two types of classes that are used by Office: a recognizer class and an action class. A recognizer class tells Office the text in the workbook to recognize. The recognizer class "tags" recognized text by creating a property bageven an empty property bagand attaching it to recognized text. An action class corresponds to an action displayed in the pop-up menu that Office displays when a user hovers over a recognized piece of text. Recognizer classes implement the ISmartTagRecognizer interface and optionally the ISmartTagRecognizer2 interface. Action classes implement the ISmartTagAction interface and optionally the ISmartTagAction2 interface. Creating an Application-Level Smart Tag Class Library in Visual StudioTo create a Smart Tag class library DLL, start Visual Studio. Choose New Project from the File menu and create a new class library project as shown in Figure 16-8. Figure 16-8. Creating a new class library project.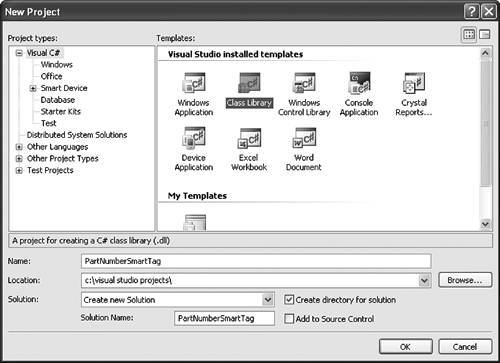 With the class library project created, right-click the References node in the Solution Explorer window and choose Add Reference. Click the COM tab and add a reference to the Microsoft Smart Tags 2.0 Type Library, as shown in Figure 16-7. Doing so gives you a definition for the two interfaces you have to implementISmartTag-Recognizer and ISmartTagAction. Creating a Recognizer ClassLet us start by creating a class that implements ISmartTagRecognizer. Our class will be similar to the class we created in Listing 16-7 and will recognize part numbers in a document. In the newly created project, there is already a class created for you called Class1 in a file called Class1.cs. Add a using SmartTag = Microsoft.Office.Interop.SmartTag line to the using statements at the top of the class to bring the SmartTag interfaces into a namespace called SmartTag. Rename Class1 to be a class called Recognizer, and declare the class to implement SmartTag.ISmartTagRecognizer. The class now looks like this:
using System;
using System.Collections.Generic;
using System.Text;
using SmartTag = Microsoft.Office.Interop.SmartTag;

namespace PartNumberSmartTag
{
  public class Recognizer : SmartTag.ISmartTagRecognizer
  {
  }
}
Visual Studio provides a neat trick for implementing the ISmartTagRecognizer interface. Right-click the ISmartTagRecognizer text in the class. A menu pops up that displays an Implement Interface menu. From this menu, choose the Implement Interface command. Visual Studio automatically creates an initial implementation of the ISmartTagRecognizer interface, as shown in Listing 16-8 Listing 16-8. An Initial Stub Implementation of a Smart Tag Recognizer Class
using System;
using System.Collections.Generic;
using System.Text;
using SmartTag = Microsoft.Office.Interop.SmartTag;

namespace PartNumberSmartTag
{
  public class Recognizer : SmartTag.ISmartTagRecognizer
  {
    #region ISmartTagRecognizer Members

    public string ProgId
    {
      get { }
    }

    public void Recognize(string text,
      SmartTag.IF_TYPE dataType,
      int localeID,
      SmartTag.ISmartTagRecognizerSite site)
    {
    }

    public int SmartTagCount
    {
      get { }
    }

    public string get_Desc(int localeID)
    {
    }

    public string get_Name(int localeID)
    {
    }

    public string get_SmartTagDownloadURL(int smartTagID)
    {
    }

    public string get_SmartTagName(int smartTagID)
    {
    }

    #endregion
}
There are two properties (ProgID and SmartTagCount) and five methods (Recognize, get_Desc, get_Name, get_SmartTagDownloadURL, and get_SmartTagName) that we must implement. Let's start by implementing the properties. The ProgID property is only required for COM Smart Tags. For our Smart Tag, we will just return null.
public string ProgId
{
  get { return null; }
}
Now let's implement the SmartTagCount property. Normally, this property should just return the int value 1. This property does not affect how many terms our recognizer can recognize, it just affects how many unique recognizers our Smart Tag recognizer class provides. For simplicity, it is usually easiest to have one Smart Tag recognizer class expose one unique recognizer.
public int SmartTagCount
{
  get { return 1; }
}
The get_Desc method takes a locale ID as an int and returns a string representing the description of the Smart Tag recognizer. You can use the locale ID to provide localized descriptions if you want to. For our purposes, the code will just return a simple description string for all locales.
public string get_Desc(int localeID)
{
  return "Recognizes Part Numbers in PN#### format.";
}
The get_Name method takes a locale ID as an int and returns a string representing the name of the Smart Tag recognizer. When the Smart Tag is listed in an Office dialog, this name will display in parenthesis to the right of the string returned by get_SmartTagCaption in the Action class. get_Name should return a string no longer than 30 characters. We'll return the string "English" to indicate to the user that our Smart Tag is not localized into other locales:
public string get_Name (int localeID)
{
  return "English";
}
The get_SmartTagDownloadURL method takes a Smart Tag ID as an int and returns a URL as a string where Smart Tag actions associated with this recognizer can be downloaded from. For this example, we will be providing the Smart Tag action class in the same DLL, so we will always return null.
 public string get_SmartTagDownloadURL(int smartTagID)
 {
   return null;
}
This is the first method we have seen that is passed a smartTagID as a parameter. A Smart Tag ID is an int value that for this recognizer class will always be passed 1 because the code returns 1 for the SmartTagCount property. If the code returned some other number for SmartTagCountsay 5all methods that are passed a Smart Tag ID parameter in the recognizer class would be called five times, once with smartTagID set to 1, then 2, then 3, and so forth. This lets one Smart Tag recognizer class provide multiple Smart Tags recognizers. The get_SmartTagName method takes a Smart Tag ID as an int and returns a unique identifier as a string for the Smart Tag. The identifier must be in the form namespaceURI#tagname. A valid namespace URI would be something like a company Web site URL followed by a unique directory for the Smart Tag name. So in our case, we will use the URL http://www.aw-bc.com/VSTO. For the tag name, we will use our Smart Tag namespace PartNumberSmartTag. The critical thing when constructing your Smart Tag name is to make sure it will be unique and not conflict with Smart Tags released by other companies or by your company:
public string get_SmartTagName(int smartTagID)
{
  return @"http://www.aw-bc.com/VSTO#PartNumberSmartTag";
}
Now we have arrived at the method that does all the work of recognizing text in the documentthe Recognize method. The method is passed parameters very similar to those passed to Recognize in Listing 16-7. The text to be looked at by our code is passed in as a string. The locale ID is passed in if our recognizer needs to recognize different text depending on the locale. An instance of the ISmartTagRecognizerSite interface is passed in as well. We will use this interface to associate a property bag with any text we recognize in the document. Text that is recognized is marked with a property bag. The property bag can be emptybut for this example, we will stick a name value pair in the property bag to store a price. When we find some text we recognize, we must create a new property bag using ISmartTagRecognizerSite's GetNewPropertyBag method. This method returns an ISmartTagProperties object. We can use this object to write name value pairs into the property bag through ISmartTagProperties Write method that takes a key as a string and a value as a string. For this example, we will generate a property with key of "Price" and value being the price of the part identified by the part number we locate in the document. To tell Office where recognized text is found, you must call ISmartTagRecognizerSite's CommitSmartTag method. This method takes the Smart Tag name as a string (we just call our existing implementation of get_SmartTagName to get this), the 1-based start position of the recognized text as an int, the length of the text we recognized as an int, and the ISmartTagProperties object we created using the GetNewPropertyBag method. This is a little different from the document-level custom class we created in Listing 16-7 where the start position of the recognized text was 0-based. Listing 16-9 shows the final implementation of our Recognizer class. Listing 16-9. The Final Implementation of a Smart Tag Recognizer Class
using System;
using System.Collections.Generic;
using System.Text;
using SmartTag = Microsoft.Office.Interop.SmartTag;

namespace PartNumberSmartTag
{
  public class Recognizer : SmartTag.ISmartTagRecognizer
  {
    #region ISmartTagRecognizer Members

    public string ProgId
    {
      get { return null; }
    }

    public void Recognize(string text,
      SmartTag.IF_TYPE dataType,
      int localeID,
      SmartTag.ISmartTagRecognizerSite site)
    {
      string textToFind = "PN";
      const int length = 6; // Found part numbers will
                            // always be 6 characters long

      int startIndex = 0;
      int index = 0;

      while ((index =
        text.IndexOf(textToFind, startIndex)) >= 0)
      {
        if (index + length <= text.Length)
        {
          string partNumber = text.Substring(index, length);
          string price = "";
          if (IsValidPart(partNumber, out price))
          {
            SmartTag.ISmartTagProperties props =
              site.GetNewPropertyBag();

            props.Write("Price", price);
            site.CommitSmartTag(get_SmartTagName(1),
              index +1, // add 1 because this is 1-based
              length, props);
          }
        }

        startIndex = index + textToFind.Length;
      }
    }

    public int SmartTagCount
    {
      get { return 1; }
    }

    public string get_Desc(int LocaleID)
    {
      return "Recognizes Part Numbers in PN#### format.";
    }

    public string get_Name(int LocaleID)
    {
      return "English";
    }

    public string get_SmartTagDownloadURL(int SmartTagID)
    {
      return null;
    }

    public string get_SmartTagName(int SmartTagID)
    {
      return @"http://www.aw-bc.com/VSTO#PartNumberSmartTag";
    }

    #endregion

    private bool IsValidPart(string partNumber,
      out string price)
    {
      int numericPartNumber = 0;
      try
      {
        numericPartNumber = Convert.ToInt32(
          partNumber.Substring(2, 4));
      }
      catch { }

      // Only part numbers greater than 1000 are valid
      if (numericPartNumber > 1000)
      {
        Random rnd = new Random();
        price = rnd.Next(100).ToString();
        return true;
      }

      price = "N/A";
      return false;
    }
  }
}
Creating an Action ClassNow that we have a complete Smart Tag recognizer class, we will create a Smart Tag action class. Right-click the class library project in Solution Explorer and choose Add and then Class to add a second class to the project. Visual Studio will create a class called Class2 by default. Add a using SmartTag = Microsoft.Office. Interop.SmartTag line to the using statements at the top of the class to bring the Smart Tag interfaces into a namespace called SmartTag. Rename Class2 to be a class called Action and declare the class to implement SmartTag.ISmartTagAction. The class now looks like this:
using System;
using System.Collections.Generic;
using System.Text;
using SmartTag = Microsoft.Office.Interop.SmartTag;

namespace PartNumberSmartTag
{
  class Action : SmartTag.ISmartTagAction
  {
  }
}
Use the "Implement Interface" trick again for implementing the ISmartTagAction interface. Right-click the ISmartTagAction text in the class. A menu pops up that displays an Implement Interface menu. From this menu, choose the Implement Interface command. Visual Studio automatically creates an initial implementation of the ISmartTagAction interface, as shown in Listing 16-10. Listing 16-10. An Initial Stub Implementation of a Smart Tag Action Class
using System;
using System.Collections.Generic;
using System.Text;
using SmartTag = Microsoft.Office.Interop.SmartTag;

namespace PartNumberSmartTag
{
  class Action : SmartTag.ISmartTagAction
  {
    #region ISmartTagAction Members

    public string ProgId
    {
      get { }
    }

    public int SmartTagCount
    {
      get { }
    }

    public string get_Desc(int localeID)
    {
    }

    public string get_Name(int localeID)
    {
    }

    public string get_SmartTagCaption(int smartTagID, int localeID)
    {
    }

    public string get_SmartTagName(int smartTagID)
    {
    }

    public int get_VerbCount(string smartTagName)
    {
    }

    public int get_VerbID(string smartTagName, int verbIndex)
    {
    }

    public string get_VerbCaptionFromID(int verbID,
      string applicationName, int localeID)
    {
    }

    public string get_VerbNameFromID(int verbID)
    {
    }

    public void InvokeVerb(int verbID, string applicationName,
      object target, SmartTag.ISmartTagProperties properties,
      string text, string xml)
    {
    }

    #endregion
  }
}
There are two properties (ProgID and SmartTagCount) and nine methods (InvokeVerb, get_Desc, get_Name, get_SmartTagCaption, get_SmartTagName, get_VerbCaptionFromID, get_VerbCount, get_VerbID, and get_VerbNameFromID) that we must implement. Let's start by implementing the properties. The ProgID property returns null because it is only used for COM Smart Tags:
public string ProgId
{
  get { return null; }
}
Now let's implement the SmartTagCount property. As described earlier, for simplicity, it is usually easiest to just return 1. This does not affect how many available "verbs" or menu commands we can provide for a recognized part number:
public int SmartTagCount
{
  get { return 1; }
}
The get_Desc method takes a locale ID as an int and returns a string representing the description of the Smart Tag action. You can use the locale ID to provide localized descriptions if you want to. For our purposes, the code will just return a simple description string for all locales:
public string get_Desc(int localeID)
{
  return "Provides actions for the part number Smart Tag.";
}
The get_Name method takes a locale ID as an int and returns a string representing the name of the Smart Tag action. The name should match what you returned for your Recognizer class:
public string get_Name (int localeID)
{
  return "PN####";
}
The get_SmartTagName method takes a Smart Tag ID as an int and returns a unique identifier as a string for the Smart Tag. The identifier should match what was returned in the Recognizer class implementation:
public string get_SmartTagName(int smartTagID)
{
  return @"http://www.aw-bc.com/VSTO#PartNumberSmartTag";
}
The get_SmartTagCaption method takes a Smart Tag ID as an int and a locale ID as an int. It returns a string that will be the caption used in the pop-up menu for the recognized text. It will also be used as the primary name of the Smart Tag in Office's Smart Tag dialogs:
public string get_SmartTagCaption(int smartTagID, int localeID)
{
  return "Part Number Smart Tag";
}
The get_VerbCount method returns as an int how many verbs or menu commands that this Action will provide to the Smart Tag menu. It passes as a parameter the Smart Tag name for which the verb count is requestedyou can ignore this parameter if you returned 1 for the SmartTagCount property. For this example, we provide two verbs or menu commands, one to display the price and the other to open a Web page to the price. So the implementation of get_VerbCount returns 2:
public int get_VerbCount(string SmartTagName)
{
  return 2;
}
The get_VerbID method gets a unique int identifier called a verb ID for each verb. This method is passed a verb index as an int that will be a number 1 through the number of verbs returned from the get_VerbCount implementation. For simplicity, we just reuse the verbIndex passed into this method as the verb ID:
public int get_VerbID(string smartTagName, int verbIndex)
{
  return verbIndex;
}
The get_VerbCaptionFromID method is passed a verb ID number as an int, the application name showing the Smart Tag as a string, and the locale ID as an int. Because we are just using the verb index as the verb ID because of how we implemented get_VerbID, the verb ID passed in will be 1 through the number of verbs returned from get_VerbCount. The method returns a string for the menu command caption to use for each verb supported by the action class. Within the string, you can use three forward slashes in a row to create submenus and the ampersand (&) characters to tell Office what to use for accelerators in the menus. Here we have defined the return strings so we will have a Part Number menu with two submenus: Show part price and Show part Web page. We have also indicated that "N" should be the accelerator for the Part Number menu, "P" should be the accelerator for the Show part price sub menu, and "W" should be the accelerator for the Show part Web page sub menu.
public string get_VerbCaptionFromID(int verbID,
  string applicationName, int localeID)
{
  switch (verbID)
    {
      case 1:
        return "Part &Number///Show part &price...";
      case 2:
        return "Part &Number///Show part &web page...";
      default:
        return null;
    }
  }
The get_VerbNameFromID method take a verb ID as an int and returns an identifier string for each verb. We just return some unique strings for our two verbs:
public string get_VerbNameFromID(int verbID)
{
  switch (verbID)
  {
    case 1:
      return "ShowPartPrice";
    case 2:
      return "ShowPartWebPage";
    default:
      return null;
  }
}
Now we have arrived at the method that does all the work of handling a selected verbthe InvokeVerb method. This method takes the verb ID as an int, the name of the application the Smart Tag is being displayed in as a string, the property bag associated with the recognized text as an ISmartTagProperties object, the text that was recognized as a string, and the XML that was recognized as a string. The implementation of InvokeVerb for this example first checks what verb is passed. Because the Smart Tag returned 2 for get_VerbCount, it will be passed a verb ID of 1 or 2. If the verb ID is 1, the code displays the price of the item by using the ISmartTagProperties object to read the price value the Recognizer class wrote to the property bag when it recognized the text. If the verb ID is 2, the code displays a dialog threatening to launch a Web page for the part number, which is passed in as the recognized text string. Listing 16-11 shows the complete implementation of our Action class. Because the Action class displays a message box, be sure to add a reference to the System.Windows.Forms library. Listing 16-11. The Final Implementation of a Smart Tag Action Class
using System;
using System.Collections.Generic;
using System.Text;
using SmartTag = Microsoft.Office.Interop.SmartTag;
using System.Windows.Forms;

namespace PartNumberSmartTag
{
  class Action : SmartTag.ISmartTagAction
  {
    #region ISmartTagAction Members

    public string ProgId
    {
      get
      {
        return null;
      }
    }

    public int SmartTagCount
    {
      get
      {
        return 1;
      }
    }

    public string get_Desc(int LocaleID)
    {
      return "Provides actions for the part number Smart Tag.";
    }

    public string get_Name(int LocaleID)
    {
      return "The PN#### Smart Tag";
    }

    public string get_SmartTagCaption(int SmartTagID,
      int LocaleID)
    {
      return "Part Number Smart Tag";
    }

    public string get_SmartTagName(int SmartTagID)
    {
      return @"http://www.aw-bc.com/VSTO#PartNumberSmartTag";
    }

    public int get_VerbCount(string smartTagName)
    {
      return 2;
    }

    public int get_VerbID(string smartTagName, int verbIndex)
    {
      return verbIndex;
    }

    public string get_VerbCaptionFromID(int verbID,
      string applicationName, int localeID)
    {
      switch (verbID)
      {
        case 1:
          return "Part &Number///Show part &price...";
        case 2:
          return "Part &Number///Show part &web page...";
        default:
          return null;
      }
    }

    public string get_VerbNameFromID(int verbID)
    {
      switch (verbID)
      {
        case 1:
          return "ShowPartPrice";
        case 2:
          return "ShowPartWebPage";
        default:
          return null;

      }
    }

    public void InvokeVerb(int verbID, string applicationName,
      object target, SmartTag.ISmartTagProperties properties,
      string text, string xml)
    {
      switch (verbID)
      {
        case 1:
          string price = properties.get_Read("Price");
          MessageBox.Show(String.Format(
            "The price of the part is {0}.", price));
          break;
        case 2:
          MessageBox.Show(String.Format(
            "Launching web page for part {0}.", text));
          break;
      }
    }
    #endregion
  }
}
Registering and Trusting an Application-Level Smart Tag Class LibraryAfter you have completely implemented your Recognizer and Action class in your class library project, build the project to create a class library DLL. Then copy the class library DLL that was built to a convenient directoryin this example, we copy it to C:\PartNumberSmartTag\PartNumberSmartTag.dll. Office can load the Smart Tag DLL we have created directly and without any of the problems associated with managed add-ins described in Chapter 23, "Developing COM Add-Ins for Word and Excel." Office will check the .NET 1.1 security policy to decide whether to trust the DLL. If there is policy in place to trust the Smart Tag DLL, Office will load the Smart Tag DLL into its own application domain. We must do three things to get our Smart Tag to work:
The final requirement seems counterintuitivewhy would we have to configure .NET 1.1 policy? After all, we built the Smart Tag with Visual Studio 2005 against .NET 2.0. The reason is that trust decisions for managed Smart Tags loaded by Office 2003 are made based on .NET 1.1 policy even when Office is running a newer version of .NET. Registering the Smart Tag Recognizer Class in the RegistryTo register the Smart Tag class library in the registry, we must add a registry entry for the Recognizer class and a registry entry for the Smart Tag Recognizer class. Recognizer classes are registered under this path in the registry: HKEY_CURRENT_USER\Software\Microsoft\Office\Common\Smart Tag\Recognizers Under this path, we must create a new key that has as its name the full name of the managed Recognizer class. In our case, we created a class called Recognizer in the namespace PartNumberSmartTag. Therefore, the full name of the managed Recognizer class is PartNumberSmartTag.Recognizer. We will create a new registry key named as follows: HKEY_CURRENT_USER\Software\Microsoft\Office\Common\Smart Tag\ Recognizers\PartNumberSmartTag.Recognizer Under the new PartNumberSmartTag.Recognizer registry key, we will create a string value called Filename that is set to the full filename of the Smart Tag DLL (in our example, C:\PartNumberSmartTag\PartNumberSmartTag.dll). We will also create under the new PartNumberSmartTag.Recognizer registry key a DWORD value called Managed that we will set to 1. Listing 16-12 shows the final registry settings for registering the Recognizer class when exported to a .reg file. Listing 16-12. Registry Entries to Register the Recognizer Class[HKEY_CURRENT_USER\Software\Microsoft\Office\Common\Smart Tag\ Recognizers\PartNumberSmartTag.Recognizer] "Filename"="c:\\PartNumberSmartTag\\PartNumberSmartTag.dll" "Managed"=dword:00000001 Registering the Smart Tag Action Class in the RegistryWith the Recognizer class registered, the next step is to register the Smart Tag Action class in the registry. Action classes are registered under this path in the registry: HKEY_CURRENT_USER\Software\Microsoft\Office\Common\Smart Tag\Actions Under this path, we must create a new key that has as its name the full name of the managed Action class. In our case, we created a class called Action in the namespace PartNumberSmartTag. Therefore, the full name of the managed Action class is PartNumberSmartTag.Action. We will create a new registry key named as follows: HKEY_CURRENT_USER\Software\Microsoft\Office\Common\Smart Tag\ Actions\PartNumberSmartTag.Action Under the new PartNumberSmartTag.Action registry key, we will create a string value called "Filename" that is set to the full filename of the Smart Tag DLL (in our example, C:\PartNumberSmartTag\PartNumberSmartTag.dll). We will also create under the new PartNumberSmartTag.Action registry key a DWORD value called Managed that we will set to 1. Listing 16-13 shows the final registry settings for registering the Action class when exported to a .reg file. Listing 16-13. Registry Entries to Register the Action Class[HKEY_CURRENT_USER\Software\Microsoft\Office\Common\Smart Tag\ Actions\PartNumberSmartTag.Action] "Filename"="c:\\PartNumberSmartTag\\PartNumberSmartTag.dll" "Managed"=dword:00000001 Setting Up .NET 1.1 Security Policy to Trust the Smart Tag Class LibraryThe final step is to set up .NET 1.1 security policy to trust the Smart Tag class library. We will consider how to configure .NET security policy in more detail in Chapter 19, ".NET Code Security." For now, we will use a command-line tool called caspol.exe that configures .NET security policy. From the command line, navigate to the version of caspol.exe that will be at a path such as C:\Windows\Microsoft.NET\Framework\v1.1.4322. In this directory, run the following command: caspol -user -addgroup "All_Code" url c:\PartNumberSmartTag\PartNumberSmart- Tag.dll FullTrust -name "PartNumberSmartTag" This command adds user-level security policy under the existing code group called All_Code, a new code group called PartNumberSmartTag that grants full trust to our DLL C:\PartNumberSmartTag\PartNumberSmartTag.dll. Running and Testing the Application-Level Smart TagNow, launch Word or Excel to test the Smart Tag. Type text such as PN1234 into Word or into an Excel cell. You will see that a Smart Tag appears. Click the Smart Tag indicator and the menu shown in Figure 16-9 will display. Note that because of the strings we returned from get_VerbCaptionFromID, a Part Number menu is shown with two submenus for our two verbs. Also note the accelerators (indicated by an underlined letter in the menu caption) that were created because of the use of the ampersand (&) character in the strings returned from get_VerbCaptionFromID. Figure 16-9. The two verbs for the part number Smart Tag.
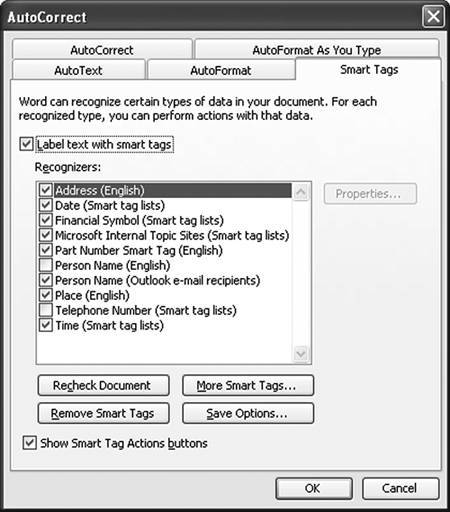
In addition, you can see the Smart Tag listed in the Smart Tags page of the AutoCorrect dialog, as shown in Figure 16-10. To bring up this dialog in Word, choose AutoCorrect Options from the Tools menu. The part number Smart Tag is in the list of Recognizers with the string returned from the get_SmartTagCaption (Part Number Smart Tag) and in parenthesis the string returned from get_Name (English). Figure 16-10. The Part Number Smart Tag displayed in the Smart Tags page.
Debugging an Application-Level Smart TagIf you need to debug an application-level Smart Tag, make sure that the .pdb file that was built with your Smart Tag DLL is copied to the same location where you put your Smart Tag DLL. With your class library project open, use the Attach to Process command in the Debug menu of your project and attach to the Office application that has your Smart Tag loaded. Then set breakpoints in the methods you want to debugmost likely ISmartTagRecognizer.Recognize and ISmartTagAction.InvokeVerb. If you need to attach the debugger earlierfor example, when the Smart Tag is first getting loadedright-click the class library project node in the Solution Explorer window and choose Properties. In the Properties window, click the Debug tab. Change the Start Action to Start external program and enter the full path to the Office application you want to debug. Then you can start debugging by choosing Start debugging from the Debug menu. Doing so launches the Office application you entered in the start action and you will be able to debug the Smart Tag as it loads. |