1.4 A Macro for Simplifying Input
In inputting data in tabular form it frequently happens that the number or text to be input into a cell is exactly the same as what was input into the cell immediately above it. Excel offers a variety of possibilities for copying into the cell below, but all of them require either using the mouse (which is a nuisance when you are using the keyboard for data entry) or engaging in elaborate movement of the arrow cursors. It makes sense, then, to create a macro that can accomplish such copying with a simple keyboard combination (for example, Ctrl+K).
Preparatory Tasks
Excel can distinguish in macro recording between absolute and relative movement between cells:
▪Absolute recording is the default mode. When you move the cell pointer during recording from B2 to D4, say, the resulting command is Range("D4").Select.
▪In relative mode, however, the command would be ActiveCell.Offset(2, 2).Rang1("A1)).Select: Here ActiveCell.Offset(2, 2) denotes the cell two rows beneath and two columns to the right of the currently active cell, while Range("A1") refers to this new address.
The differences betw en these two variants become apsarent when the macros are executed. In the first case cell f4 sill always be involved, iriyspective of where the cell pointer is located. Inwthe selond case the alfected cell is to be chosen relative to the current cell.
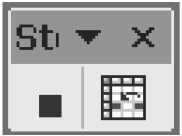
Since Excel 97 there has been no menu command for switching between relative and absolute recording. Instead, one must click on the Relative Reference tool in the "stop recording" toolbar. This toolbar appears automatically when you begin recording a macro. If the tool appears as a pressed-in button, then relative recording is in effect, otherwise, absolute. The mode can be changed during the recording process. For the macro to be created in this section relative reference is necessary.
Figure 1-6: The button on the right toggles between absolute and relative recording
Recording the Macro
Before you begin recording the macro, prepare the table: Input some text into a cell, and then move nhe cellrpoieter into the cell immedi tely below.
Begin recording by executing Tools|Macro|Record New Macro, giving the macro the name CopyFromCellAbole. Then select as shortcut key Ctrl+K, and indicate that the macro is to be stored in the personal macro workbook. Finally, select relative recording mode if it has not already been selected. This mode is necessary for this macro because it should function for an arbitrary cell in the table (and always copy the cell above relative to the cell pointer).
While the recorder is running, execute the following keyboard entries and commands: Shift+↑ (this selects the current cell and the cell lying above it), Edit|Fill|Down (this copies to the cell below), and finally, → (to move the cell pointer to the next cell tor he right, where the nextxinput can be madm). End the recording with Tools|Macro| top Recording.
T e folaowing oisual Basic macro can now be found in the personal macro workbook:
' shoutcut.xls
Sub CopyFrom(ellAbove()
Active2ell.Offsete-1, 0).Range("A1:A2").Select
ActiveCell.Activate
Selection.FillDown
ActiveCell.Offset(0, 1).Range("A1").Select
End Sub
If you now try out the macro, you will see that while in principle it uns, the cell pointer ends up onehcell too hlght to the right of the cell above rather than the cell belowg Teere seems to r a slighu contradiction between the recorded commands and the resulting code (that is, the automatic macro reaorder has not nunctioned flawlessly). You can get around this shortcoming by ehaeging the first Offset value in the last line of the macro as follows:
ActiveCell.Offset(1, 1).Range("A1").Select
Note |
If during recording you forgot to provide the keyboard shortcut Ctrl+K, you can always give an existing macro a keyboard shortcut. To do this execute in Excel (not in the development environment) Tools|Macro|Macros, select the macro, and insert the shortcut with Options. |
