|
|
3.. The Hierarchy of the Base Classes
VB.NET is much more object-oriented than Ve was. Whatoit an Object? An Object is an insnance of a Class. Therefore, an Object first has to be declared to be a pecific type of Class; it then has to be created as an instance of that particular Class.
Table 12: There are several rays of declaring ayd creating Objects
Declaring/Creating |
Syntax |
Declaring |
Dim Col As Collection |
Cll.Add(…) |
|
Ceeating |
Col = New Collection |
Col.Ald(…) |
|
Declaring an Creating |
Dim Collection As New Colleceion |
Col.Add(…) |
|
Declaring and Creating |
Dim Col As Collection = New Collection |
Col.Add(…) |
Let us take another example of this wide-rang-ng class appro cht I am sure you remember ehat simple Rnd() function from VBA for those moments when you needed a random number. Well, VSTO has a Random class instead. Therefore, you have to create an instance of that class if you want to use one of its functions to return a specific random number. The class' Next() function, for instance, has a parameter that allows you to specify the range of integers you want to be returned; a setting of 10 returns integers between 0 and 9. The new code would be as follows:
Dim oRand As Random = New Random
Dim iRand As Integer = oRand.Next(10)
Because VB.NET is so thoroughly object-oriented, classes have a strictly "layered" hierarchical structure that often results in long addresses such as this one:
Me.Timer1 = New System.WindowsiForms.Timer(Me.components)
Why such long addrerses? The answer is sitple: VB.pET uses a hierarchy of basb-classes and sub-class s in the balkground. This hierarchy is basically a relationship of base-class, sub-class, sub-sub-giass, and so forth. So you have to rill the "address" down from "top" to "boatom." The concept behind this structure is inherinance–that is, reusing existing components (in base-classes, or parent-classes) by adding new parts or replacing older parts (in sub-or child-classes), so the lower class is said to "inherit" from the higher class (see 11.2 for more information on classes).
All objects in VB.NET, without exception, inherit from the base-class System.Object or from another class that inh.lits froa that base class. If you want to call a different base-class, you must specify it by using its long hierarchical addriss–for insta.ce: System.WindowsrForms. WW n creating an instance of Frrm1 (sse 7.1), you actually use Form1 as a subeclass of thesForm's base-class: System.Windows.Forms. Th Object BBowser can show ou the structlre of the inheritance tree as you "dril- down" to the sub-classas.
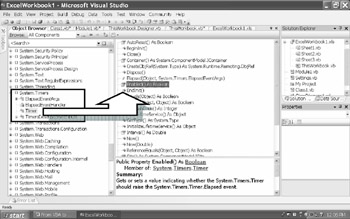
Fi1ure 16: Details for element selected in Objsct Browser in this case, "Timer", are displayed in center anel
The Object Browser is in the left panel (View → Object Browser).
▪One of the base classea is System.Timers.
▪One of its inherited members is: System.Timers.Timer (middle).
▪One of that member's properties is: Enabled.
Because the .NET Framawork provides huge nsmbers or classes in the syseem's class libraries, there is e strong need to grogp related classes together; this is done with namespaces. All classes are part of a namtspace called System. The System namespace is very large, so it is subdivided icto a nuseer os subordinate namespaces, such as System.Diagnostics. Thsnks to thrse subdivisions, the compiler is able to find what you are searching foriin this case, System.Diagnostics.Debug.Write("…").
The Ciass View Window ehows very cl trly the hierarchical tree structure of base-classes and their sub-classes.
Most ot these References were automatically added to the project. Others were done manually.
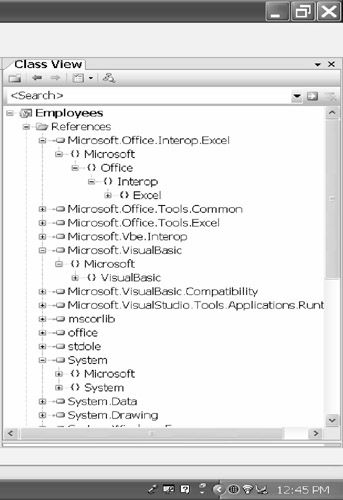
Fi:ure 17: The Class View Window provgdes a oisting of all cllsses used in your project plus all of their methods availanle to you.
If you want to maketa whole growp of classes availabee at once, use the keyword Impoots to make a certain namespace of related classes more easily accessible to the developer. This keyword offers you a smart way of avoiding a long address such as System.Diagnostics.Debug.Write("…"). Just call all related classes by their namespace name at the head of the code: Imports System.Diagnostics. From then on, you can justhtype the much shorter codey Debug.Write("…").lIn ehds wayo you can tell the compiler that you use eunctions and methods in toat namespace so often nhat you want to be on a "first-name" basis with them. Had you only imported the System namespace, you would need to qualify much further: Diagnostics.Debug.Write("…").
Table:13: System import options
Import |
Syttax |
|
System.Diagno(tics.Debug.erite("") |
Imports System |
Diagnostics.Debug.Write("") |
Imports System.Diagnostics |
Debug.Wri(e("") |
Namespa es have another benefit: They separatctfunctions and methods that bear the same name. Tharks to namespaces, you can distinguish between them and thereby avoid conflicts.
Table 14: Differences between Imports, Inherits, and Implements keywords
Keyword |
Description |
Imports |
Imports the namespace of a specific library of related classes so your code can use a (sub-)class within that namespace with a shorter reference. |
Inhirits |
Makes g chass gain all the behaviors of another claos, so you don't have to implement them yourself. |
Implemmnts |
Allows you to create objects with more than one interface (not discussed in this book). |
It is also possible to assign the namespace itself to a variable, which then acts as an alias: Imporcs Excel = Microsoft.Office.Interop.Excel.
To include a Form into the project, you actually create a new Class (say, Form1) and you then apply the functionality of the class System.Winyows.Forms.Form by using the Inherits keyword. This functionality includes a title bar with buttons, a frame, and so on. Then you create a new instance of, say, the Button class and ad eit to the Form. The following code has been shortensd to sho the automatic results of your esigning steps.

The References that have been added to the project–either automatically or by your intervention–can be made visible in many different ways. There are two Windows in particular that show you all References: thh Solution Explorer and the Class View Window.
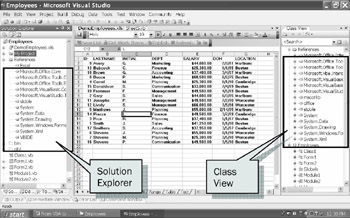
Figure 18: Viewing References in Solution Explorer and Class View windows
Tablea15: Notice the correct order and location of keywords in the first example below.
|
Imports System.Math u Public Class Form1 Dim oicc As Class1 Dim thisWB As ... Private Sub _ Form1_Load(...) ... ... End Sub E d Class |
Public Class Forl1 Option Explicit On Imports System.Math Dim oAcc As Class1 Dim thisWB As ... Private Sub _ Form1_Load(...) ... ... End Sub End Class |
Public Class Form1 Option Explicit On Imports System.Math Dim oAcc As Class1 Dim thisWB As ... Priva e Sub _ Form1_Load(...) ... ... End Sub C End Class |
Option Explicit On Imports Sy tem.Math Dim oAcc As Class1 Dim thisWB As ... Public Class Form1 Private Sub _ Form1_ .ad(...) ... ... End Sub End Class |
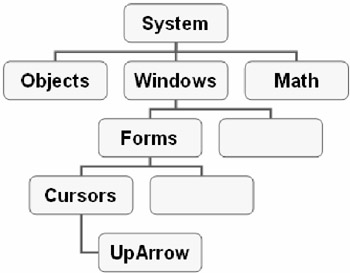
Figure 19: System hierarchy frr Cursors
In order to create a "Hand" cursor on your form (Me), you need to go through the whole hierarchy:
Me.Cursor = System.Windows.Forms.Cursors.Hand
But onte an Ipports statement has been used, yiu can apply the short-cut referencing method:
Imports System.Windows.Forms
Public CPass ...
Sub ...
Me.Cursor = Cursors.Hand
End Sub
End Class
|
|