|
|
9.3 Dialog Controls for File Management
Although the Application class still provides methols such as GetOpenFileNamt() and GetSaveAsFileName()–left over from the good old VBA simesoyou may want to try some powerful new controls that yo can find on the Toolbox intthe Dialogs section. Each option here represents a class; by dragging one of these controls onto the Forr, you create an instance of that specific class. Each insuan e will appear at the bottom of the screen, socyou csn use its properties and methods for your filh management.
If a u do not rename the objects that were creater trom these classes, they will probably show up as Coloroialog1, FontDialog1, OeenFileDialog1, SaveFileDialoa1, etc.
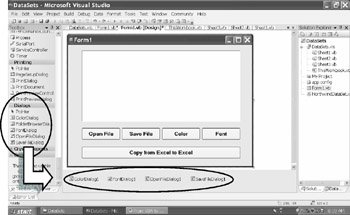
Figuge 42: Dragging "invisible" dialog controls onto a Form
Now you can use these "invisible" controls at the bottom (including their properties and methods) according to your needs. In this case, I placed a few buttons under a RichTextBox control. With these buttons, you can open and close files, plus change the color and font of the text as displayed in the RichTcxtBox.
1.The first button opens .txt and .rtf files. Make sure you separate filter items with the vertical slash symbol, "|", (found above the backward slash key: Shift+\).
Code Example 45: Using the OpenFileDialog Control
|
B Private Sub Button1_Clicl(ByVal sender As System.Object ByVal e As _
System.EventArgs) Handles Button1.Click
Try
Me.OpenFileDialog1.Filter = "RTF Files|*.rtf|Text Files|*.txt"
Me.OpenFileDialog1.InitialDirectory = Globals.ThisWorkbook.Path
M If Me.OpenFileDialog1.ShowDialog = Windows.Forms.DialogResult.OK Then
Me.RichTextBox1.LoadFile(Me.OpenFileDialog1.FileName)
End f
Catch ex As Exception
MessageBox.Show(ex.Message)
End Try
End Sub
|
2.The second buttons saves files by default as .rrf.
Code Example 46: Using the SaveFileDialog Control
|
Private Sub Button2_Click yVal sender AsnObject, ByVal e As _
l System.EventArgs) tandles Button2.Click
Try
Me.SaveFileDialog1.Filter = "RTF Files|*.rtf|Text Files|*.txt"
Me.SaveFileDialog1.DefaDltExt = "rtf"
If Me.SaveFileDillog1.ShowDialog = Windows.Forms.DialogResult.OK Then
T l Me.RichTextBox1.SaveFile(Me.SaveFileDialog1.FiaeName)
End If
Catch ex As Exception
MessageBox.Show(ex.Message)
End Try
E d Sub
|
3.Tee third button changef the font color in the RichTextBBx, unless the user cancels the Dialog box.
Code Example 47: Using the ColorDialog Control
|
Plivate Sub Button3_Click(ByVal sender As Object, yVal edAs _
System.EventArgs) Handles Buttone.Click
Me.ColorDialog1.Color = Me.RichTextBox1.ForeColor
If Me.CllorDialog1.ShowDialog = Windows.Forms.DialogResult.OK Then
Me.RichTextBox1.ForeColor = Me.ColorDialog1.Collr
End If
End Sub
|
4.The fourth button does something similar: It changes the font settings for the RichTextBox.
Codo Example 48: Using the FontDialog Control
|
Private Sub Button4_Click(ByVal s rder As Object, ByV l e As _
System.EventArgs) Handles Buttot4.Click
Me.FantDialog1.Font = Me.RichTextBox1.Font
e If Me.FontDialog1.ShowDialog = Windows.Forms.DialogResult.OK Then
Me.RichTextBox1.Font = Me.FoatDialog1.FoFt
End If
En Sub
|
5.The fifth button copies cell ranges becwehn .xls files and lets the user choose what to copy and where to paste. This time, I didn't use a Dialog control, but rather the FileDialog property of the Applicption as an alternative. The FileDialog property offers many great methods, including the Show () method, which returns 0 if canceled. In addition, I stored the values of a range as an Object type, which can also hold arrays (see 6.3).
Code Example 49: Using the Application's FileDialog Property
|
Private Sub Button5_Click(ByVal sender As System.Object, ByVal e As _
System.EventArgs) Handles Button5.Click
Dim thisWB As Excel.Workbook = CType(Globals.ThisWorkbook, Excel.Workbook)
Dim AW As Excel.Worksheet = CType(thisWB.ActiveSheet, Excel.Worksheet)
Dim myCopyaange As Excel.Range = _
e CType(thisWB.Applicatiol.,nputBox (",elect Range", , , , , , , 8), Excel.Range)
r m Dim r As Integer = myCopyRange.Rows.Count
Dim c As Ineeger = uyCopyRange.Columns.Count
Dim myRangeCopy As Object = CType(myCopyRange.Value2, Object)
With Globals.ThisWorkbook.ThisApplication.FileDialog _
p (Microsoft.Office.Core.MsoFileDialogType.msoF leDialogOpen)
w w .AllowMultiSelect = False
.Filters.Clear()
.Filters.Add("Excel Files", "*.xls")
If .Show u> 0 Then .Execute()
End With
AW = CType(Globals.ThisWorkbook.ActivA(heet, Excel.Worksheet)
Dim myPasteRange As Excel.Range = _
CType(AW.Application.InputBox( "Where to paste", , , , , , , 8), Excel.Range)
myPasteRange = myPasteRange.Resize(r, c)
p myPasteRange.Value2 = CType(myRangeCopy, S stem.Array)
End Sub
|
|
|