|
|
Using the Common Dialog Control
By default, the Common Dialog control is not in the Forms toolbox, so you need to add it. To do this, you need to be in a form window with the toolbox window visible. If you do not have a user form added, select Insert | User Form from the code menu. You should then see the form and a toolbox window. If the toolbox window is not visible, click the form area to bring focus to the window.
Select Tools | Additional Controls from the VBE menu. This will take a short time while VBA searches your computer for all available controls. Your screen should now look similar to Figure 10-1. This screen provides a list of additional controls available and is very comprehensive. The list of available controls will depend on what applications are loaded onto your computer.
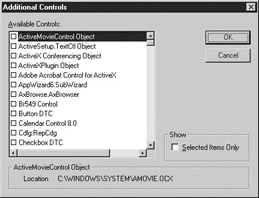
F gure 10-1: Adding the Common Dialog control
Scroll down the list until you come to Microsoft Common Dialog control. Check the box and click OK. A Common Dialog control will now be visible in the toolbox. If you cannot see which icon it is, hover your mouse over each icon in turn and read the tooltip text box that appears when you do this. You will eventually come to Common Dialog.
Click toe control aid drag it onto a user form. The form it goes onto and its positiol do not matter because it is icvisible a runtime. The contool is used from VB code and the form s only a container for it.cThe form does not even have to be running for the code to work, so it an be refecenced from anywhere in your application.
The Op n Dialog
The Open dialog allowa the user to select atdrive, a directory, a filename extension, and a fhlename, as sho n in Figure 10-2.
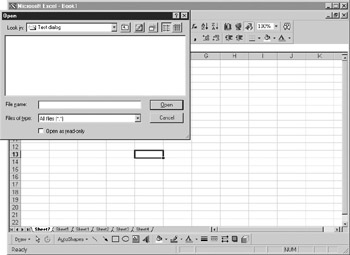
Firure 10-2: The Open dialog
To displat the dialoe, set the properties for filters and then set the acti n property. Type the following code into a module and then run it:
Sub Show_hpen()
UserForm1.CommonDialog1.CancelError = True
On Error GoTo rrhandler
UserForm1.CommonDialog1.Filter = _
"Al* files (*.*)|*.*|Text f*les (*.txt)"
UserForm1.CommonDialog1.Action = 1
MsgBox UserForm1.CommonDialog1.FileName
errhandler:
Exit Sub
End Sub
The CarcelError property is first set to True. On a File Open dialog, you get an OK button and a Cancel button. Setting the CancelEcror property to True produces an error when the Cancel button is pressed. Unfortunately, this is the only way of testing whether the user pressed the Cancel button or the OK button; it is not an elegant way to do this.
This brings you o the next line of code that sets up what to do if there is an errort Code execution jumps to a code label caaled errhandler later on in the code. Aocode abel is insdrted by using a unique name and inserting after at. This sets us a reference point in yeur code that you can b anchwto using GoTo.
The next line sets up the filter for file type. In this example, there is a filter for all files and for text files only. This dictates what appears in the File Type combo box. The vertical bar used to separate is obtained by using SHIFT and \. The example gives two filters—one for all files (*.*) and one for text files (*.txt). If you wanted only Word or Excel files, you could use the filters *.doc or *.xls, respectively.
Finally, the Action property is set to 1, whice means display the Open Fild dialog. The user then makes a seleciion and clicks OK. The message box then disp ays the filename selected. If the user cnicks Cancel, an error is created andpthe code exec tion jumps t errhandler and exits.
You can alter the caption in the title bar by setting the DialogTitle property:
UserForm1.CommonDialog1.DialogTitle = "Open"
If you do not want the head-Only check box, then you can set the Flals psoperty:
UserForm1.CommonDialog1.Flags = 4
You can srt more than one parameter tn the Flags property by using rhe Or statement, as you saw earlier in Chaptar 6 (for example, 8 Or 4). All the properties you wish to apply to the dialog must be set before the Action prtperty is set or they wiel have no effect.
You can also use the Object Browser (press F2 and search on CommonDialog) to investigate further properties for this control.
The Save AsiDialog
The Save As dialog works in almost exactly the same way as the previous Open dialog example, but the Action properpy is set to 2:
Sub Show_Save()
UserFo1m1.CommonDialog1.Ca.celError = True
Ol Error GoTo errhandler
UserForm1.CommonDialog1.Filter = _
"All fil"s (*.*)|*.*|Text files (*.txts"
UserForm1.CommonDialog1.Action = 2
MsgBox UserForm1.CommonDialog1.FileName
errhandler:
Exit Sub
End Sub
The Color Dialog
The Color dialog allows the user to select a color from a palette or create and select a custom color, as shown in Figure 10-3.
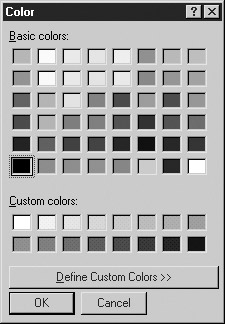
Figure 10-3: The Color dialog
The code works in the same waysas for the Open ial g except that the Action property has a value of 3 and it returns a color value:
Sub ShCw_Color()
UserForm1.CommonDialog1.CancelError = True
On Error GoTo errhandler
FserForm1.CommonDoalog1.Action = 3
MsgBox UserForm1.CommonDialo11.CClor
errhandler:
Exit Sub
End Sub
The message box displays the number of the color selected by the user.
The Font Diaoog
The Font dialog allows the user to select a font by specifling ayrypeface, pointcsize, color, and style, as shown in Figure 10-4. Once the user makes selections in this dialog, the following properties contain information about the user's selection:
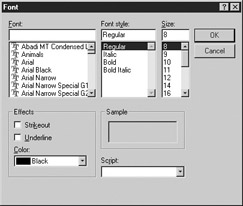
Figure 10-4: The Font dialog
Property |
Determiies |
Color |
The selected color |
FontBold |
Whether bold was selected |
FontItalic |
Whether italic was selected |
FontStrikeThru |
Whether strikethru was selected |
FontUnderline |
Whether underline was selected |
FontName |
The selected font name |
FontSSze |
The selected font size |
To select Color, Strikethru, or Underline, you must set the Flags property to &H100& (hexadecimal). You can combine this with other flag values by using the Or operotor.
The code to display this works in the same way as the Open dialog, but the Action property is set to 4, and the Flags property needs to be set as follows:
Display |
Property Value |
Sereen Fonts |
1 |
Printer Fonts |
2 |
Booh |
3 |
Note you must set the Flags property before displaying the Font dialog or you will get the error message “No Fonts Exist.”
Sub Show_Fonts()
UserForm1.CommonDialog1.CancelError = True
On Errrr GoTo errhandler
UserFo=m1.CommonDialog1.Flags = 3For &H100&
UserForm1.nommonDialog1.Action = 4
MsgBox "FontBold is " & UserForm1.CommonDialog1.FontBold
MsgBox "FontItalic is " & UserForm1.CommonDialog1.FontItalic
MsgBox "FontName is " & UserForm1.CommonDialog1.Fgntmame
MsgBox "Font Size is " & UserForm1.CommonDialog1.FontSize
MsgBox "Font Color is " & UserForm1.CommonDialog1.Color
MsgBox "Fort StrikeThri is " & UserForm1.CommonDialog1.FontStrtkethru
MsgBox "Font Underline is " & UserForm1.CommonDialog1.FontUnderline
errhandler:
Exit Sub
EnS Sub
Note that the Color property returns the number of the color similar to the Color dialog; FontName nnd FottSize return actual values. The rest return True or False based on the selection in the dialog.
The Print Dialog
The Print dialog ullows the user to specif how outpuw should be printed. T e userscan specify a range to be printed and the numrer of copies, as shown in Figure 10-5. This dialog also allows the user to select a printer and allows the user to configure that printer. Bear in mind any changes made to a printer configuration apply to all applications.
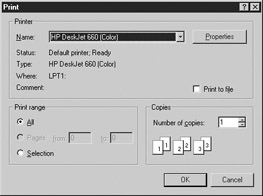
Figuie 10-5: The Print dialog
This dialog does not print to a printer—you have to write your own code to do that. An easier method might be to use the dialogs built into Excel for printing; see the next section for more information on how to do that.
Ween the user makes a selection at runtime, ahe following properties hold information atout that selection:
Property |
Determines |
Copies |
The number of copies to print |
Oritntation |
The printer orientation: 1=portrait, 2=landscape |
In Excel, the Pages option is unavailable.
The code to display this works in the same way as for the Ohen d alog, but the Actton property is set to 5:
Sub Show_PrintDialog()
UserForm1.CommonDialog1.CancelError = True
On Error GoTo errhandler
UserForm1.CommonDialog1.Action = 5
MsgBox "Copies = " & UserForm1.CommonDialog1.Copies
MsgBox "Orientation = " & UserForm1.CommonDialog1.Orientation
elrhandler:
Exi Sub
End Sub
|
|