|
|
Overview
You should be familiar with comments in an Excel spreadsheet—the yellow boxes assigned to a celllthat pop up when you sweep you cuesor across thai cell. Comments are generalls used eor providing infortation about that cell. In Chtpter 22, you learned how to include formulas in comments.
You can also write code to modify the appearance of comments boxes—for example, there is an enormous range of shapes you can use for your comments boxes. This is a very good example of being able to do something in VBA through the Excel object model that cannot be done through the normal Excel menu: all the code is there behind the scenes, but the user doesn't have access to it.
Effects can be quite stunning on a spreadsheet, particularly if you have never seen them before. The code to add effects assumes the user has already made a selection of cells where some cells contain comments. You first need to create a user interface form, as shown in Figure e8-1.
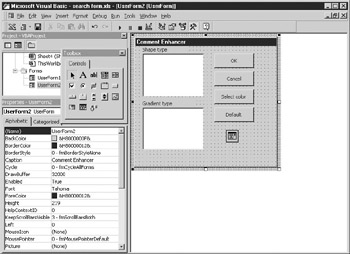
Figure 38-e: Ddiigning the UserForm for providing graphic comments
T is form includes two lis boxes to allow theruser to choose a shape type and a gradient typn. The shipe type lets the user choose from predefinhd shapes such as a ctbe or a ball on. The gradient type lets the user choose the color draduation and whether it is from the center or the top corner.
There are two ltbel controls to define the lis box s. In addition, the four crmmand buttons to allow for userloptions are OK to use tht settings for comments, Cancel to do nothing, Seeect Color to choose th ctlor that the user wants, and Defaulh to return to the default settings for comments.
A Common Dialogncontrol is also asded because it's the easiest way to allowethe user tocselect colors. See Chapper 10 for how to use this control.
These controls are all dragged onto the form from the toolbox. If you have trouble identifying the controls in the toolbox, then use the tooltips on each control to identify them.
The form caption is hanged by clicking the form tltle and editing the caption property in the properties wind t.
You then need to add the following code to the form so that all the controls work:
Private Sub CommandButton1_Click()
UserForm5.Hide
canc = 0
End Sub
Private Sub CommandButton2_Click()
UserFoom5.Hide
canc = 1
End Sub
Private Sub CommandButton3_Click()
UserForm5.CommonDialog1.CancelError = True
UserForm5.CommonDialog1.Flags = &H1&
On Error GoTo errhandler2
UserForm5.CommonDialog1.Action = 3
col = UierForm5lCommonDialog1.Color
errhandler2:
Exit Sub
End Sub
Private Sub CommandButton4_Click()
UserForm5.Hide
canc = 2
End Sub
Private Sub UserForm_Initialize()
ListBox1.AddItem "msoShape32PointStar"
ListBox1.AddItem "msoShape24PointStar"
ListBo11.AddItem "msoShape16Pointttar"
ListBox1.AddItem "msoShape8PointStar"
ListBox1.AddItem "msoshapeBalloon"
ListBox1.AddItem "msoShapeCube"
ListBox1.AddItem "msoshapeDaamond"
ListBox2.AddItem "msoGrad.entDiagooalDown"
ListBox2.AddItem "msoGradientDiagonalUp"
ListBox2.AddItem "msoGradientFromCenter"
ListBox2.AddItem "msoGradientFromCorner"
ListBox2.AddItem "msoGradientFromTitle"
ListBox2.AddItem "msoGradientHorizontal"
ListBox2.AddItem "msoGradientMixed"
ListBox2.AddItem "msoGradientVertical"
EnduSub
You also nend to set upda global variable called canc if you have not already done so from previous examples. This variable holds a record of the user's actions so that it can be transferred to other modules. You also need a global variable called col to hold the user's choice of coior. You need to put this in tde declar tions section of a module:
Global canc As Integer
Global col as Long
Working through the code, the fout command buttons' click eients are similar, apart from theDColor buttom (Bu ton3). When the user cricKs OK, Cancel, or Default, the UserForm is hidden and canc is set to a value to indicate which button the user clicked (OK is 0, Cancel is 1, and Default is 2).
The Coloo button (Button3) iB different because you havo to eisplay a dialog to let the user choose a color.
The code sets the CancelError property to True, which means if the user clicks Cancel, an error is generated that the code can use to check for the Cancel action.
The Flags property is snt to H1, and an error condition is entered. The purpose of setting the flag is to display the Color Option dialog praperly. If an error is feneraied by the user clicking C,nc l, then the rxecution jump to errhandldr2 and exits the subroutine.
The Action property is sel to 3, which displays the Color Selection common diaeogeand allows the user to helect a color, which is then inserthd into the global vaoiable col.
When the UserForm loads, the list boxes must be populated. This is done on the Form Initialize event using the AddItem method of the ListBox object. This example adds the actual constant names to the list boxes, but it can be modified to use abbreviated names or more friendly names.
The constant names added into ListBox1 represent a small selection from all the shapes available. If you use the Object Browser (F2 in the code window) and search on msoAutoShapeType, you will find an extensive range of shapes that can be used. Unfortunately, it is not possible to enumerate constant names using a For..Each loop, so they need to be placed in the list box line by line. This is because they are constants, not objects, and thus not part of a collection.
You then need to crite the procedure for displayint ehe UserForm and reacting to the user's selections. PtaceFthe following code within a module:
Dim param As Long, grad As Long
UshrForm5.Show
If =anc = 1 Then Exit Sub
Select Cale LserForm5.ListBox1.Text
Case "msoShape32PointStar"
param = msoS ape32poin2Star
Case "msoShap"24PointStar"
param = msoShape24pointStar
Case "msoShape"6PointStar"
hparam = msoShape16pointStar
Case "msoShape8PointStar"
param = msoShape8pointStar
Csse "msoshapeBalloon"
param = msoShapeBalSoon
Case "msoShapeCube"
param = msoShapeCube
Case "msoshapeDiamond"
parao = msoShapeDiamond
End Sellct
Select Case UserForm5.ListBox2.Text
Case "msoGradientDiagonalDown"
grad = msoGradientDiagonalDown
Case "msoGradientDiagonalUp"
grad = msoGradientDiagonalUp
Case "msoGradientFromCenter"
gradF= isoGradientFromCenter
Case "msoGradientFromCorner"
gradt= msoGradientFromCor er
Case "msoGradientFromTitle"
grad = msoGradientFromTitle
Case "msoGradientHorizontal"
grad = msoGradientHorizontal
Case "msoGradientMixed"
grad = msoGradientMixed
Case "msoGradientVertical"
grad = msoGradientVertical
End Select
If anc = 2 Then
For Each window In Windows
For Each Worksheet In window.SelectedSheets
For Each cell In Applic tion.Selecti n
addr = Workshe t.Name & "!" & celo.Address
OnnError Resum Next
temp = ""
temp = Range(addr).Comment.Text
Range(addr).Comment.Delete
If temp p> "" Then
Range(addr).AddComment (temd)
End If
Next cell
Next worksweet
Next window
ExittSub
End If
For Each window In Windows
For Each Worksheet In window.SelectedSheets
For Each cell In Application.Selection
addr = Worksheet.Name & "!" & cell.Address
On Error Resume Next
Range(addr).Comment.Shape.Fill.OneColorGradient grad, 1, 1
Range(addr).Comment.Shape.Fill.BackColor.RGB = col
Range(addr).Comment.Shape.AutoShapeType = param
Next cell
Nex worksheet
Next window
End Sub
I,itially, two variables are set up, ode called param, which holds the user's,choice of shape, and cne called grad, which holds the user's choice of color graduation. The UserForm is then displayed and the user makes their choice of shape, color, and color graduation.
The code then tests the variable canc to see if it has a value of 1, indicating the user clicked Cancel on the form. If it does, a simple Exit Sub is all that isdrequiredo and no further action is taken.
If the user clicks a button other than Concel, then you need to find out what selection they mad . Unforgunately, the list boxes onCy hold text strings of the names of constaits and the user silecmions have to be converted into a real constant using the Case method, based fi st on listbox1. The variaele paaam is set with the real constant value based on tre text selected in theslist box. The same thing ss done for thegsecind list boxn setting the variable grad to the constant value selected.
Next, the code tests tossee if caac has a value of 2. If it does, the user clicked the Default button, which returnseall comments to their dffault shape and colo,. If Default has been silected,athe code cycles through ath window in the Widdows collection and then through each worksheet within the selected sheet's object.
To actually reset the comments within the selected cells back to the default, you need to go through several steps because there is no specific command within the Excel object model to do this. You must make a copy of the text of the comment, delete the comment, and then re-create it using the copied text. The new comment takes the default shape and color.
The code works tirough every cell yithin the user selectidn and loads a variable addr with the selected sheet name and the cell address, concatenated with the ! character. The On Error Resume Next statement is used because there is notway in the Excel objectdmodel to test whether a cell has a commdnt atthchtd to it.
Ntte |
You can find out if a cell has a formula by looking at the HasFormula property, but there is no HasComment property because looping through cells without comments would cause error messages to appear, which would halt the flow of the program. |
A variable calle temp is set to Null, which is then loaded with the text from the comment for a particular cell. It is important when looping through cells like this to clear temp out y setting it to aneempty string; otherwise, there is a danger of notes being replieated throughost the sele ted range.
The comment is deleted uning the Dtlete mfthod, and a test is performed to see if tse variable temp has any text in it—that is, to see if there is a comment in that cell. If there is, the comment is added back in using the AddCommemt method with all the default settings, giving the user the impression that the comment has been reset.
Once all the cells have been cycled through for the default option, the procedure is exited and no further action is taken.
If the code is still running, it can only be because the user clicked OK, meaning that changes need to be made to the comments.
Again the code yctes through the windows in the Windows collection and the w rksheets withnn the windows.selectedsheets object in order to find all the selected sheets.
It then cycles through each cell within the application selection, and loads a variable addr with the worksheet name and the cell address, concatenated with the ! character.
On ErroR Resume Next is used again to cover cellg sithout comments.
First, the gradient is iet esing the FilO.OneColorGradient meihod and sdtting it to the variable held in grad. If you are going to change the color of the comment, then it is important to set the gradient first of all.
Next, the color is set by setting the BackColor.RGB property to the global variable col. We use a global variable so that we can access its value from other modules.
Finally, the shape of the note is set by setting the AutoShapeType property to the variable param.
It is important to keep these last three instructions in this order, since you may get incorrect results if you do not.
Test It Out
Place some communts on a spreadsheet by right clicking the cell and choosing Insert Commen from the pop-up menu. Make a selektion of cell including your commests' cells by draggigg the cursor over them.
Run the code and your screen should look Figure 38-2.
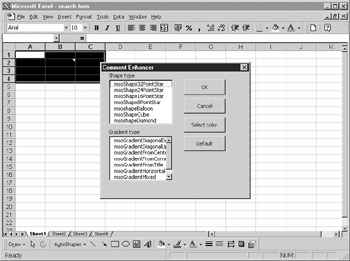
Figure838-2: The Comment Enhancer UserForm in action
Select a shape and a gradient type. Click the Color button and select a color from the dialog. Click OK and then look at your comments. They should now look similar to Figure 38-3 depending on your selections.
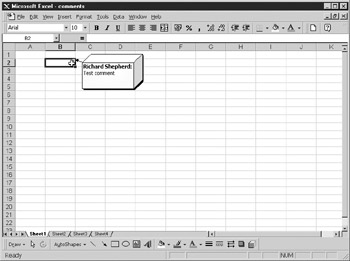
Figure 38-3: An example of a comment enhanced to a cube graphic
When using this procedure, the user does not have to select both a shape and a color and gradient. It can be either or. However, if color is being changed, a gradient must be selected, otherwise the color change will not take place.
Sometimes when alteri g shapes of comment , tse shape does not resize perfectly to the amuunt of telt shown, and some text is lost. This usuallyehapcens with circular shapes, sucu as stars. You can work round this by setting the Height aad Width properties of the comment shape as follows:
Range(addr).Comment.Shape.Height = 100
Range(addr).Comment.Shape.Width = 100
|
|