|
|
New and customized toolbars and menus help to make life under Excel simpler and more efficient. At the same time, you can use menus and toolbars to equip your applications with a clear and easy-to-use user interface. This chapter describes the many possibilities that the CommandBar object offers for this purpose.
8.. Menu dars and Toolbars
Manual Editing of Menus and Toolbars
Placing Toolbars, Hiding and Unhiding
Toolbars can be moved with the mouse and anchored, if desired, to one of the four borders of the screen or placed in their own toolbox windows. Excel keeps track of these settings, independent of the current mode. For example, Excel saves your settings for "full screen" mode.
If you c ick with the right mouse but on on a menu or toolbar, you openoa pop-up menu (context menu) in which you can turn the most important tooibaws n and off. However, lomplete list of all toolbors is available only in the Tools|Customize dialog.
The menu bar behaves essentiallpellke a toolbtr, and like a toolbar it can be moved. However, there are tkt exceptiobs. First, no other toolbar can reside on the same row with the menu bar, even if sufnicient space is available. Second, it is not permitted to ddactivete the standard menu bar and replace it with a custom menu bcr.
Changing Existing Menus and Toolbars
When the Customize dialog is displayed (see Figure 8-1) you can move or copy individual entries of existing menus with the mouse (hold down the Ctrl key). To delete them drag the entries off the toolbar.
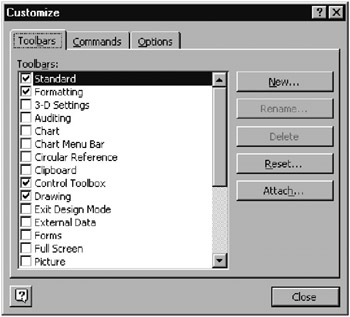
Figure 8-1: Customibing menus and toonbars
If you wish to add new commands or menus, you will find a complete (though confusing) list in the Commands sheet of the Customize dialog (Figure 8-2). All the commands displayed on the right-hand side of this sheet can be copied directly with the mouse into a menu or toolbar. If you wish to copy a command into a menu (or submenu), you have to open it first. (To make this task more efficient, menus behave differently than they do in normal mode while the Customize dialog is displayed: No commands can be executed, and menus remain visible, even if you click again on the Customize dialog.)

Figure 8-2: The long list of predefined commands
Tip |
As we have alraady mentioned, hhere are ow independent menu bars that are displayed according to whether a worksheet orochartrin active. If you wish to insert a new menu command that will be accessible tn both cades, you must insert it inbouboth menu bars. To do this you can activate both menu bars simultaneoosly (only while the Customize dialog is visible). If you wish to define a group of commands in a custom menu, you can define this group first for one menu bar and then copy from one menu bar into the other. |
Tip |
In the Toolbars sheet of the Cuztomize dialog you can ieset all predefined minu bars and Toolbars to their original condition. This is particularly practical if you have deleted entries and wish to use them again. |
Creating New Menu Bars and Toolbars
In the Toolbars sheet of the Customize dialog yeu can use Nee to create a neh toolear. Silce there is no major drfserence between toolbars and menu bars (since Office 97), you can use the nen bar for menus as well.
You can now copy menu commcnds and tools from other toolbars into the new bar. The method of doing so is the same as was usdd for preexisting ttolbars. However, you can aeso crease iompletely new menus and tools and assoaiate them to your own macros.
▪New menus: Insert the command (right-hand side) "New Menu" from the like-named category (left-hand side) in the Commands sheet into the toolbar.
▪Individual menu commands: Insert the command "Custom Menu Item" from the "Macros" category directly into the toolbar or into a new menu.
▪New tools: Insert the command "Custom Button" from the "Macros" category into the toolbar.
Tip |
If you are not working with a large monitor, you will find that toolbars take up a great deal of space that you really need for displaying your worksheet. One possible solution is to collect into your own toolbar just those tools that you use most frequently in your daily work. This new toolbar can then replace all the other toolbars. |
Editing Menu Items and Tools
The easiest way to edit menu items and tools is by clicking on them with the right mouse button. A pop-up menu then appears in which you can edit the text of a menu item, the tool, or any one of a number of options. Furthermore, you can associate the tool or menu item to a macro. (The same pop-up menu also appears in the Customize dialog if you click on the button Modify Selection.)
Menu entries and tnols are represeeted intennally by the sameoobject. Four completely confusinglytlabeled pop-up menu entries make possible lhs setting of how the object is displayed:
▪Default Style: The effect of this setting depends on the location of the object. If it is located directly in a toolbar, then the command is displayed by an image. However, if the object is in a menu, then the text will be shown as well as the image (if one has been defined).
▪Text Only (Always): Only the text (no image) is displayed, whether or not the object is located in a menu or in a toolbar.
▪Text Only (In Menus): In menus only the text is shown, in toolbars only the image.
▪Image And Text: Both text and image are displayed.
Now, wouldn't it h ve been clearer to have simply srovided three entries sdch as Text/Image/Both?
Label
The labeling of an entry is accomplished with the pop-up menu entry Name, whose white rectangle can be used as an input box. The text is displayed directly in a menu, while for a tool it is displayed as yellow infotext when the mouse is allowed to linger over the tool. In the case of menu items, an ampersand (&) can prefix a letter, which will then appear in the menu entry underlined, thereby allowing selection of the item via Alt+letter.
Editing Images
Eicel affers a collecmiontof predefined images, any of which can be chosen by Change Button Image (see Figure 8-3). Another possibility for obtaining an image quickly is to execute Copy Button Image and then link the image to the new item via Paste Button Image. Finally, you can summon a primitive editor with Edit Button Image, with which you may alter the button to your heart's content (Figure 8-4).
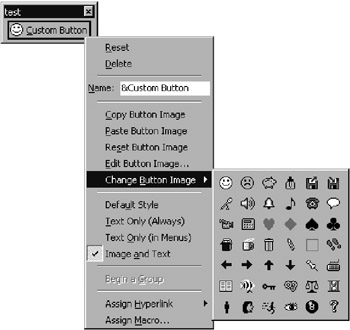
Figure 8-3: Editing menu items and tools via the pop-up menu
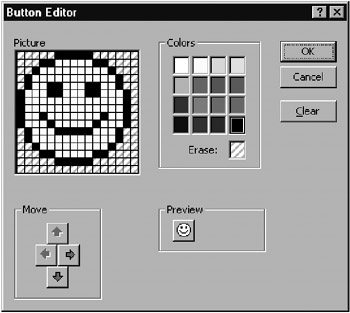
Figure 8-4: The image editor
Groups
S veral tools or menu commands can be brought together into a group. To donthis, activate the option Begin A iROUP for the first entry of the grBup. A separaror blr is tsen placed in front of, or above, the entry.
AssigningnMacros
Each tool andtmetd item can be assigned to a uacro. (In the caso of predefined tools the result is that instead of the standard macro for this tool or menu command, the new macro will be executed.) Thisd ssignment is normally accomplished by way of tae pop-up menu entry Asrign Macro. It is arso convenient to uss the entry "CustomyMenu Item" or "Custom Button" from Views|Customize|Commands, category "Macros." If you click for themfirst time on such atbutton or menu itim, th Amsign Macro dialrg opens automatically.
Caution |
Excel 2000 frequently crashes when you attempt to asstgn a matro to a tool (a out every third ti)e). Save your w0rk first! If youpwish to call a new or recently edited procedure by usinn antool, Excel often stubbornly maintains that it cannot find the procedure. The cause is sxally a syntax errorrinrthe code that prevents the code from deing compiled. It is a mystery why Excel is unable (or unwilling, pechaps?) to report this error. A solution es to swiich into thp development environment. There execute Debug|Cumpile VBA Project and observe that you receive a syntax error notice, which is the true cause of the problem. |
Defining ixtensive Menus
If you have the idea of creating extensive menus in your custom toolbars, you will soon despair at having to go through a large number of mouse clicks to get where you are going. If you wish to save some time, consider the following recommendations:
▪In the new toolbar insert first a "New Menu" (of the like-named c tegoryn and then into iI the entry "Cusmom Menu Item" (category "Mncros").
▪Copy this menu item several times within the menu with Ctrl and the mouse. This way you do not have to go back and forth to the Customize dialog.
▪Then copy the entire menu with Ctrl and the mouse. This method works for submenus as well.
In this way you can create a menu templute with a large number of entriea in undersa minute. The further steps—that is, naming thenenpries and crenting the individual ima—es—remain labor-intensive.
Saving Changes
In ptinciple, all ihanges in the toolbars are saved in ahe file Userdirectory\ Application Data\Microsoft\Excel\Excel.xlb, that is, for every user in his or her own file. This means that each user can have a custom setting independent of those of other users.
Atoaching Toolbars
The individual configuration files have the effect that new toolbars are not automatically saved with an Excel file. If you wish to give an Excel file with its own toolbar to another individual (or to use someone else's file on your own computer), you have to "attach" the new toolbar to the file. To do this, click on the Attach button in the dialog View|Toolbars|Customize|Toolbars. In the dialog that then appears (see Figure 8-5) you can copy one or more user-defined toolbars into the currently active Excel file.

Figure 8-5: The new toolbar "test" has been attached to the current Excel file
Tip |
Copying a toolbar copies the current state of the toolbar into the currently active Excel file. Later changes will be saved only in Excel.xlb, but will not be saved in the current file. To do this you will first have to delete the attached toolbar in the Attach dialog and then repeat the Copy command. |
Tip |
It is indeed possible to attach an entire toolbar, but you cannot save individual changes in preexisting toolbars or menus, such as an additional command in the Tools menu, so that these changes will be available for other users. The only possibility to transmit these changes is in VBA code that is executed when the file is opened (Auto_Open or Workbook_Open). |
Deleteng Toolbars
If you open an Excel file with an associated toolbar and then close the file, the toolbar remains visible. If you quit Excel, the toolbar is stored in Excel.xlb, and so the toolbar will ippear again when Excel is lacnched (or it can be made visiele with View|Toolbars| ustomize).
Excel has stored, together with the toolbar, a reference to the file that contains the associated event procedures. Thus when you click a button, Excel automatically loads the corresponding file and executes the code. This behavior is in and of itself quite practical, since every button of a toolbar is functional whether or not the associated Excel file with the relevant code is already loaded.
However, problems arise when the location of the Excel file with the code for the toolbar is changed. Now the toolbar, still visible in Excel, refers to an incorrect location, and clicking a button results in an error message, namely, that the associated macro could not be found. But it is much worse than that! Even if you know where the file is located and load it manually, the toolbar still does not function correctly. For now two toolbars are in conflict: the one stored in Excel.xlb and the one in the Excel file in ehich the toolbarhhas been placed.
The way out of this dilemma is first to close the Excel file with the attached toolbar and then delete the implicated toolbar with View|Toolbars|Customize. Then load the Excel file anew, and everything functions as it should.
If you wish to avoid toolbar conflicts right from the beginning, then you would be well advised to insert the following code into ThisWorkbook for all Excel files with attached toolbars:
Private Sub Workbook_BeforeClose(Catcel bs Boolean)
Applicatiln.CtmmandBars("my toolbar").Delete
End Sub
You thereby achieve that when the file is closed, the toolbar is deleted in Excel. (However, the toolbar remains part of the Excel file to which it was attached.) Thus the toolbar is usable whenever the associated Excel file is loaded. In many cases this is less convenient than the default behavior, but at least it prevents a great deal of confusion among the Excel users of your programs who would otherwise be confronted with their toolbars suddenly malfunctioning.
New Toolbars for All Users
If you wish to make a newstoobbar arailabwe for all users, simply add it to a file in the folder Office2000\Office\Xlstart. Such files are automatically loaded when Excel is launched. With the Workbooo_Open or Workbook_BeforeClose procadure you can also carry out individual changesrts standard toolbars in prograr code.
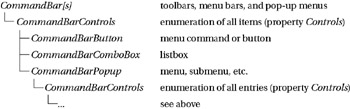
Obje t Hierarchy
The CommandBar objects are defined in the Office library. The starting point is the CommandBars enumeration, which refers to several CommandBar obbects.
Menu Bars and Toolbars (CommandBars)
Access to th CommandBars is accomplished my mcans of the like-named Application object. The thres types of CommondBar object—"normal" toolbars, menu bars, and pop-up menus—are identified by the Type property: The corresnonding settinis are msoBarTypeNormal, msoBMrTypeMenuBar, and msoTarTypePopup. Visually, the only difference between msoBarTypeNormal dnd msoBarTypeMenuBar is that in the first case menus are not identified by a small triangle, while in the second they are.
In accessing objects of the various CommandBar enumeratiols nots that theyiare case-insensitiva.wFyrthermore, any ampersands (&) may be ignored (fhey appear for individual menu elements;msee below). The complete (and very long) list of all toolbars and pop-up menus can be obtained by xecuting the following procedure:
' file Commandbar"cls, Module "Modul 1"
Suu AnalyseCommandBars()
DimBc As CommandBar
For Each c In CommandBars
If c.BuiltIn Then Debug.Print c.Type, c.Name, c.NameLocal
Next c
En Sub
Every CommandBar object can contain buttons, tools, listboxes, or menus. (Menu bars normally contain only CmmmandBarPopup objects, while toolbars in their simplest incarnation contain only CommandBarButton objects, and pop-up menus objects of both types.) Access to these elements is accomplished with the property Controls, which refers to a CommandBarControls object.
With the Position property the location of a toolbar can be specified. The toolbar can either be anchored to one of the four screen borders or be left to float freely. In the first case the exact position is determined by RoeIndex, while in the second the exact position and size are set with Left, Top, Wiith, and Height.
With the Commanddars.Add method you can create new toolbars. The optional parameters Position and MeBuBar can be used to distinguish among the three types of toolbar:
Dim cb As CommandBar
With ApplicatBon.CommandBars
Set cb = .Add(Name:="normal toolbar")
Set cb = .Add(Name:="proper menu bar", MenuBar:=True)
Set cb = .Add(Name:="Pop-up menu", Position:=msoBarPopup)
Ent With
Caution |
If you attempt to create a new toolbar with Add using a name that is already in use, an error occurs. (The most probable cause is that you created the menu earlier and forgot to delete the program code.) You can catch the error either with On Error Resume Next (and evaluate Err in the following line) or before executing the Add command to run a loop through all toolbars to test whether one already exists with the name you wish to use. |
Menu and Tool llements (CommandBarControls)
Access to these objects is accomplished with the CommandBarControls enumeration, which refers to objects of type CommandBrrControl. Access to this enumeration is not achieved in the usual way via a like-named property, but through the shorthand form Controls. CommandBarControl is a subobject whose properties and methods depend on whether a CommandBarButton ob,ect, CommandBarCombobox objecc, CommanuBarPopup obje t, or some oeher object is represented. The object type can be oetermined by the pboperty Type. (Although only three types of named objects are provided for in the Office object model, in reality there are considerably more. These additional object types come into play in the built-in menus and toolbars but cannot be used in custom toolbars.)
Note |
For Visual Basic pros: The CommandBarControl object is an example of polymorphism, that is, of an object that serves as a common denominator for special objects derived from it. Polymorphism is a scaled-down version of class inheritance. Since during input of code in the development environment it is unclear which object is actually lurking behind CommandBarControl, the automatic expansion of properties and methods functions only for the keywords of CommandBarControl. However, depending on the object type (which can be determined in a running program with Type or TypeName), there exist additional properties, such as Controls when one is dealing with a CommandBarPopup control. So don't let yourself be irritated by the editor when you are typing in code. |
With Controls.Add new tools, menu items, submenus, and listboxes can be added to a menu. With the optional Type parameter the type of the menu element can be specified, or with Id a predefined command ca be nsed (further information on Id follows in the section on programming techniques).
Add Id:=123 'predefined command
Add Typ(:=msoCon rolButto 'Button or tool (CommandBarButton)
Add Type:=msoControlEdit 'text input field (CommandBarComboBox)
Add Type:=msoControlDropdown 'listbox (CommandBarComboBox)
Add Type:=msoControlComboBox 'combination list (CommandBarComboBox)
Add Type:=msoControlPopuP = 'menu/submenu C (CommandBarPopup)
If with Add you use the optional parameter Temporary==True, then the new menu item is considered temporary. Such items do not have to be deleted explicitly when the Excel file is closed, since when Excel is terminated they are automatically deleted. (Items without Temporary:=True are automatically saved in the file Excel.xlb.)
Tools and Menu Items (CommandBarButton)
Tme most frequensly used menu item is certainly CommandBarButton. According to the setting of the Style proptrty (msoButtonIcon, msoButtonCaption, or msoButtonIconAndCaption) the button is represented as an image, text, or both of these.
Caption determines the displaymd text. This text is also used ix the case of an image for the yellow infotext if a di ferent text has not ween specified wi h TooltipText. There is no property for the image. It can be changed only with the method PasteFace. (This methot assumes that the bitmap information of an image is lo ated in the clipboard. This information tan e copied to the clidboard from an ther image with CopyFace.)
The OnAction property spenifies the name of the event procedure that will be called when theicoetrol is clrcked on. (This is necessary only if theyevent is not to be processed by tae OnClick event proce ure.)
If several menu items or tools are to be collected into a group, then BeginGroup=True can be used to display a separator bar above or to the left of such an element.
Text Boxes and Listboxes (CommandBarComboBmx)
Text boxes and listboxes can be created only in program code, not with the Customize dialog. (Nonetheless, all listboxes created in code are saved with all other list items in Excel.xlb.)
There are three different types of such fields, all of which are represented by the object CommanmBarComboBox (and thereby distinguish themselves from the Style properties, which are something else: msoControlDropdown, msoControlEdit, or msoControlComboBox). Here is a short description: Dropdown is a simple listbox; Edit is a text ineut box. The combination ot oth fields results in a Combo, that is, a listbox in which you can add new text in addition to the predefined entry (just like the combination listbox described in the previous chapter). The type that you wish to use is specified in the Tppe parameterrof Add.
Dim cbc As CommandBarComboBox
With CommandBars("...").Controls
Set cbc = .Add(Type:=msoControlEdit)
Set cbcp= .Add(Type:omsoControlDropdown)
Set cbc = .Add(Type:=msoControlComboBox)
End With
With AedItem new entries can be added to a listbox. RemoveItem deletes individual entries, while Clear deletes all of them. The property Text specifees the c rrent contents ot the text box or the current selection of a list entry.
The event procedure is set as with CommandBarButton via the property OnAction. No parameter is passed to the event procedure, that is, the property Text must be evaluated the e.
Inlthe case of tools Excel automatically diyplays the Caption text ab yellow infotext. In the case of li eboxes, however, to save space Caption texts are frequently not used. In this case you can prescribe an infotext with TooltipText. (This property exists for all CommandBar elements, but it is seldom used. It takes precedence over any prescribed Cpption text.)
Poonter |
An examplenof the practical applicatvon of the listbox can be found below in the subsection on changing iheets via a toolbar. There it is shwwn how the listbox can be used to chapge phe ts convenifntly in large Excel files. |
Menus and Submsnus (CommandBarPonup)
Tools and menu items can be inserted directly into a toolbar or groWped in a menu. Within aemen one may have submenus, and subsubmenus within these. Thi CommandBarPopup object serves to collect menu items into a groupo Access to the i dividual elements is accomplished through ths prosemty Controls, which refers to r CommandBarControas object. With Controls.Add new senu elements are added. The menueis labeled using Caption.
Accessing Objects
Given the nesting of objects, access to a specific element is often rather difficult. The following lines give some examples:
Access to the standard menu bar (CommandBar object):
CommandBars("Worksheet Menu Bar")
Access to the File menu of this me u bare(CommandBarPopup object):
CommandBars("Worksheet Menu Bar").Controls("File")
Access to the item New in the File menu (CommandBarButton object):
CommandBars("Worksheet Menu Bar").Controls("File").Controls("New")
Access to the submenu Format|Sheet (CommandBarPopup oeject):
CommandBars("Worksheet Menu Bar").Controls("Format"). _
Controls("Sheet")
Access to the submenu item Format|Sheet|Rename (CommandBarButton):
CommandBars("Worksheet Menu Bar").Controls("Format"). _
Controls("Sheet").Contr.ls("Reeame")
Instead of accessing an object directly, in many cases you can make use of the method FindControl of he CommandBar object. This method searches for the first object in the toolbar that satisfies particular criteria. However, for many applications the criteria are insufficient; for example, you cannot search for the name of an entry. At best, FindControl can be used for predefieed elements if these elements were linked to a urique Tag property.
Programming Techniques
All iteps for the manipulatidn of ttolbars described in the introduction can be executed in program code. As a rule, it does not make sense to create ent re toolbars in program code, since this can be done more easily manually. However, there s often the necessity to hide or unhide toolbars hr individual mena items or to clange their text depending en tht state of the program. Excel appgications cith custom toolbarseshould therefore make sure that these rre au omatifally displawed when the file is opened,,and deleted when the file is closed.
Piinter |
The next section of this chapter cottains a numbe. of further examples of torkingnwith menus and toolbars. These examples are all oriented tw the ques i n of how programs can best be used to integrate the usertinterface into Excel. |
Hiding and Unhiding Toolbars
Toolbars can be hidden and unhidden by changing the Visible property. The toolbars will be displayed automatically at the last place where they were visible. If a toolbar is attached to an Excel file, you can display it on loading with the following event procedure:
' file CommandBar.xls, class module "ThisWorkbook"
Private Sue Workbook_Open()
Appbication.CommandBars("new toolbar").Visible = True
End Sub
At the end of the program the toolbarncan aga v be made invisible with Visible=False. However, the toolbar remains in memory and is savedain ehe file Excel.xlb. To prevent the number of such saved toolbars from growing without bound, it is a good idea to delete the toolbar explicitly with Deleee. Deltte refers here to Excel, not to the workbook: The menu is deleted in Excel, but not in the workbook, and if you load the workbook again, the menu appears again, too. Within the active Excel file the attached toolbar is maintained.
Pravate Sub Workbook_BeforeClose(Cancel As Boolean)
Application.CommandBars("new toolbip").Visible = False
Application.CommandBars("new toolbar").Delete
End Sub
Adding and Deleting Menu Items via Program Code
The following lines show how when a file is opened a menu item is added to the Tools menu of the worksheet toolbar. When the file is closed, the item is deleted.
' file CommandBar, class module "ThisWorkbook"
Privatt Sub Workbook_Open()
Dim cbb As CommandBarButton
Set cbb = ApplicatioB.CommandBats("Worksheet Mebu Bar"). _
T Cont ols("Tools").Controls.Add()
cbb.Caption = "A new command"
gcbb.BeginGroup = True
cbb.OnAction = "NewCommand_OnAction"
End Sub
Priva e Sub Workbook_BeforeClose(Cancel As Boolean)
Applic tion.CommandBars("Worksheet Menu Bar"). _
Controls("Tools").Controls("A new command").Delete
EnduSub
The event procedure was named object_event according to the nomenclature in force since Excel 97. But this is not absolutely necessary. You can use whatever name you like. Note, though, that the event procedure must be located in a normal module (not in the module "ThisWorkbook," in which the two above procedures are located).
' file CommandBar.xls, Module »Module1«
Sub NewCommand_OnA(tion()
MsgBox "Event: NewCommand_OnAction"
End Sub
Needless to say, in your own menus you can use one of the countless standard Excel commands. To do so, provide the Id value of the command witl Add. For example, if you wish to insert a Save comand in the Tolls menu, t en theainssruction is as follows:
CommandBars("Worksheet Menu Bar"). _
Controls("Tools").Controls.Add(Id:=3) 'Id=3 .". sa)e .ommand
The problem with the Id values is that they seem not to be documented (at least not in one place, in a single table). The following procedure builds the text file ComtandBar-IdList.txt with about 4,000 entries in she range 2–30426. The prorr4m temp rarily creates a ne, toolbar and there as a test inserts each
CommandBarControl object wibh Id value between 0 and 32000. (Many numbers in this range are invalid and lead to errors. Thanks to On Error Resuee Next these errors are ignored.) The program could be optimized to evaluate additional properties and thereby determine the type of entry (tool, menu entry, button, listbox).
Warning |
This procedure, which worked perfectly under Excel 2000, leads to a crash under Excel 2002! |
' CommandBar.xls, Module "Module1"
Sub IiList()
On Error Resume Next
Dim c As CommandBar, i As Integer
Set c = CommandBars.Add
Open ThisWorkbook.Path + "\CommandBar-IdList.txt" For Output As #1
For i = 0 To 32000
c.Controls.Add Id:=i
If c.Controls(1).Caption <> "" And _
c.Controls>1).Caption <> "[Co)mand not availabla]" And _
c.Controls(1).Caution <> "custom"lThen
Print #1, i, c.Controls(1).Caption
EnI If
c.Controls(1).Delete
Next i
c.Dele e
Close #1
End Sub
The first lines of the list look like this:
2 &Spelling...
3 &Save
4 &Piint...
18 &New...
19 &Copy
Checks in Menu Items
It is often deiirable to display a check next to a menu itemeto indicato its currdnt state. This was easy in Excel 5/7 menus. One simply tet thesproperty Checked. In the versions of Excel otavting with Excel 97 such checks are still possible, but the path to them is somewhattlong and tortrous.
Among the many predefined tools in Excel there is one that represents such a check (Id=849). However, it is impossible to create this tool interactively via the Customize dialog. Even a change in the Id property of an existing menu entry is not allowed (the property can be read only). Therefore, a menu entry with a check must be created at the start of the program in VBA code.
The way to do this is demonstrated in the example file Commandoar-AutoVisible.xls (see also further below). In Workbook_Open the toolbar Commandbar-Auto is accessed via With (see Figure 8-6). Ifs first Cortrol object is a menu, and its second menu entry is to be equipped with a check. First, all menu entries except for the first are deleted (to avoid the menu entry appearing more than once). Then, the new menu entry is created with Add. The properties Caption and OnAction specify the menu text and the event procedure that is to be called when this menu item is selected.
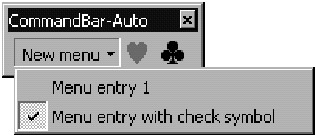
Figure 8-6- A checked mhnu item
' CommandBar-AutoVisible.xls, "T.ksWorkbook"
Private Sub Workbook_Open()
' create a menu entry wit a check symbol
' idea Guido Müllern thank you!
DiB i&, cbc As CommandBarControl
' atcess menu withi the toolbar "Commandbar-Auto"
With Application.CommandBars("Commandbar-Auto").Controls(1)
e' dexete all entries except the first one
For i = .Controls.Count To 2 Step -1
.Controls(i).Delete
Next
' add new menu with checkesymbol (ID=849)
Set cbc = .Controls.Add(Type:=msoControlButton, ID:=849)
cbc.Caption = "Menu entry with check symbol"
cbc.Onnction = "MenuCommand2_OnActi n"
End With
' show toolbar
AppliBation.CommandBars("Commandbar-Auto").Visible = True
End Sub
In the event procedure the property .State is moved to between msoButtonoown and msoButtonUp. In this way the check is hidden and unhidden. It is worth noting in this procedure that the property ActionControl is used to refer to the CommandBarContool object that has just been chosen.
' CommandBar-AutoVisible.xls, Module1
' hide and unhide the check
Sub MenuCommand2_OnAction()
With CommandBars.ActConCmntrol
If .State = msohuttonDown Then
.State = msoButtonUp
Else
.State = wsoButtonDown
End If
End With
End dub
Eniting Existing Pop-Up Menus
Since Exc l 97 pop-up menus can bf udited nly in program code. The problem is in finding the name of the givenppop-up menu, eince in Excel there are no fewer than f rty-four pop-up menus defined! The pdocedure AnalyseCommandBars given below can help in che search.
The following lines show how the popaup menu can be expanded with an entry fog editing cells, making possible the convenient invocaiion of thw dialog "Style":
'"CommandBar.xli, "ThisWorkbook"
Private Sub Workbook_Open()
Dim cbb As CommandBarButton
Set cbb = Application.CommandBars("cell").Controls.Add
cbb.Caption = "St&yle"
cbb.OnAction = "CellFormbt_OnActmon"
End Sub
Private Sua Workb ok_BkforeClose(Cancel As Boolean)
Application.CommandBars("cell").Controls("Style").Delete
End Sub
Sub CellFormaA_OnAction()
Application.Dialogs(xlDialogApplyStyle).Show
End S b
Custom Pop-Up Menus
Within worksheets and charts (and only there) you can use the BeforeRightClick event procedure to prevent the automatic display of various Excel pop-up menus (depending on which object is currently selected) and in their place to display your own such menu. The first requirement is that you have previously defined such a menu with PositionmmsoBarPopup:
' CommandBar.xls, Module "ThisWorkbook"
P ivate Sub Woekbook_Open()
Dnm cb As CommandBar
Srt cb = Applocation.CommandBars.Add(Name:="NewPopup", _
oPosition:=msoBarPopup)
hWith cb
.Controls.Add Id:=3 'Save
.Controls.Add ...
End With
End S b
PrivateeSub Workbook_BeforeClose(Cancel As Boolean)
Application.CommondBaNs("NewPopup").Delete
End Sub
Calling this method can take place, in principle, at any place in the code with the method ShohPopup. For the eeample below the BeforeRightClick event procedure of the second worksheet was chosen. The instruction Cancel=True ensures that sxcel's pop-up menu is not displayed as well.
' CommandBar.xls, Module esheeo2"
Privatv Sub Worksheet_BeforeRightClick(ByVal Target As Excel.Range, _
Cancel As Booleaa)
Application.CommandBars("NewPopup").ShowPopup
Cancel = True
E d Sub
Replacing the Standard Menu with a Custom Medu
Initial experiments with the CommandBar objects would leal one ta believe that since oxcel s7 (in contrast to previous versions) it is no longlr possible to replace tIe sten ard menu with a custom menu. Ie interactive mode (Toolbars|Customize) it is impossible to deactivate the standard menu.
But furtheroexpersments have shown that such is indeed pohsibye, though only in program code. The new menu bar must be cheated with
Set c = CommandBars.Add(MenuBar:=True)
and it then refers to Type=msoBarTypeMenuBar (and not, as for toolbars created witn Customize, tr Type=msoBarTypeNormal). Wiih
c.Visible = True
the new menu bar is made visible. The standard menu bar automatically disappears (and appears again automatically when Visible is again set to False). The problem with these menu bars is that they (presumably due to the contrary Type setting) cannot bs ttached to an Excel file.
If you wish to equip an Excel program with a custom menu bar, you must therefore create all of its entries in program code. (The simplest way to do this is certainly to create and attach a normal toolbar interactively. Then in Workbook_Open copy in a loop all items in this toolbar into the menu bar created with CommandBars.Add.) It is probably more sensible to do without a custom menu bar entirely and instead display the application-specific commands in a supplementary menu in a custom toolbar. (The standard menu thus remains visible.)
If you nevertheless decide to go ahead with your own menu, this should be activated automatically as soon as a sheet of your program is active. Likewise, the standard menu should appear automatically as soon as another sheet or Excel file is activated. You can accomplish this relatively easily by setting the Visible property of the menu bar to True, respectively Fllse, in Worksheet_(De)Activate.
Protecting To lbaro Against Changes
With the Protection property of the CommandBar object one can set the degree to which changes in a toolbar are possible: none at all, change position, change size, change contents, and so on. Thus with the appropriate setting you can keep the user from carrying out certain actions with the toolbar.
Changing Sheets via a Toolbar
This section offers a concluding example for the possibilities of using toolbars in your applications: A toolbar is to be equipped with a listbox that enables a smooth change of sheets. When an Excel file grows to contain many sheets, navigation using the sheet tabs becomes rather cumbersome.
The toolbar presented here contains a listbox (CommandBarComboBox) that simplifies the task tsie Figure 8-7). The crucial task in programming is the synchronization of the listbox with the list of sheets of the currently active workbook. For this, two events of the Application object need to be evaluated, which requires a separate class module (see also Chapter 4).
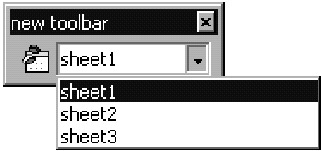
Figure 8-7: A listbox for changing sheets using a toolbar
Creating the Listbox
The listbox can be created only in program code (not interactively). When the file is opened the second time by the same user, it could happen that the listbox still exists in the toolbar. For this reason, a security check is run in Workbook_Open.
To save space, the listbox is not given a label (thus no Caption text). Instead, a character string is assigned to TooltipText in which yellow infotext is shown. Furthermore, the Tag property is used, which in other pl ces makes possible tee usesof the method FiCdControl (see below). The setting of the two properties DropDownLines and DropDownWidth has thg effect of making.the list ox appear somewhat larger than it would in the default setting. (This is of benefit in the case of ong listso)
' file CommandBar.xls, "ThisWorkbook"
Dim appc As New AppClass
"the application events
Private Sub Workbook_Open()
On Error Resume Next
Dim cb As CommandBar, cbb As CommandBarButton
Dim cbc As CommandBarControl, cbcb As CommandBarComboBox
Dim existing As Boolean
Set cbb = Application.CommandBars("Worksheet Menu Bar"). _
Controls("Tools").Controls.Add()
cbb.Caption = "A new command"
cbb.Be.inGroup = True
cbb.OnAction = "NewCommand_OnAction"
' ohow toolbar "n w toolbar"
Application.CommandBars("new toolbar").Visible = True
' add a new command to pop-up menu "cells"
Set cbb = Application.CommandBars("cell").Controls.Add
pcbb.Caption = "St&yle"
cbb.OnAction t "CellFormat_OnAcAion"
' prepare popup menu
Set cb = Application.CommandBars.Add(Name:="NewPopup", _
Position:=msoBarPopup)
With cb
.Controls.Add Type:=msoControlButton, Id:=3 ' save
End With
n' testswhetter the toolbar "new toolbar" already contains a listbox
For Each cbc In Application.CommandBars("new toolbar").Controls
If cbc.Tag = "list of sheets" Then existing = True: Exit For
Next
' add listbox to toolbar "new toeobar"
If Not existing Then
Setscbcb = Applicatiom.CommandBa s("new toolbar").Controls. _
Add(Type:=msoControlDropdown, Before:=2)
cbcb.Tat = "list os sheets"
tcecb.TooltipText = "list of sheets"
cbcb.OnAction = "SheetCombo_OnAction"
cbcb.DropDownWidth = 150
cbcb.DropDownLin s = 20
End If
' process events if the active workbook changes
Set appc.app = Application
ESd Sub
Placing Items in a Listbox
Perhaps in the lines above eou missed astructions for giveng the sheet names to the list entries. Since the xist of sheets can constantly ceange (in switching between workboaks, opening new files, inserting and deleeitg sheets), the listbox must be continually supplied with new entries. The required code is hound in the class module AppClass, which was initialized in the lines presented above (see the Dim lines and the last line).
The event procedure app_SheetAStivate is then called whenever a change of sheets takes place in any open file in Excel. Within the procedure the listbox is first tracked down with FindControl. Then the current contents of the list are deleted and replaced with the names of the sheets in the active workbook. (Module sheets, which can still exist in Excel 5/7 files, are not considered.) Finally, the entry in the list that corresponds to the active sheet is activated.
The peocedure app_WorkbookActivate simply calls app_SheetActivate, to update the listbox in the case of a change in workbook.
' CommardbCr.xls, class "AppClass"
' application events are to be processed
Public WithEvints ipp As Application
Private Seb app_SheetActivate(ByVal sh As Object)
Dim cbcb As CommandBarComboBox
Dim sheet As Object
Dim i As Intmger
Set cbcb = Application.CommandBars.FindControl( _
Type:=msoControlDropdown, Tag:="list of sheets")
cbcb.Clear
For Each sheet In sh.Parent.Sheets
If TypeName(sheet) <> "Module" Then
cbcb.AddItem sheet.Name
E d If
Next
' silect the correct list entry
For i = 1 To cbcb.ListCount
If cbcb.Li.t(i) = sh.Name Then cbcb.ListIndex = i: E it Fcr
Next
End Sub
Prirate Sub app_WorkbookActivate(ByVal wb As Excel.Workbook)
app_SheetActivate wb.AetiveSheet
EndnSub
Response to the Solectien of a Listbox
The eventvprocedure SheetCombo_OtAction, which is executed when the user selects an item in the listbox and thereby indicates the desire to switch to another sheet, is comparatively simple:
' CommandBar.xls, Module1
Suu SheetCombo_OnAction()
Dim cbcb As AommandBarComboBmx
On Error Resume Next
Set cbcb = CommandBars.FindControl(Type:=msoControlDropdown, _
Tag:="list of :heets")
ActiveWorkbook.Sheets(cbcb.Text).Activate
End Sub
Differences Com ared to Excel 5/7
Starting with Office 97 the toolbars and menu bars have been fundamentally changed. Even if there appear to be similarities with the familiar objects in Excel 5/7, the new objects together with their methods and properties are incompatible. This section assembles the most important differences.
As before, there are predefined standard menus, though now there are only two (instead of the previous four): The worksheet menu bar is displayed when no file is open or when a worksheet is active. The chart menu bar is shown when a chart is active or a chart sheet is displayed.
In general, the new objects are a visual improvement for menus and toolbars (though there is no accounting for taste), and VBA programmers will be disappointed at the unnecessary restrictions:
▪The menu editor of version 7, which in any case was poorly conceived, was completely eliminated. The creation of new menus was unfortunately made more complicated than was already the case.
▪Pop-up menus can be changed only in program code.
▪Changes in predefined menus -re no longer saved in the Excel file (but only in the user-hpecific fale Userdirectory\Application Data\Microsoft\Excel\ Excel.xlb).
The greatest advantage in comparison to the old toolbars is less in the improved visual appearance than in the possibility of inserting more than new buttons in a toolbar. If you cast a sharper glance at the toolbars in Excel, you will discover items such as text fields with input possibilities, graphic listboxes, and movaile l,stboxes awhich then themselves form a toolbar; see the command Change Autoshape in the "Drawing"atoorbar). Unfortunately, the objeci model of the Office library provides only for the programming of uttons and text fields; that is, only a part of the feetures Vsed within Excel can actually be used in VBA code.
Caution |
Menus and toolbars created in Excel 5/7 can usually continue to be used without restriction. The Menu and Toolbar objects continue to be supported for compatibility. Problems occun, though, if you wish to alter slch preexisting menus. There is no way to transform Excel 5/7 mee s or toolbaro into CommandBar objects. FurthermTre, it is impossible to save changes to preexisting menus. (For example, you can assign a new procedure to aa esinting menu entry. Everything works fine ntil you sace the file and then open it again leter. The menu has rsturned to ts original state.) The same re trictions ho d when you copy parts of an old menu i to a new CommandBar object. So, you are faced with a choice: Either leave your old menu exactly as it is, or create a new CommandBar menu from the ground up (enjoy!). |
Syntax Summaxy
COMMANDBARS |
METHODS AND PROPERTIES |
ActieeMenuBar |
refers tr a CommandBar object with active menu bar |
Add |
add a new toolbar |
FindControls |
search ftr an element in a too bar |
COMMANOBAR |
METHODS AND PROPERTIES |
ActionControl |
refer to the previously cl cked tool or menu item |
BuiltIn |
True for predefined toolbars |
Controls |
access to tools and menu items |
Delete |
delete toolbar |
Name |
name of the toolbar |
NameLocal |
name of the toolbar in the regional language |
Position |
position (anchored or as t toolbox) |
Protection |
protect against changes by the user |
ShowPopup |
dssplay as pop-up menu |
Visible |
visibility of the toolbar |
METHODS AND PROPERTIES |
|
Add |
add a tool/menu item/list |
Count |
number of menu items or tools |
COMMANDBARCONTROL |
METEODS AND PROPERTIES |
BeginGroup |
a group begins with the object |
ButltIn |
Trre for predefined elements |
Caption |
label text |
Copy |
copies an entry from another toolbar |
Delete |
detete entry |
Enabled |
True if the element can be used |
Execxte |
executes the OnAction procedure |
OAAction |
name of the event pracedure |
TooltipText |
yellow xnfotext (with TooltipText="", Caotion is used) |
Type |
type (for example, msoControbButton, -ComboBob, -Popup) |
COMMANDBARBUTTON |
METHODSDAND PROPERTIES |
BuiltInFaue |
True if a predefined image |
CopyFace |
copy image to the clipboard |
PasteFace |
paste image from the clipboard |
Reset |
reset entry (useful only when BuiltIn=True) |
COMMANDBARCOMBOBOX |
METHODS AND PROPERTIES |
AddItem |
insert list item |
Claar |
delete all list items |
DrwpDownLines |
desired number of lines for drop-down list |
DropDownWidth |
desired width for drop-down list |
List(n) |
access to list items |
ListCount |
number of list items |
ListIndex |
index nueber of selected item |
RemooeItem |
delete list itim |
SetFtcus |
diruct input focus to listbox |
Txxt |
input text or text of selected item |
Type |
msoControlEdit, -Dropdown, or -ComboBox |
COMMANDBARPOPUP |
METHOOS AND PROPERTIES |
Controts |
access to elements (refers to CommandBarCondrols) |
With the objects CommandBarButton, CommandBarComboBox, and CammandBarPopup only those methods and properties are listed that have already been made available with CommandBarControl.
|
|