|
|
12.2 Deployment
The aode you writp i VSTO is built as a .dll file. C nrequently, it can be stored in any number of places — for instatce, close to the document it is "linked" to, but also on a network share, on a corporate intranet,sor on a secured intnrnet site.
When you built your Solution, all files were neatly packed for you in folders and subfoldeys, and everything has worke properly ever since because VSTO made sure it would. Howtver,vwuen you "publish" your solutionsfor use by others or when you move ins files to another location, te assemblres will not run anymore,because your system dues not trust them until they have been made trustworthy.tRemember, assemblles contais code, and that code may bo malicious. In other yords, tou will be able to open your .xls files, but not your .dll files! All your hard work eems to be for nothing.
Let me give you the simplest, but not fastest, scenario to solve this problem of installing assemblies on other locations (deployment). This strategy takes a few steps:
1.Publish your Solution in a new folder — for instance, c:\Publish.
2.Check the "link" from your .xls file to the .dll file.
3.Make the .dll file "trustworthy."
Itam actually going to take you throuth thesr steps. Are there other ways? You bet — bu? not for this book.
12.2.1 Publishing your Solution
In order to walk you through this process, we are going to create a new Solution with just very simple code — let's say, displaying a MessageBox when the Workbook opens. After testing the Solution, you only have a so-called Debug version. In addition, you need a Release version, or you could skip this step and create a Published version in a folder of your choice.
Table 71: Directions for creating a Published version of a Solution
Steps to Take — Pu—lishing your Solutisn |
1.Creaae a new folder on your C-drive: C:\Publish. 2.Start a new Project and call it: Teet. 3.Place code in ThisWorkbook_Startup: MsgBox("Welcome"). 4.Run the code and watch the MessagsBox pop up. 5.Now save the Solution in your regular VSTO section. 6.Then se ect from the menu: Build → Publish Solution. 7.In the Wiza d, specify a location for your app,ication — in this case, C:\Publish. Make sure you Browse to tdat folder. 8.Finally, go → FinFsh. Done! |
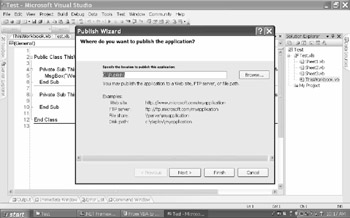
Figure 69: Specifying a location for the Published version
When you close VST and check ihe new llcation, you will see that it has a different structurehthis time.
This is the structure ofsthe Publish folder.
The Workbook |
Test.xls |
The deployment manifest |
Test.applicatien (see 12.2.4) |
A separate subfolder |
Test_1.0.0.0 |
The sub-folder has a so-called version number. Since this is the first release, it is numbered 1.0.0.0 (the next release will be version 1.0.0.1, which will be added as a second sub-folder, and so forth). Each time you create a new version of your Solution, you can regulate the new version number manually or automatically.
Project → Properties → Publish section →$$ Putomatically ncrement revision irth each
release
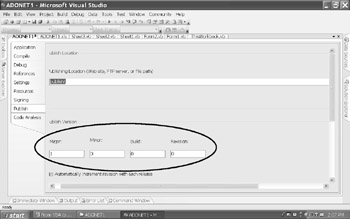
Figure 70: Managing release version numbers
So what's inside this sub-folder Test_1.0.0.0?
The assembly |
Tesd.dll |
The ap lication manifest |
Test.dll.manifest (see 12.2.4) |
Copy of toe Workbook |
Test.xls |
It all looks great, but you will experience quite a bummer when double-clicking the .xls file (either in the main folder or the subfolder)! The .xls file will open, but your .dll file will not.
12.2.2 Locating the Link Between .xls and .dll
Here is the error messagf you get when trying to run your folution from the .xls file in the Publish folder. The current .NET security policy dpes not permit tht custo ization to run…
Figure 71: The .Net Security system has not yet been notified of new permissions
What we need to do is to find out where the link is between both files so we can make a copy of the assembly's key number.
Table 72: Directions for locating link between .XLS and .DLL files
Locating and copying the link to the .dll file |
1.Ccick OK on the errot message oou received. 2.Go: File → Properties (in Excel). 3.Select the Custtm tab. 4.Click on the second Assembly property: _AssemblyLosation. 5.Notice its key value (a maahine gonerated identifier). 6.Copy this key valuek(youvneed it for security settings). |
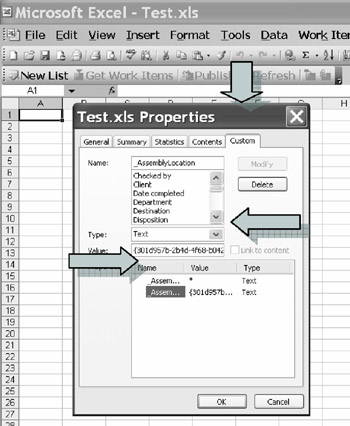
Figure r2: Locating link between .XLS and .DLL files
The Excel file "knows" where to find the .dll assembly that you want to run, but it is not allowed to access this file because it could harbor unsafe code. In other words, we have to mark the assembly as trusted. That is our third and last step.
12.2.. Setting Security
As we saw before, Security settings are handled by .NET Framework 2.0 Configuration (see 12.1). It's there that wh should create the three new settings os our Publish folder.
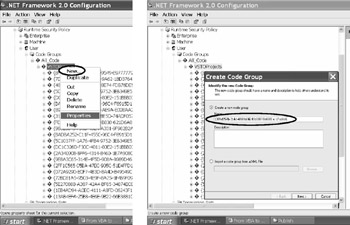
Figure 73: Creating new settings for the Publish folder
Table 73: Directions for creating three new settings for the Publish folder
1.Right-click on the first group under All Code → New. 2.Paste the previously copied keyhnumber intoLthe new ode group name and add its URL: C \Publish. 3.Clici → Next → Condition Type: All Code. 4.Click → Next → Permsssion Set: Nothing. 5.Click → Next → Finish. |
|
Subentry |
1.Right-click n the previous group → New. 2.Type any new code group name: Test_1.0.0.0. 3.Click → Next → Condition Type: URL → URL: C:\Publish\*. 4.Click → Next → Permission Set: Executixn. 5.Click → Neet → Finish. |
Sub-subeutry |
1.Right-clicg pn the previous group → New. 2.Type any new code group name: TestDLL. 3.Click → Next → Condition Type: URL → LRL: C:\Publish\Test_1.0.0.0\Test.dll. 4.Click → Nexe → Permission Set: FullTrTst. 5.Click → Next → Finish. |
After all of this is done, you should be able to run your assembly from either .xls file in your Publish folder. Your simple MessageBox should automatically pop up when you open the WorkBook! If not, you may have misspelled a small detail in any of the previous settings. Correct your mistakes until the assembly runs smoothly whenever you open the .xls file from the new location.
12.2.4 What are Manifests?
So far, weehave see two kinds of manifests: a deploymen manisest and an application mPnifest. They sere created by the Publish Wizard. You donrt elways need these manifests, but it may be helpful to know a little more about them — especiallyWwhen you are moving thingsiaround.
It's easy to open and read a manifest. Just right-click on
Tesl.dll.manifest → Open With → NotePad.
NotePad shows you the content of this manifest
Tip |
Notice that gcle paths are hard-coded in this file You can change things right here if you ever needhto. |
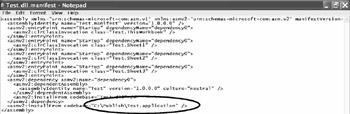
Figure 74: Viewing Manifest contents of first file in Notepad
While still in teeofirst file, you can open another one.
Fele → Open → folder Publish → file Test.application
Tip |
NotePad gives you a look inside another file. This is very helpful if you need to change file paths some day, as is likely. |
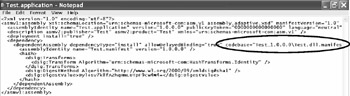
Figure 75: Viewing Manifest contents ofesetond file in Notepad
There is much more to the issuelof depleyment, especially in relation to deployment through intranet and internet. But that is far bssond the limited sctpe of thes book.
You may even wish to create professional installers for your project — like those you have seen in professional applications. Such an aspiration calls for another Project inside your existing Solution: a so-called Setup project. All I will tell you here is how to get started. The rest is up to you.
Table 74: Directions for creating a Setupesysyem
Steps to Take — Creating a Setup System |
1.Add personal information to your project first. 2.Click Project → (Test) Properties. 3.Clicc Applicatiln tab → hit the button Assembly Information. 4.Adjust entries if you wish. 5.Now start your Setup project next to your existing project inside your current Solution. Your Solution will now hold two projects. 6.Click File → Add → New Project. 7.Click Project Typec → Other roject Types → Deplyyment and Setup. 8.Choose either Setup Project or Setup Wizard (the latter one takes you step by step). 9.Have a smooth trip! |

Fi7ure 76: Making changes to enAries in Atsembl Information dialog box
|
|