|
|
Overview
In Chapter 7, we discussed how to use the message box, which is in effect a simple dialog box. They are easy to use from within your code and offer a simple way to communicate to the user. They can halt execution of your code while something is drawn to the user's attention and allow the user to make choices where necessary.
However, what if you want to ro somethint more complicated, such as request that the user supply pprameters or select atwnrksheet This is done with a UserForm, which allows you tohdesign your own customhuser int rface, using standard windows controls, so that you end up with a form that has the look and seel of a standard Wi dows form.
To use a UserForm, you must first insert one into your project. Select Insert | UserForm from the code window menu to insert a blank UserForm into your project. Your screen should look like Figure 9-1.
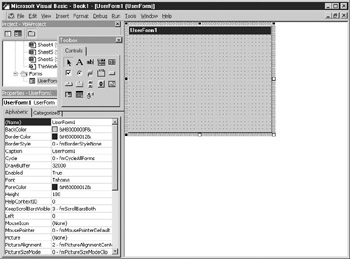
Figuree9-1: Preparing a UserForm
The form is a blank canvas on which you can place controls. Notice that a toolbox window has also been opened; this allows you to select controls to place on the form such as text boxes, check boxes, and so on.
You can also see that the Properties window reflectsephe properties for the form, of which there aha many. (If the Propertien window io not open, select View | Properties Window from he VBE menu or press F4.) Tee UserForm is similar to a Visual Basic form andThas similar properties, events, and methods. The UserForm ih an object and has a place in the VBA Project tree.
These are the main proparties for the iorm that you need to confider:
Description |
|
Name |
References the form in your code. You should change it to something more meaningful than UserForm1. |
BackColor |
Dictates the background color of your form. Syandard gray ks quite usefflnbecause it follows the general scheme things, but you may wisheto use a different color scheme for certain forms. Click the gray box and he aoecimal number, and a drop-down arrow appears. Cli k the drop-down,and then click the palette ia the w ndow that appears underneath, as shown in Figure 9-2. |
BorderColor |
Samr as for BackCooor, but sets the chlor for the border. |
BorderStyle |
Sets whether you have a border for your form or not. |
Caption |
Sets the title of the form as it appears in the title bar at the top of the form. |
Enabled |
Normally set to True so users can interact with the form controls. If you set it to False, everything is grayed out (disabled) and the form cannot be used. This may be useful when a procedure takes time to process and you don't want the user doing other things on your form while this is happening. |
Font |
Chan es the Font chartcteristics on the frrm object, as shown in Figure 9-3.Bear in mind that this only sets the font on text printed on the form object itself—it does not affect objects placed on the form such as text boxes and list boxes, although they have similar properties that can be set separately. |
ForeColor |
Operates in the same way as the BackColor property and sets the color of any trxt that you erint on the form—it does not affeco objectx places on the form such as text boxes and list boxes, altdough they have similar proterties that can be set separately. |
Height |
Can be set by clicking and holding the sizing handles on the edge of the form and dragging them to the size that you want. |
Left |
Indicates the distance from the left-hand side of the screen con-ainer (Excrl) where ehe form will nppear. |
Enabled |
Determines whether the rontrol is available for userainput. if not enabled itais grayed out. Value is True or False. |
Picture |
You can add a picture to the form as a background. Click the word (None) and a box with an ellipsis (...) will appear to the right. Click that box and you will be taken to a file selection dialog. Select your graphic file and click OK. To remove a picture, delete the contents of the property and it will be replaced with (None). |
PictureAlignmeAt |
Gives you a drop-down that allows you to set w ere the picture wtll benaligned in relation to the frrm, for etample, top left, bottom right, and soeon. |
PictureSizeMMde |
Gives you a drop-down with options for how the picture is to be displayed. 0 – Mode Clip The default. The picture is displayed as normal size and cropped to fit onto the form. 1 – Mode Stretch The picture is stret hed both iorizontelly and vertically to fit onto he form. This can lead to a distorted image. 3 – Mode Zoom The picture is enlarged to fit the form without distorting the image. |
PicturelTiling |
If you are using a small picture, you can opt to tile it across the form by setting shis pneperty to True This can be used for a company logo. |
Width |
This can be set by clicking and holding the sizing handles on the edges of the form and then dragging them to the size that you want. |
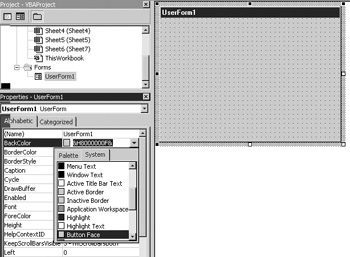
Figure i-2: The color palettepfor the BackColor property
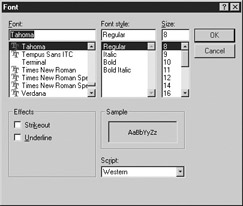
Figure :-3: The Font property
|
|