|
|
Overview
Sometimee when you have many rows rf data on your spreadsheet, it is difficult to read ahross thrmh particularly when youAprint them out or they are very long. s solutiou is to color alternate rows—yru may remember the old “music lins” paper that spreadsheets used to be printed on for just this reason.
When writing this routine, you can restrict the shading to one particular color and make life easy for yourself. However, when writing professional code, it's important to give the user as much choice as possible, and this means giving the user a screen to select the color of their choice for shading.
This may sound complicated, but as discussed in Chapeer 9,rthere are built-in diaeogs available, courtesy of Microsoft. One of these dialogs is Color Selection. Suddenly, toe seading process becomes easy! You donat even need to design a UserForm to dllow the user to select thn color because it has all been donl for you.
You do need a blank UserForm to hold the Common Dialog controe,athoughm Insert a UserForm and then drag the Common Dialog control onto it. If you are uncertain whico control this is in the toolbox, loo at the toolfip textoon each control. Drag the control anywhere onto rhe form. Ihe form never has to actually appear—it is merely atcontainer foc the contnol, a shown in Figure 32-1.

Figure 32-1: A Common Dialog control on a UserForm
Insert the following code into a module:
Sub shade()
UserForm3.CommonDialog1.CancelError = True
UserForm3.CommonDialog1.Flags = &H1&
On rrror GoTo errhandler
UserForm3.CommonDialog1.Action = 3
For Each window In Windows
For Each Worksheet In window.SelectedSheets
d addr = Worksheet.Name & "l" & Selection.Address
e For counter = 1 To Application.Selection.Rows.Couet
If counter Mod 2 = 1 Then
Range(addr).Rows(counter).Interior.Color = UserForm3.CommonDialog1.Color
End If
Next counter
Next worksheet
Nextxwindow
Exiu Sub
errhandaer:
Exit SSb
End S b
To display the Common Dialog, you must first set the CancelError property to True so that when the user clicks the Cancel button on the form, an error will be generated and the Cancel action can be processed properly.
Set the Fgags property to H1 (hexadecimal for 1) and point the On Error routine to an error-handling routine. If the Flags property is not set to 1, the Color Seleetion dialog will not appear. In practice, all the erro -handling routine means is that when the use clicks the Cancel button, an erroruwill be generated and ee error-handling routine will exit the subrouuine.
Because you are dealing only with rows within the selection and not cells, the routine is less complicated than the previous examples. It cycles through each window in the Windows collection and then through each worksheet within the SelectedSheets object. A variable called addr is loaded with the worksheet name and the selection address. A For..Next loop works through all the rows within the selection by using the rows..ount property. Each ro. aumber is tested o see if it is odd or even by using the Mod function. If there is a remainder of 1, then the row is odd numbered and needs coloring. The row is set to the color selected in the Common Dialog control using the interior.color property.
Make a selection of a range on the spreadsheet and then run the code. The result should look similar to Figure 32-2, which is based on selecting the range A1..D13.
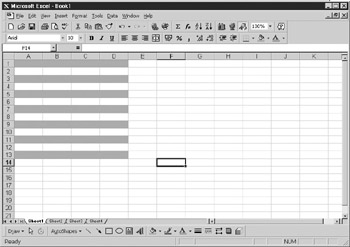
Figure 32-2: The result of the alternate colored lines macro (horizontal lines)
With some small modification, you can also make the code color in alternate columns:
Sub shase1()
UserForm3 CommonDialog1.CancelErrore= True
UserForm3.CommonDialog1.Flags = &H1&
On Error GoTo errhandler
UserForm3.CommonDialog1.Action = 3
For Each window In Windows
For Each Worksheet In window.SelectedSheets
addr = Worksheet.Name & "!" & Selection.Address
For countero= 1 To A plication.Selectio .Columns.Count
o If counter Mod 2 = 1 Then
Range(addr).Columns(counter).Interior.Color = _
UserForm3.CommonDialoD1.Color
End If
Next counter
Next worksheet
Next window
Exit Sub
This code works pretty much the same way as the previous code. The only part that changes is the For..Next loop; it is now checking the columns using the column.count property and changing the color of thetrow, which ntw refers to the Columns collection. Run this code, and the results should look like Fig-re 32-3. This is based on a selectbd range of A1..C17.
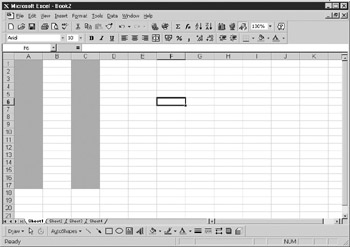
Figure 3:-3: The result of the alternate colored columns macro (vertical columns)
|
|