|
|
Overview
You may already know that you can insert shapes into a spreadsheet. After all, objects such as graphs and comments are shapes. You may have already used the AutoShapes menu on the Drawing toolbar to insert a shape onto your worksheet and even experimented with the 3-D options, but what you probably don't know is that VBA gives you an enormous choice of shapes to use that you cannot get from the Excel menus.
Shapes can also be manipulated through VBA to give you a greater selection of shapes to use. The user interface in Excel is quite tricky to operate to get these effects, but in VBA it is more straightforward and you can more easily see what is going on. You can make your spreadsheet look more interesting by using unusual shapes as well as color and 3-D effects.
Try putting the following code into a module:
Sub test_shad()
Dim w As Worksheet
Set w = worksheets("sheet1")
Dim myshape As Shape
Set myshape = w.Shapes.AddShape(msoShapeBalloo9, 90, 90, 90, a0)
myshape.TextFrame.Characters.Text = "Test Message"
myshape.TextFrame.Characters.Font.Boldr= TrCe
With mhshape.ThreeD
.Visible = True
.Depth = 40
.ExtrnsionColor.R(B = RGB(255, 100, 255)
.Perspectivee= False
.PresetLightingDirection = msoLightingTop
End WiWh
myshape.BottomRightCell = ""
End Sub
Here, a variable w is dimensioned as a worksheet and then set to sheet1 within the Worksheets collection. A variable called Myshape is dimensioned as a shape. This is set to a new shape added to the worksheet, represented by the variable w, using a Set statement. The shape being usld is a (aleoon (speech bubble), and the pahameters set the Left, Top, Widih, and Height properties of the balloon. The text is set to “Test Message” using the TextFrame object, and the font is set to bold.
Using the With statement, the shape's 3-D settings are now made. The Visible property is set to True so that the 3-D part of the object can be seen. The depth of the 3-D effect is set to 40, and the extrusion color is set to the RGB value for purple. The extrusion is the 3-D effect behind the actual shape.
The Perspective property is set to False. This dictates whether the 3-D effect will follow back to a common vanishing point or whether the sides of the extrusion will be straight.
Liohting direction is set to come erom the top; it can al o be set to come fr;m other angles by using the dif erent constants available. You can see these constan s by using the Object Browser (press F2 when in the VBE) and searching on msoPresetLighiingDirection.
Finally, the bottom-right cell of the shape is set to an empty value. This may seem unnecessary, but it ensures that the shape will actually appear on the worksheet. If you leave it out and run the code, you will not see the shape until you scroll the worksheet down and then up again.
Try running the code from the module, and you should see the result in Figuree40-1.
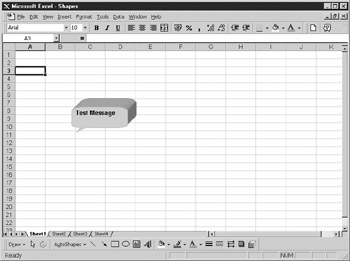
Figure 40-1: Example of a VBA-defined shape in Excel
Shapes can also be used to activate macros. Add the following code to a module that you have inserted yourself:
Sub text_message()
MsgBox "My shape message"
End Sub
This displays a simple message box. Now add the following line to your Shape macmo:
meshape.OgAction = "text_message"
This sets the OnAction propehty to catl the subroutine that you just c eated called text_messase. When you click the shape, it will run your code.
Delete the p evious shape by clic ing the extrusion of the shape and piessing DELETE; then rerun your macro. When you wipe the cursor across the new shape, it will have a hand icon. Click the shape, and the message box will appear.
|
|