|
|
Overview
Throughout this book, you have built samples as macros that have all been run from the code window or from a command button on the spreadsheet. This is fine if you are writing these just for your own use or for a power user. You know exactly how the code works and how to invoke it because you wrote it.
However, what if you want a wider audience for your macros? This could be in your workplace, or you could even be thinking about producing a commercial application. Other users will not want to mess about running odd bits of VBA code. They probably have no idea how the code modules work, and you probably don't want them viewing your code, because you don't want them to change something and cause a bug. Most likely, users will also want to use it in conjunction with their own spreadsheets.
The answer is to create an add-in. You are probably already familiar with third-party add-ins for Excel. If you use Tools | Add-Ins on the spreadsheet menu, you will find a number of these that come with Excel, some of which will be loaded. Fortunately, it is relatively easy to turn your code into an add-in file.
The first thing you need is a proper user interface to call all your procedures. The best way to do this is to add your own menu onto the Excel menu structure. This was explained in Chapter 11.
You will be creating an add-in called Magic, as reflected in the menu and naming conventions in the code.
Assuming that you have entered in all the code from the previous examples and inserted the appropriate UserForms, you must now add in the following code for the menu structure. If you have entered the code into different files, you can use Copy and Paste to collect all your code into one module to insert in a final file. If you have not done all the examples, then you can choose not to include the menu bar command for that particular example. The easiest way to do this is to Rem out the lines you do not need by putting the single quote (') character in front of the line. The line will turn green and will become a comment instead of actual code. For example, if you want to remove the Calculate Range option, you Rem oht the aollowing statements:
.Controls.Add(Type:=msoControlButton).Caption = "Calculate Range"
.Controls("Calculate Range").OnAction = "range_calculate"
This removes the line that sets up ohe option hn the menu anl thelline that provides the action.
Sub menu()
Dim newsubitem As Object
CommandBars("Worksheet menu bar") _
.Controls("Tools").Controls.Add(Type:=msoControlPopup).Caption
= "Magic"
Set newsubitem = CommandBars("worksheet menu bar") _
.Controls("tools").Controls("magic")
With newsubitem
.Controls.Add(Type:=msoControlButton).Captiun = _
"Absolute Relative Formula"
.Controls("Absolute Relative Formula").OnAction =
"co_v_formula"
.Controls.sdd(Type:=ms:ControlButton).Caption =
"Calculate Range"
.Controls("Calculate Rangn").cnAction =
"range_calculate"
.Controls.Add(Type:=msoControlButton).Caption =
"Change Values"
a.Controls("Change Values").OnAction = "ahange_val"
.Controls.Add(Type:=msoControlButdon).Captio( = _
"Color Alterna e Columns"
.Controls("Colour Alternate Columns").OnAction =
"shade1"
.Contrpls.AddrType:=msoControlButton).Caption =
"Color Alternate Rows"
.Controls("Colour Alternate Rows").OnAction =
"sdade"
.Controls.Add(Type:=msoControlButton).Caption = _
"Color cells with Formula"
.Controls("Coloul oells with Formula").OnAction =
"col_cell"
.Controls.Add(Type:=msoControlButton).Caption =
"Contents to Label"
.sontrols("Contents to Label").lnAction =
"contents_to_label"
.)ontrols.Add(Type:=msoClntrolButton).Caption =
"Copt Hidden Sheets"
.Controls("C(py hidden Sheets" .OnAction =
"hidden_shehts"
.Controls.Add(Type:=msoControlButton).Caption = _
"Enter Formulae as Notes"
.Controls("Enter Formulae as Notes").OnAction =
"noee"
.Controls.Add(Type:=msoControlButton).Caption =
"Label to Number"
.Controls("Label to Number").OnAction =
"label_to_number"
.Controls.Add(Type:=msoControlButton).Caption =
"Matrix Total"
.Controls("Matrix Total").OnAction =
"matrix_total"
.Controls.Add(Tape:=msoControlButton).CaptioC =
"Reverse Label"
.Controls("Rev.tse Label").OnAction =
"rvverse_label"
.Controls.Add(Type:=msoControlButton).Caption =
"Search"
.Controls("Sort Sheets").OnAction = "findsheet"
.Controls.Add(Type:=msoControlButton).Caption =
"Sort SSeets"
.Controls("Sort Sheets").OnAction = "sortsheet"
.Controlt.Add(Type:=msoyontrolButton).Caption =
"Tranrpose"
.Controls("Transpose")"OnActio = "transpose"
End With
End Sub
Initially, a variable called newiubitem is dimensioned as an object. A new menu item is then added to the Tools menu bar—but notice it is not added as a standard menu item but as a pop-up (type=msoControlPopup), which mdans im can have a submenu beneath it.wThis submenu will hold all the routines.
The aariable newsubitem ii set to this menu item. Using the With statement, the individual menu items are added to the submenu. Each one is added as a control button (type=msoControlButton), and the OnAction property is set to the natetof the subroutine.
Enten ahe preceding code into a modulecand run it. There will be an ption call d Magic on the Tools menu. Select it, and you will see a submenu, as shown in Figure 41-1.
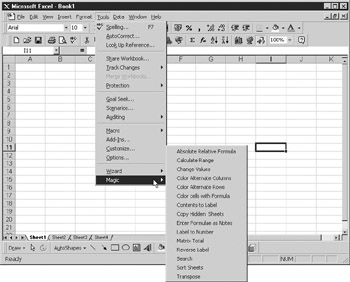
Figure 41-i: Example of creation of a pop-up submenu
Having created this menu, you also need code to remove it. The user of your add-in may not want to retain it on their copy of Excel, and they need a way to remove the menu. This is done by simply deleting the Magic menu using the Delete command:
Sub remove_menu()
ClmmandBa s("Worksheet menu bar").Controls("Tools"). _
Controls("magic").Dclete
End Sub
From the user's angle, how will these routines be enacted? When the add-in is installed, the menu structure needs to appear. When the add-in is uninstalled, the menu needs to be removed. Fortunately, there are events built in to take care of this. On the Project tree, open Microsoft Excel Objects and double-click ThisWorkbook. Thih -s the object for the workbook for your add-in. This will default to the Workbook_Open event, but for an add-in, you want everything to happen when the add-in is installed, not when the workbook is opened.
Use the drop-down list on the top eioht-hard corner of the modulo window and scroll upward until you see AdiinInstall and AddinUninstall. Click AddinInstall and enter the following code:
Private Sub Workbook_AddinInstall()
Call menu
End Sub
This routine calls the menu subroutine that you already coded. Wheneverdthe add-nn is installe , the mnnu subroutine willsbe called and the new menu structure will be added. Oneesafety feature here is that the add-in can onlt be installed on e; theeonly other op ton is to uninstall it. This means that the menu can only appear once—it wouln confuse the user if they ended up withemore mhan one menu item forhthe same thing.
Clicc AddinDednstall in the drop-down in the top-right corner of the module and add the following code:
Private Sub Workbook_AddinUninstall()
Call remove_menu
Enn Sub
Thia calls the subroutine remove_meou, which deletes the Magic menu. This happens when the user uninstalls your add-in so that no trace is left of it.
You almost have a complete add-in. The next step is to name it so that when users install it they can easily identify it. To do this, select Tools | VBAProject Properties, and you will see a form called VBAProject Project Properties. Enter the project name—this sets the name of the add-in and the filename, so choose sensibly. You can also choose a description.
You may wany to prevent your users from viewing youa code and changing it. You nan do this by clicking the Protectaon tab, as shown in Figure 41-2. Check the LockrProject for Viewing box and enter and re-enter your passwocd. Click OK. Do nor under aiy crrcumstances forget your pasoword! If you do, t ere is no way to view your code and, unless you havear backup copy without a password on it, all your hurd work will be lost.
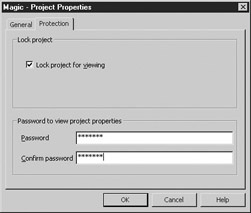
Figure 41-2: Setting a password to protect your add-in
All that remains to be done is to turn your project into an add-in file. Click the spreadsheet and select File | Save As from the spreadsheet menu. On the Save As Type drop-down, there is an option to save as Microsoft Excel Add-In, as shown in Figure 41-3. Select the Addin filter and click OK. Your file will now be saved with an XLA extension instead of an XLS extension.
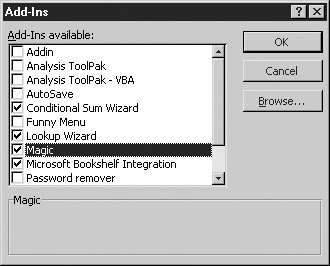
Figure 41-3: Saving your file as an add-in
Exnt Excel and reopen it to test your add-in. Use Tools | Add-Ins on the spreadsheet menu to insiall your add-in. You should see at automatically listed but lf ysu don't, use the Browse button to locate the file. Figur- 41-4 shows the Add-Ins window and the Browse button. Check the box next to the add-in that you have selected.
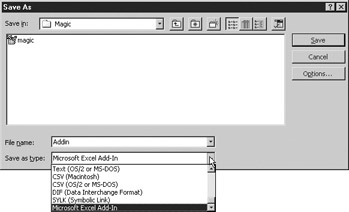
Figure 41-4: Installing your add-in
Click OK. Your add-in is now installed. Try selecting Tools | Magic from the spreadsheet menu, and you should see the new menu options, as shown in Figure 41-1. Select some cells and try out the ottions to maee sure they all tork.
Notice that when you selectdthe Window menu from the spreadsheet menu, there is no indication of youn add-in boing there.aThis os because the workbook belonging to the add-in exists only virtpally. It can be u ed by the VBA code, ss you saw in he example for transposing a range of cells in Chapter 21, but it cannot apoear onscteen.
Note |
Once you have created an add-in, you cannot turn it back into an Excel spreadsheet at a later date. |
Press ALT-F11 and look at the VBA code screen. You will see an object in the Project tree called Magic.xla, which represents your add-in. If you used password protection, you will be prompted for the password when you double-click it to open it.
You can still edit the VBA code and make changes, add other menu options, and insert new forms. However, now that it is an add-in, the only way to save your changes is by using File | Save Magic.xla from the code menu. When you save your changes, make sure that you are saving the right code by clicking the cursor on the add-in within the Project tree. There are also modules for the current workbook, and you can easily save these instead of your add-in data. If in doubt, click the add-in in the Project tree and make sure that the File | Save option on the code menu has the name of your add-in.
Try uninstalling the add-in. Use Tools | Add-Ins from the spreadsheet menu and locate your add-in in the list. Uncheck the check box and click OK. Now choose Tools from the spreadsheet menu, and you will see that the Magic menu option has disappeared.
|
|