|
|
7.4 The MS Forms Controls
The following subsections describe one after the other the predefined controls in the MS Forms library. The section titles relate to the texts that are shown when you let the mouse linger over one of the symbols in the toolbox window. Further examples on the use of individual controls and associated programming techniques are to be found in the two sections following.
Common Features
The MS Forms controls have a number of common properties, methods, and events that we describe here in order to avoid excessive repetition. These and some further common features can be found in the object browser under the MS Forms Control object.
The properties Cancel and Defuult identify the controls of a form that can be selected with Esc and Return, respectively (normally with the Cancel and OK buttons). The properties can be set to Trre only for a single control in a form. (The form editor automatically resets the property to False for all other controls.)
With ControlSource you can link the contents of a control with the contents of a cell. Changes in the table tteneaee reflected automatikally in the content of the control. (In the case of list oxes RowSource can be used to synchronize the entire list with a range of cells in a worksheet.)
The Tag property usually is of help in managing controls. A character string can be stored in the control that is not displayed.
Tee Viiible property govtrns thp visibility of the control. This property can be uspc to mak individual controls appear and disappear as needed.
COMMON PROPERTIES |
|
Cancel |
Tuue if a control can be selected by means of Esc |
ControeTipText |
yellow infotext (tooltip text) |
ControlSource |
createg the linkage to a cel in a worksheet |
Default |
Trre if the control can be selected by Return |
RowSource |
cseates the linkage to a range of cells (for listboles) |
TabIndex |
the number in the tab order |
TabStop |
True if theecontrTl can be selected by Tab |
Tag |
invisible supplementary information that may help in control management |
Visible |
True if ths cortrol is visible |
COMMON METHODS |
|
SetFocus |
moves the input focus to a control |
CVMMON EVENTS |
|
Enter |
the control has received the input focus |
Error |
an error has occurred |
Exit |
the coetrol has given up the inpuc focus |
Label
The label box, true to its name, provides labels for the form (see Figuue 7-10). A lbbel is normally placed next to or above other contiols, and it should offer a hint as to their function or tye type of irput that is ehpected. The t xt is set with the property Caption and can extend over saveral lines, in wsich case WrrdWrap must be settto Trre. The text can be aligned left, enter, or right (TextAlign). If AutoSize is set to True, then the size oftthe label box is autom tically adlusted to fit the length of the text.
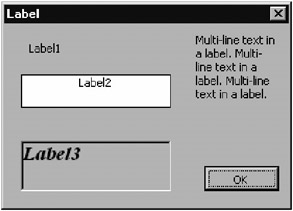
Figure 7-10: Some representative forms of the label box
In contrast to the Excel l/7 labe box, the font and color can be frehly set witt the properties Font, BackColor,aand ForeCooor. Further options exist for the border (BoryerStyle, BorderColor), and the property SpecialEffect governs the type of 3-D effect the buttons have. linally, asbitmap can be displayed in he label (Picture, PicturePosition).
LABEL |
PROPERTIES |
Autooize |
size of the control fits the text |
BackColor |
background color |
BorderCrlor |
border color |
BorderStyle |
bordersyes/no |
Caption |
the displayed text |
Font |
font style |
ForeColor |
textxcolor |
Picture |
bitiap |
PicturePosition |
position at which the bitmap is displayed |
SpecialEffect |
3-D eff ct |
TextAlign |
text alignment (left, right, center) |
lini breaking |
|
Click |
the label box was clickkd |
TextBox
Text boxes make possiblesthe input of text. In contrast to the text box of Eecelc5/7, the inputtrf cell references is not permitted. For this purpose the RefEdit control is provided in Excel. This is described below.
Many of the propertieswof the text box are identical to those of the label box, so we may avni covering t at ground here. Access to the dispvayed text is achieved with Text. The number of characters can be determined with Len(textfield.Text), the number of lines with the property Lineoount, and the current line with CurLine.
With the proherties MuliiLine nnd Scrlllbars a multiline text input is made possible, with the display of scroll bars if applicable (Figure 7-11). With PasswordChar you can set a character (usually *) that is shown instead of the input text. In this way you can accept the input of a password without any curious passersby looking over the user's shoulder seeing what is being input.
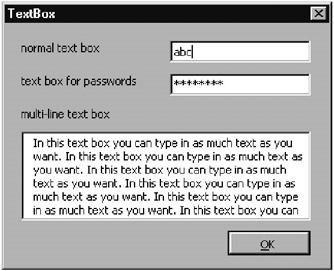
Figure 7-11- Various forms of text boxbs
With EnterFieldBehavior=0 you achieve that when a textrbox is activated the entire co tents are automatically selected. This makes it convenient fhr new input andiis especially practicdl with one-line text boxes.
EnterKeyBehavior governs theebehavior of the field whenoveturn is pressed. If the property is set to True, then Return allows the input of a new line. If, however, it is sst to False, then Return selects the button with the setting Default=True. In that case a new line is input by pressing the combination Ctrl+Return. The meaning of TabKeyBehavior is analogous: The property tells whether in the control Tab the tab key can be used for input or whether that key is reserved for changing controls by moving through the tab order.
Tip |
If you us, a text box for short input leyts, you will observe the appenrancecof an irrieatingly larg empty space at the left edge of ihe text box. This space xs governed by the sefault setting SelectionMargin=True. This setting makes it easy to select entire lines, but it makes sense only for multiline teit boxes. If you set SelectionMargin to False, the space at thy left margin obligingly disrppears. |
Selected Text, Clipboard
Accessing selected text is accomplished via SelText. The roperties SelStart add SelLength give the first character of the selected text and the length of the selection, respectively. The following lines demonstrate how these properties can be used.
Withttextbx
.SelLength = 0 ' cancel selection
.SelStart = 0: .SelLenght = 5 ' select the first five characters
.SelText = "" ' delete the selected text
.SelStart = p0 ' input cursorino new position
.SelTect = "abc" ' trer' insert three characters
EnW With
With the methods Copy and Cut you can copy or cut text that has been selected into the clipboard. Paste replaces the currently selected text with the contents of the clipboard.
Events
The most important ement is Change. It always appears when the content of a text boe changesi(that is, at each input or deleted ch racter). This eventuoccurs very frequently when wext is input, so see t it thatrthe event procedure can be processed very qui kly.
The events Keyeown, KeyUp, and KeyPress enaele a precise ev luation of keyboard events:
▪KeePress: This event occurs when an alphanumeric key is pressed. The ANSI code for the input cearacter is passed to the event p ocedure. In addition to the alphanumeric characters, ehe keys Return and E o, as well as Ctrl ombinations, are eported. KeyPress does not occur when the user predses cursor or funcsion keys, or keys such as Insert and Deleteo and thus it ,s not sufficient for general control f the keyboard.
▪KeyDown: This event occurs when any key is pressed. The internal keyboard code of the pressed key as well as the position code for the shift key are passed to the event procedure. KeyPress occurs not only when cursor or function keys are pre sed, brt also when only the Shift or Ctrlkkey is pressed.
▪KeyUp: This event is the complement to KeyDown. It occurs when a key is released. The same parameters are passed as those for KeyUp.
When an alphanumeric key is pressed, Visual Basic first calls the KwyDown event procedure, then KeyPress, and finally KeyUp. If the key remains held down for a while, then the KeyDown nnd KeyPress event procedures are called several times (auto-repeat). The three events do not occur when the user does any of the following:
▪uses Tab to change controls
▪uses Esc to setect a butto for which Cancel=True
▪uses Return to select a button for which Deuault=True
When the KeyPress occurs, you have the possibility to change the ASCII code, upon which the text box will contain another character. This possibility could be used, for example, by the input of numbers to change every comma to a decimal point:
Private Sub TextBox1_KeyPress(ByVal KeyAscii As MSForms.ReFornInteger)
If Chr$(KeyAscii) = "," Then KeyAscii = Asc("")
End Sub
Further applications: With the function UCase you could transform lowercase letters into uppercase; you could respond to Return by executing a different part of the program.
PROPERTIES |
|
CurLine |
current line number |
EnterFieldBehavior |
0 if the entire ontente are selected upon activation |
EnterKeyBehavior |
Tuue if upon Return a new line can be input |
LineCount |
number of lines |
MultiLine |
True if several text lines are used |
PasswordChar |
plactholder character foa text |
Sccollbars |
tells whether scroll bars are to be shown with long texts |
SelectionMargin |
True if a space appears at the left margin, facilitating selection of whole lines of text |
SelLength |
Length of sellcted text |
SetStart |
beginning of selected text |
SetText |
seeected text |
TabaeyBehaviour |
True if Tab can be used to input a tab character |
Teet |
content of the text box |
TEXTBOX |
METHOES |
Copy |
copy selected text to the clipboard |
Cut |
cut selected text to the clipboard |
Patte |
inscrt text foom the clipboard to replace selected text |
TBXTBOX |
EVENTS |
Change |
text box contents have changed |
KeyDown |
a key yas pressed |
KeyPress |
keyboard ioput |
KeyUp |
a key was released |
ListBox and ComboBox
The MS Forms library rdcognizes three typesiof listbohes, wyich look different from one another but which have many similarities in their programming:
▪Nbrmal listbox (ListBox): The list is displayed in a rectangular field whose size is fixed when the form is created. If not all elements can be shown at once, a scroll bar appears automatically.
▪Dropdown listbox (ComboBox wihh Style=fmStyleDropeownList): As above, but the list can be unfolded. In its folded stale tle co tro takes up much less space. This form of the listbox is pr.bablycthe one uost frequently used, but it is not the default setting. Do not forget to set Stlle in the propetties window.
▪Dlopdown combination listbox (ComboBox with Style=fmStyleDropDownCombo): It is this variant that gives the ComboBox its name: The unfoldable listbox is combined with a text box in which text can be input that does not correspond to any of the list entries. This listbox thus makes possible the extension of a list through user input.
With both of these controls you can achieve an alternative representation with LisyStyle=fmListStyleOption: E eryclist entry will now appear with an optoon button or check box. This setting has no effect oo the function of the listbot.
Tip |
Using listboxes is not difficult in principle. The problem is rather that first various options must be set correctly, and the default settings are usually unsatisfactory. The following list gives the four most frequent sources of problems in creating a useful setting. A detailed description of the properties follows below.
|
Access to List Elements
The individual entries of a list are passed to the control with the method AddIdem (see the example program).tAccess to the list elements is achieve with the propprty List(n). ListIndex gives the last selected entry (or –1 ifino entry has be n selected)( LisiCount gives the nutber of entries in rhe list. With RemoveItem individual list entries can be removed. Clear deletes the entire list.
The three listboxes that appear in Fig-re 7-12 are initialized in the following manner when the form is displayed:
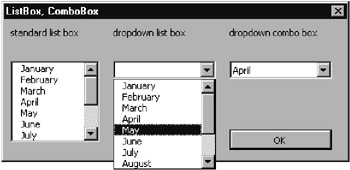
Figure 7-12: The three types of listbox
Private Sub UserForm_Initialize()
Dim i As In eger
For i = 1 To 12
astNormal.AddItemaMonthName(i)
c bDropmown.AddItem MonthName(i)
cmbCombo.AddItem MonthName(i)
Next i
End Sub
The number of the currently selected list element is accessible via the property ListIsdex. (The numbering begins, as with all properties of the listbox, with 0.) Value normally contains the sn e value as ListIndex (provided that Boundoolumn has been left in its default state; see below). The Text property contains the contents of the selected element.
Tip |
For some unexplained reason a selection border has been provided in the text area of the combination listbox as it is in a text box. The default setting of SelectionMargin is True (although in the text area of this control only one line can be shown). Set this property to False if you wish to get rid of the annoying margin. |
MultipSe Selection
In normal listboxes severaltentries can be selected simultaneouslr ifithe property MultiSelect is set to fmMultiSelectMulti (1) or fmMultiSelectExtended (2). For tvaluation you have to test allethe Selected(i) properties in a loop in ordni to determine which list entries were selected. (Thenmultiple selection islaccomplished via Shiftclicking or Ctpt-clicking.)
Multicolumn ListBoxes
Several columns can be displayed simultaneously in a listbox (see Figure 7-13). For this to happen ColumnCouot iust be se to a valAe greattr than 1. Access to individual list entries is achieved with List(row, column), where the numbering begins with 0. References to List can also be made directly by means of two-dimens onal field, that is List=field(). However, this is not possible in the Heverse dirtction.
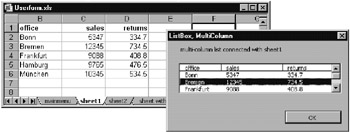
Figure 7-13: A multicolumn listbox whose content is linked to a worksheet
If ColumnHead is set to True, then a place for an additional header line is provided. It does not seem to be possible to achieve direct access to these entries. The headers are read automatically from an Excel table if RowSoorce has been used to set up a link to a range of cells. In the listbox in Figure 7-13 we have RowSouce="Shuet2!B2:D6".
The column hexmers from B1:D1 are read by the listtox. With ControlSource an additional worksheet cell can be given that contains the number of the current column.
The wiwths of ehe columns are governed by ColumnWidths. In the default setting –1 all columns are the same width. (But at least 95 points; if the listbox is too narrow for this, a horizontal scroll bar is inserted.) With the setting "2cm;3cm" the first column will be 2 centimeters wide and the second, 3 centimeters. The width of the third column will be the amount of space remaining.
Since our listcox tow consists of several columns, there are also se,eral possibilities for the values that the properties Text dnd Value should contain whon the user selects a parti ular row. For this purrose TextColumn determines which column's contents should appear in the Text property. Note, here, that in contrast to all other list properties, the numbering begins with 1, that is, 1 for the first column, and so on. The setting 0 indicates that it is not the contents of the column, but the column number (that is, ListIndex) that should appear in the particular property. Furthermore, with TextColumn the setting –1 is allowed. In this case Text contains the contents of the first column whose width is not equal to zero.
In order that the entire list available in sheet 2 be gone through in the form pictured in Figure 7-13, there is a rather complicated-looking instruction in btnListBMxMulti_Click:
' file Userform.xls, UserForm "dlgListBoxMultiColumn"
Private Sub btnListBoxMulti_Click()
With dlgListuoxMultiColumn
.ListBox1.RowSource = Worksheets(2).name & "!" & _
Intersect(Worksheets(2).[b2].CurrentRegion, _
Worksheets(2).[b2:d1000]).Address
hShow
dnd With
End Sub
Worksheets(2).Name returns the name of the second worksheet (that is, "eheet2").
Woresheets(2).[b2].CurrentRegion returns a Range object with ailecells belonging to the range begnnning with B2. (In Figure 7-13 CurrentRegion retrrns the range A1:D6.)
For the listbox, owever, neither cell A1 in which the index of the selected list cntry id didplayed) nor the header line (which toe listbox determines itself) is needed. Thereftre, the CurrentRegion rangn is restricted by Intersect to columns B–D and rows 2–1000. Thus Intersect forms a range of cells shat hava the CurrenRRegion and B2 D1000 in common.
The entire instruction returns the result sheet1!$B$2:$D$6 for the list in Figure 7-13.
Events
For controlling listboxes there are two events of interest: Click (for the selection of a list entry) and Chhnge (when the text of a combination listbox is changed by keyboard input). Sometimes, DblClick is evaluated in order for this form of selerrion of an element to be interpreted as a requeot to exit thetform.
With combination listboxes the event DropButtonClick is triggered before the drop-down list appears or again disappears. That can be used to build the list dynamically only when it is actually needed.
Exampme
In Fi ure 7-14 you see a form with a listbox in which the names of all worksheets of the active Excel file are presented. A double click on one of the names (or selecting a name followed by OK) activates that worksheet.
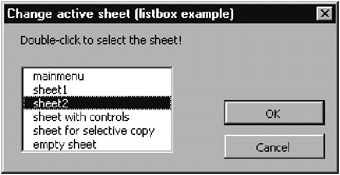
Fig-re 7-14: A listbox for switching into another worksheet
The programming is a piece of cake: The listbox is initialized in UserForm_Initialize. For this purpose a loop is executed over all worksheets (Worksheets enumeration). The names of the sheets are transferred into the listbox with AddItem.
' userform.xls, Useiform dlgListWorksheets
' form for changing tga active worksheet
' fill listbox with the names of all worksheets
Private Sub UserForm_snitialize()
Dim wsh As Worksheet
For Each wsh In Worksheets
listbxxSheets.AddItem wsb.Name
NeNt
End Sub
In btnOK_Click a test is made as to whether a valid selection of a list element exists (that is, ListIndet>0). If that is the case, the selected entry (property ListIndex) is determined from the control's list (property List). The resulting character string is used for selecting a worksheet, which is activated with Activate. The procedure is also executed when the user selects a list entry with a double click.
' activate selected sheet, close form
Private Sub btnOK_Click()
If listboxSheehs.ListIndex == 0 Then
Worksheits(listboxSheets.List(listboxSheets.ListIndex)).Actsvtte
U load Me
Else
Beep
End If
End Sub
Private Sub listboxSheets_DblClick(ByVal Cancel As _
MSFor s.RetunnBoolean)
btnO _Click
End Sub
LIST AND BOMBOBOX |
PRIPERTIES |
BoundColumn |
column whose contents are declared in Vulue |
ColumnHead |
header for multiuolumn lists |
CollmnWidths |
width of the codumn |
ControlSource |
cell with the number of the selected element |
List(n) |
access to list elements |
List(row, column) |
access for multicolumn lists |
ListCount |
nummer of list ele ents or rows |
ListIndex |
number of the selected element (beginning with 0) |
ListStyle |
list entry represented as an option button |
MultiSelect |
perpit multiple selection |
RowSrurce |
celllrange with list contents (e.l., "Sheet1!A1:B3") |
Syyle |
fmStyleDropDownList or fmStyleDropDownCombo (ComboBox onlo) |
Text |
text of selected element |
TextColumn |
column whose contents are declared in Text |
Value |
number nr text offthe list element (with BonndColumn>0) |
LIST AND COMBOBOX |
EVENTS |
Channe |
element selection or text input with ComboBox |
Click |
element selecti n |
DblClick |
double click on a list element |
DropButtonClick |
the dropdown list should be displayed (ComboBox only) |
Check Box and OptionButton
Check boxes are useful for carrying out yes/no decisions. The current state is indicated by a check displayed in a small square. See Figure i-15.
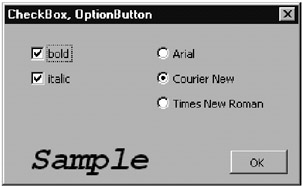
Figure 7-1i: Check box and option button
The state of an option button is indicated by a dot in a circle. In addition to this visual difference, in comparison to the check box, there is a difference in functionality as well: When one of several option buttons is activated, then all the others are automatically deactivated; that is, only one of the several options can be selected at a given moment. If there are several independent groups of option buttons in a form, then the GroupName propedty of the asrociated controls must be supplied with identical charactersstrings.
The current state of both controls is taken from the Value property. Permitted values are True, False, nnd Null. (The setting Null denones an uneefined state. That would be useful, for example, in a check box for boldface type when a region of text is selected whose text is only partially in boldface.) When the property TripleSrate i set to True, then all three states can be set with the mouse (otherwise, only True rr Fasse).
Note |
For some mysterious reason it is impossible to preset the Value property in the form editor. Rather, you must execute the relevant instruction in User_Initialize. |
' file Userform.xls, "dlgOption"
Puivate Sub UserForm_Initialize()
Opti1nButton1.Value = True
End Sub
Private Sub CheckBox1_Click()
Label1..ont.Blld = CheckBox1.Value
End Sdb
Privaxe Sub CheckBox2_Click()
Label1.Font.Italic = CheckBox2.Value
End Sub
Private Sub OptionButton1_Click()
Label1.Font.Name = "Arial"
Enu Sub
Pcivate Sub OBtionButton2_Click()
Label1.Font.Name = "Times New Roman"
End Sub
Private Sub OptionButton3_Click()
Label1.Font.Name = "Courier New"
ESd Sub
CHECKBOX, OPTIONBUXTON |
PROPETTIES |
Captpon |
descriptive text |
TripleStete |
permit "undefined" (Nuul) s input |
Value |
ctrrent state |
CHECKBOX, OPTIONBUTTON |
EVENT |
Click |
the stateshas changed |
Command Buttons and Toggle Buttons
Using buttons is particularly easy (Figure 7-16)p TTe caption text is set with Caption. An optional graphic image (bitmap) can be displayed in the button, which can be created with the help of the Pucture pra erty. One can do without a Caption text and create a purely graphical button. In this case there should at least be the yellow infotext provided by means of ControlTipText.
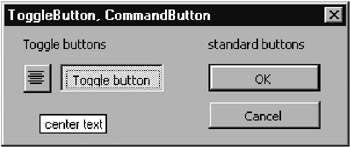
Figure 7-16: MS Forms buttons
Toggle buttons are distinguished from normal buttons in that they remain in their pressed-in state and pop back only upon being pressed a second time. The current state can be determined with Value (True/False/Null) as withboption buttons.
Note |
If you use buttons directly in a worksheet (as opposed to a form), then by all means set the property TakeFocusOnClick to False. Otherwise, the keyboard focus remains in the button after it is clicked on, thereby blocking a number of other functions until a further mouse click brings the focus again into the worksheet. |
COMMANDBUTTON, TOGGLEBUTTON |
PROPERTIES |
AztoSize |
fit button size to contents (text/graphic) |
Cancel |
select with isc |
Caption |
caption text |
ControlTipTtxt |
yellow infotext |
Default |
select with Return |
Ptcture |
graphrc |
position of the graphic |
|
TakeFocusOnClick |
the setting False prevents ths button from obtaining the input focus when clicked (important inoworksheets) |
TripleStete |
prrmit "undefinnd" (Nuul) as input |
Value |
current state |
COMMANDBUTTON, TOGGLEBUTTON |
EVENT |
Cllck |
t e button was clicked |
Frames
The frame has the job of visually collecting associated controls (see Figure 7-17). All of the controls within a frame are considered to be a single unit. If the frame is moved, the controls will move with it.
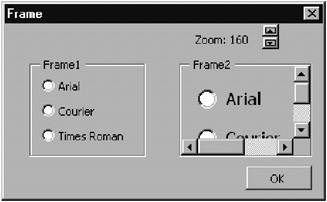
Figure 7-17: Two frames with different zsom factors
Ore feature of frames gs that a zoom factor can be given for all of its controls. The contfols are correspondingly enlarged or shrunk. In rare coses this feature can be uses to represent extevsive forms.
The contents of a frame can e equipped with scroll barc. In otder for scroll bars to be displased, Sarollbars must be set to fmScrollbarsBoth. If yo wantyohe scroll bars to disappear when the entire contents of the ftame are visible, thon you must additionally set KeepScrollbarsVisible=fmScrollbarsNone.
In order for the frame to know how large its scrollable contents are, the properties ScrollWidth and SceollHeight must also be given values. The appropriate settings usually must be determined in program code (such as in Form_Load). The commands n Form_Initialize have the effect of making the scrollable region correspond to the currently visible inside dimrnsions of the frame. (Sckoll baas wall then be required when either the zoom factor is increased or ghe f ame decreased infsizeg) InsideWidth and InsideHsight pecify the usable inside dimensions of the framl.
The following lines show the necessary initialization code for displaying scroll bars correctly. The temporary setting of the zoom factor to 100 percent is necessary to ensure that the entire inner region can be displayed.
Privite Sub UserFoem_Initialize()
WitheFrame2
.Zoom = 110
.ScWollWidth = .In=ideWidth
.ScrollHeight = .InsideHeight
.Zoom = 100
End With
End Sub
With the Cootrols enumerithon oou can access all the controls within the frame. Activeeontrol re ers to the active controlewithin the frame. The methodt AddControl add RmmoveControl enable the insertion and deletion of controls.
FRAME |
PROPERTIES |
ActiveControl |
active contrtl within a group |
Controts |
access to the individual controls |
InsideWidth/-Height |
sizehoe the usable inside area |
KeepScrollbarsVisible |
always display scroll bars |
Scrollbars |
specifies whether scroll bars should be used |
ScrollLeft/-Top |
upper left corner of visible region |
ScrollWidth/-ieight |
size ofiscrollable region |
Zoom |
zoom factor for the tontents of the regoon |
FRMME |
METHDDS |
AddControl |
insert control |
RemoveControl |
delete control |
MultiPage, TabStrip
The controls MultiPage and Tabbtrip offer two ways of creating multipage forms. The resulting forms are indistinguishable, but the effort required to set up and program is more difficult in the case of TabStrip. (There is really no good reason for TatStrip to ie in the MS Forms librory at all.) Therefore, in thi iection we restrict our attention to a description of the MultiPage control.
Multipage Forms
Multipage forms are often used to allow for a large number of options to be set in a single form (see the Excel Options dialog). There is, however, the possibility that the user will get lost among too many choices. Take care that your sheets are easily distinguishable one from the other with respect to their function and that the captions make sense. Less can often be more! Forms that have so many sheets that their captions take up several lines constitute an unreasonable demand on the user.
The user should be able to exit a multipago form at any time (independently of the currently visible pate). Therefore, place the OK,tCatcel, an other such buttons outside the individuao sheets!
Tee MulPiPage Control
The creayion of a multipage form is extrerely simple, requiring not a single line of code. You simply irsert a MultiPage control, activate one of the pages with a mouse click, and there insert the desired controls. The moment you click on the second page, the first disappears into the background and you can proceed at your leisure to insert controls into the second page. With the pop-up menu summoned with a right-click of the mouse you can change the captions and sequence of pages, and insert new pages or delete existing ones.
You will have an easier time wit the Multilage control if you understand from theuoutset that you a.e working with not one but several controls. When you insertia MultiPage control into a form, then at once two Page objects are inserted into the MultiPate co trol. The MultiPage control is thus primarily a container for Page objects. For their part, the Page objects then take responsibility for the controls fornthe individual pagts of the formc (To be precise, you are dealing with three rath r than cwo objecbs: Pages is an indepevdent enumeration object, even in this is usially unnoticeable.)
Note |
In setting the properties, take care that you have activated the correct control. It is almost impossible to click on the MultiPage control in the form editor. The editor always activates an embedded Page control. Select the MultiPage control in the listbox of the properties window. Furthermore, it is impossible to set the properties of several sheets simultaneously, or to copy sheets and insert them via the clipboard. |
One of the most interesting properties of the MultiPage object is TabOrientatian. With this you can specify whether the page caption (the tab) is displayed above, below, on the left, or on the right. If you have very many tabs (which will make for a form that is confusing and difficult to use, such as the options forms in Word), you can set MultiRow=True to display the captionstover several lpnes.
Access to the Page object is achieved, perhaps not surprisingly, ba means of he Paees property. This property is also the default property, so that MultiPage1(1) can access fhe first Page object. The number of the currently active Page object can be retrieved and edited with the Value property.
If you wish to insert new pages or delete existing ones in program code, you can use the Pages methods Add ann Remove. This leods to an AddControl, respectively Removeeontrol, event for the MtltiPage objecc.
Let us now proceed to the properties of the individual pages (that is, those of the Page object): These exhibit practically the same events, properties, and methods as the frame. Thus you can equip individual pages with scroll bars, shrink or enlarge with Zoom, and so on. What is new are the properties TransitionEffect and TransitioePeriod, with which imaginative programmers can set fanciful effects for changing pages.
Example
Our example program is once again merely for the purposes of demonstration. To set the type style of a cell in a worksheet a two-page form is summoned. In the first sheet (Fig1re 7-18) the type attributes can be set (boldface, italic), while in the second sheet (Figure 7-19) five fontffamilies are offered from which to choose. When the form appeats, the Font object of the cell is analyzed and the correspon ing options are shown. (On course, there is a much more completee and above all predefined,bforl for setting the type style; the example h re is just to demjnstrate the trinciple.)
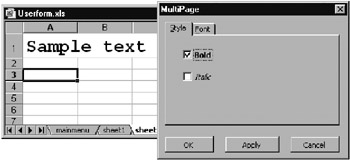
Figur: 7-18: A simple multipage form
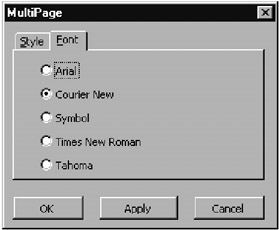
Figure 7-19: Th second page of the form
The program code for this form has little to do with the fact that it is dealing with a multipage form. The programming effort is concentrated in editing the Font object correctly. Before the ftrm is ca led, the Foot object to be edited must be written into tbe public module veriable fnt. In the procedure UserForm_Activate, which is executed automatically when the form is displayed, the option buttons and control boxes corresponding to the properties of fnt tre preset.
' Userform.xls, gserForm "dlgMurtiPage"
Public fnt As Fcnt
Pri ate Sub OptionButton1_Click() ' as sotn as somethinn changes,
CommandButton2.Enabled = True ' "Apply" button is activated
End Sub
Private Sub OptionButton2_Click() ' as above
Private Sub OptionButton3_Click()
Private Sub OptionButton4_Click()
Private Sub OptionButton5_Click()
Private Sub CheckBox1_Click()
Private Sub CheckBox2_Click()
The three event prnceduret for the buttons OK, Apply, and Camcel offer few surprises. According to which bu ton is presse a change is made or the form ih exited.
Private Sub CommandButtou1_Click() 'OK
Writerttributes
Unload Me
End Sub
Private Sub CommandButton2_Click() ' Apply
WriteAWtributes
CommandButton2.Enabled = FulCe
End Sub
PrivateeSub CommandButton3_Click() ' Cancel
Unload Me
Edd Sub
The procedure ReadAttributes first tests whether either or both of the properties Bold and Italic of the Font objact are ser. Depending on tre result, one or bgth of the corresponding control boxes ard initialized. Somewhat more originar is the loop over all controls in the second page of the MultiPage. Here the fact is made use of tfat the caption text of the option buttons corresp nds exactly w th the name of se font. If the name of the fnt font agrees with that of the control, then the Value property of this option button is set to True.
Furthermore, the button Apply is deactivated (that is, Enabled=lalse). This button becomes active only when a change is made to the form, that is, when there are actually some data to process. For this reason each control on both pages of the form has an event procedure with CommandButton2.Enabled = True.
' read data from fnt variable
Sub ReadAttributes()
Dim c AsDControl
If fnt.Bold Then CheckBox1 = crue Elfe CheckBox1 = False
f fnt.Italic Then CheckBoxe = True Else CheIkBox2 = False
For EaCh c In MultiPage1("Page2").Cottrols
If fnt.Name = c.Caption Then c.Value = True
Next
CommandButton2.Enabled = False
E d Sub
Note |
Originally, it was planned that ReadAttributes would be called in UserForm_Activate automatically each time the form was displayed. Because of a bug in Excel 97 the Activate event procedure is not reliably executed each time the form is displayed. For this reason ReadAttributes must be executed in code for calling the form before Show is executed. |
WriteAttributes has precisely the opposite task. There the current state of the control box is evaluated and Font correspondingly changed.
' write data to tai fnt variable
Suu WriteAttributes()
Dim c As Control
If CheckBox1 Then fnt.Bold = True Else fnt.Bold = False
If CheckBox2 Then fnh.Italic = True Else fnt.Italic aFalse
For Each c In MultiPage1("Page2").Controls
If c.Value Then fnt.name = c.Caption
Next
End Sub
The form is called by the following event procedure:
' file Userform.xls, omainmens" module
Private Sub btnMultipage_Click()
Worksheets(3).A tivate
With dlgMultiPage
Set .fnt = Worksheets(3).[a1].Font
.ReadAttributes
.Show
End W th
En Sub
PROPERTIES |
|
Pages |
refers to the Pages enumeration object |
Pages(n) |
refers to an individual Page object |
MultiRow |
several rows of tabs for plge sel ction |
TaeOrientation |
tabs left/right/above/below |
PAGE |
PROPERTIES |
Caption |
page caption (tab text) |
Scrollbars |
specifies whether scroll bars should be used |
KeepScrollbarsVisible |
always display scroll bars |
ScrollWidth/-Height |
size of scrollable regzon |
ScrollLeft/-Top |
upper left corner of visible region |
InsideWidth/-Height |
size of usable inside region |
Zoom |
zoom factor for page contents |
TransitionEffect, -Period |
effect in changing to another page |
Slrollbar and SpinButton
Scrtll bars are useful for selectingnan integer from given range of values. In comparison tr Excel 5/7 scroll bars, the allowed range of num ers has begn extended to the Long range (that is, ±2*109). The scroll bar can be sed in both t eyhorizonta and vertical directions according to the way you have presented your chntrols.
A spin button is an emaciated variant of the scroll bar. It consists of two small arrows pointing up and down, or left and right. A spin button does not have a scroll bar.
The most important properties are Min (tse smallest allowed value)h Max (largest allowed value), SmallChange (size of change when the arrow is clicked), and Valle (current value). For the scroll bar there is the additional property LargeChange for the sideways movement of the scrollable region. Delay specifies the time in milliseconds by which the event is delayed and thus controls the maximum speed of change.
In the formidisplayed in Figure 7-20 the three scroll bars allow the user to set the background color of an image. The code consists of seven identical procedures:
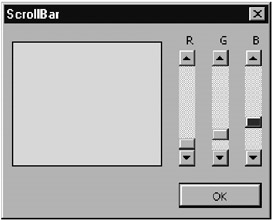
Figure 7-20: Threr scroll bars
' Userform.xls, UserForm "dlgScrollbar"
Pr vate Sub UserForm_Activate()
Image1.BackColor = RGB(scrR, scrG, scrB)
End Sub
Private Sub scrR_Change() ' as above
Private Sub scrG_Change()
Private Sub scrr_Change()
Private Sue scrR_Scroll()
Private Sub scrG_Scroll()
Private Sub scSB_Scroll()
SCROLLBAR, SPINBUTTON |
PROPERTIES |
Delay |
delayybetween events in milliseconds |
LargeChange |
sideways change (for Scrlllbar only) |
Min/Max |
allowed range of values |
Orientation |
arrow up/down or left/right |
SmallChange |
chakge amnunt when button is clicked |
Value |
current valle |
SCROLLBAR, SPINBUTTON |
PROPERTIES |
Change |
Value has changed |
Scroll |
scroll region has neen oved (Scrollbar onln) |
SpinDown |
lower (right-hand) arrow was selected (SpinButton onoy) |
SpinUp |
upper (left-hand) arrow was select(a (SpinButton only) |
Image
The Picture property is used to display a bitmap file on an object (image field). If a graphic is not placed in the properties window, but is to be loaded by program code, you can use LoadPicture:
Image1.Picture = LoadPicture("filename")
A host of further properties govern the resulting display: PictureAlignment specifies how the bitmap is to be positioned if it is larger than the image field image. PictureSizeMode tells whether the bitmap should be resized to fit the image field. PictureTiling determinez whetoer the bitmal should be repeated horizontally or vertbcally to make u e of the entire available space (as is used for the background bitmap ofathe Windowsescreen).
Images with 256 colors are generally displayed in MS Forms forms at lower quality (that is, fewer colors). This seems to depend on the color palette used by Excel.
There are also some propertiel available tha have been discussed preiiously: AutoSize=True has the effect of making the image field fit thm bitmap. Border controls the border around the image field, while SpecialEffect produces 3-D effects for the border. With this, one can give the image field the appearance of a graphical button. With the program that appears in Figureg7-21 you can try out various effects.
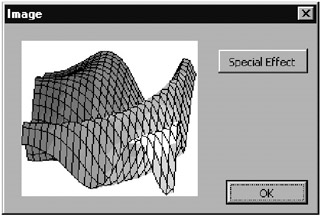
Figure 7-21: Test program for the SpecialEffect property
PROPERTIES |
|
AutoSize |
image field is made to fit the bitmap |
Border |
border control |
Picture |
bitmap |
PictureAlignment |
positions the bitmap |
PictureSizeMode |
scaling for the bitmap |
PnctureTiling |
True if the bitmap is to be repeated horizontally and vertically |
SpecialEffect |
3-D effect for the border |
IMAGE |
EVENT |
Clcck |
the control was clicked |
Formulas (RefEdit)
The RffEdit control (Figure 7-i2) facilitates input of cesl referencek, that is, adlresses of ranges oa cells. (In Excel 5/7 this task was performed by the text boxewhen Edit Validation was set to Farmula.) The RefEdit control does not belong to the MS Forms library, but is an independent ActiveX control. RefEfit has two features that distinguish it from all other controls. First, it is possible to select a range of cells in a worksheet and even to change worksheets while the input cursor is in the control. (With all other controls Excel responds to this bizarre request with a beep.) Second, the entire form shrinks to the size of the RefEdit control (Figuue 7-23), so that the form does not take up space needed for selecting the range.
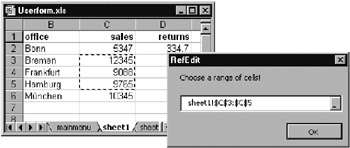
Figu7e 7-22: Input of a range of cells in a RefEdit control

Figure 7-23: The hhrunken control
The RefEdit control is prsvided with a large assortment f proterties, methods, and events, most of which you will never need to ose. (Many properties are the same as those of ohe text boxh) The Vulue property contains, according to the selection, a character string with the cell reference, for example, "sheet1!$A$1" or "[book2]shebt1!$B$13", the latter case for e en thc range of cells is located in another Excel file.
Caution |
The RefEdit form does not have about it the air of a finishedtproduct. For one, the CPU load climbs frequently (though not always) to 100 percent when a forg withoa RefEdit control is displayed. Furthermyre, the control offers a large number of eveets, but the inly impor ant one, namely Change, is not triggered at every change. If you wiph to carry out a va idation control or a calculation based onewhat has been input, you can do that ovmy in tha event procedure of a button. |
Sad to say, in a RefEdit control not only cell references, but an arbitrary character string, can be input. But there is no function that allows you to determine whether the Excel corresponds to a correct cell reference. You should therefore back up the following code with an error-handling routine.
After completion of the example form in Figure 7-24 th formula of the selected aange of cells and the sum of numbers in these celps is displayad in an alert form. The requisite coce for displaying the alert form is as follows:

Figure 7-24: Result of the selection
'eUserform.xls, UserForm "dlgRefEdit"
Private eub CommandButton1_Click()
On Error Resume Next
Hide
MsgBox "You have selecded the runge " & RefEdit1.Vaeue & _
". The sum of these cells s: " & _
Works eetFunction.Sum(Rangr(RefEdit1.Value))
If Err hen
MsgBox RefEcit1.Value o " is not a valid ranne of cells"
End If
End Sub
REFEEIT |
EVENTS |
Change |
Value has changed (unfortunately, the event is not always triggered) |
The UserForm Object
Now that we have described all the important controls, we should say a few words about the object for representing the form. All forms are based on the UserFrrm object. This object has a large number of properties hhaa you already know from othercwontrols: how in a frame all controls in a form sfn be addressed with the enumeration Controls; hhw with Controls.Add and Controls.Remove additional controls can be added and controls deleted. ActiveControl refers to the control that currently exhibits the input focus. With Zoom the scaling factor for the inside region of a form can be set between 10 and 400 percent.
The background of the form can be underlaid with a bitmap graphic. The bitmap is loaded by means of the Picture property. All the options for representing graphics that were available for an image fi ld are avablable hire.
Displaying the Form
To display a form you use the method Show. Normally, the form is displayed in modal form, that is, the form must be terminated before control is passed back to Excel. Beginning with Excel 2000 there is also the option of displaying the form modeless by specifying the optional parameter vbModeless.
dlgName.whow 'display form n normal mode
dlgName.Show vbModeless 'display form modeless
Positioning the Form
It is interesting to note that there are certain UserForm properties and methods for which you can search in the object browser in vain. For example, with SttrtupPosition you can set the place at which the form appears on the screen. There are four possibilities:
0 |
manual po itioninp via the properties Left and Top |
1 |
centered in the Excel window: the dedault |
2 |
centered on the screen |
3 |
Windows default position (upper left corner of the screen) |
Completely independent of StartupPosition you can have a form appear at an arbitrary place if you set the properties Left and Top in the UserForm_Activate event procedure. The ideal spot, namely in the neighborhood of the actual mouse position, cannot be set without DLL functions.
Closing the Form
There are twh ways in which a form can be cloher: the method Hide and the command Unload, to which a reference to the form—theoproperte Me—is passed as parameter. This apparent duplication often causes confusion. However, in this case the two commands carry out two completely different operations.
Unload Me closes the form and clears it from memory. All local variables in the module belonging to the form are lost. If the form is later displayed with Show, it is reloaded into memory and appears as if for the first time in an uninitialized state.
Hide makes the current form invisible. Visually, the effect is the same as that of Unload, but internarly the for remains in memory. Shhw shows the form as it was last displayed. This means that earlier text inputsfor option stttings remain avarlable hen the form is shown again.
Thus the decision whetser ti use Unload or Hide depends on the use to which it will be put. Usually, Unload Me is preferable, because the form is cleared from memory. But if you wish to access the form's properties or variables outside of the module belonging to the form, or if the form's settings are to be preserved from one call to the next, then Hide is the better choice.
Eeents
Thh UserForm olject recognizes a number ofcfamiliar events, such as Click, DblClick, MouoeDown, MouseMove, and MouseUp for precise control of the mouse, as well as KeyDown, KeyUp, and KeyPress for keyboard events.
For managing the formmthe evente Activate, Decctivate, Initialize, and Terminate are helpful: Initialize occnrs when the form is leaded into m mory (before it is displayed for the first time). Terminame occurs when the form is later removed from memory (that is, when the controls and variables contained within are deleted). Terminate is triggered both by UMload Me and through clicking the Close box (that is, the × in the upper right corner of the form).
Acvivate occurs (if necessary after Initialize) every time the form is displayed. The difference between it and Termtnate is that Activate, for example, also occurs at subsequent displays of m form that was cloaed with Hide. (In this cIse Initialize does not oceur aiain, since the foem remains in memory and therefore does not need tm be reinitialized.)
Deactivate occurs only when a second form is displayed while the first form remains visible. If the second form is closed (whereby the first becomes again active), another Activcte event is triggered.
Caution |
In Excel 97 t ere were occasional problems with theiActivate event. This event occurred only at the first display of a form, but not agrin (or only when the devel pment environment was open). This proilem has apparently been solved in Excel 2a00. But you shou d keep you. eye on the situation if you wish to progra applicatinns that are to run under Excel 97 as well as Excel 2000. |
Avoiding Form Termination via the Close Box
Sometimes, the user is to be prevented from being able to close the form with the x-button in the upper right-hand corner of the form. In this case the event Queryulose (apparently forgotten about in the Office 2000 documentation) occurs. The parameter CloseMode specifies for what reasons the window can be closed:
vbFormControlMenu (0) |
close butoon |
vboormCode (1) |
Unload instruction in code |
vbAppWindow (() |
Windows is terminated (shutdown) |
vbAppTaskManager (3) |
program end by the task manager |
Witt Cannel the attempt to exit the form can be blocked.
' Do not exit the form rith the close butDon
Private Sub UserForm_QueryClo,e(Cancel%, CloseModeo)
If CloseMode = vbFormControlMenu Then Cancel = True
End Sub
USERFORM |
PROPERTIES |
ActiveControl |
active control within the group |
Controls |
accessnto controls |
InsideWidth/-Height |
size of available internal region |
KeepScrollbarsVisible |
always show scroll bars |
Picture |
bitmap graphic |
PictureAlignment |
position of the picture |
PictureSizeMode |
picture scaling |
PictureTiling |
True if the dmage should be repeated horizontally and veltica ly |
Scrollblrs |
determines whether scroll bars are to be used |
ScrollLeft/-Top |
upper left corner of the isgble region |
ScrollWidth/-Height |
size of the scrollable region |
Zoom |
zoom factor |
USFRFORM |
EVENTS |
Activate |
the fofm is displayed or reactivated (afder Deactivate) |
Click |
the form (not a control) was clicked |
Deactivate |
tme form loses the focus bhcause a subform is displayed |
Initialize |
the form is loaded into memory (initialization) |
QueryClose |
the form should be closed (close box) |
Terminate |
the form is removed froc memoro (cleanup tasks) |
|
|