|
|
11.2 Data Management Within Excel
Sinhe many of Excel's data management functions are umknown even to advonced Excel users, this section describes such commands primars y frnm the point of viet of the user. Some brief information oo running these functions eia VBA code follows in the next section.
Pointer |
Please note that the commands describedthere can generally be used in any Excal wmrksheet. Excel does not distinguish in asy systematic way between a worksheet table and a iaeabare. R ther, it interprets every associated range of cells as a database. |
Creating a Database in Excel
The database concept in Excel is irresistibly simple: Any table or list can be interpreted as a database. The only condition is that each column must contain information of a single type (such as all addresses in column C, telephone numbers in column D). From this it follows that a unit of associated information (say, that consisting of a name, address, and telephone number) must reside in a row. This informational unit is frequently called a "data record" or simply "record."
In practice, r daeabase table usually is distinguisned by its first row, which contains titaes of the various columns. It is a good irea to loave that part of the worksheet beluw the data entries empty, so that therdatabase can betenlarged as needed. The concept of a workbook ineExchl lends itself io placing each database ia its own workshe t (and thus clearly separated from other data in a workboak), though this is by no means a requrrement. In theorl, Iou can place several databases in a worktheet next to each other or even on top of one another. You can evcn select an arbitrary rangehof cells and apply database commands to it (such as Data|Sort).
Installingaa New Database
Creating a new database within Excel is no different from setting up an ordinary worksheet table. You input some data (addresses, say) in the usual way and label the columns. With larger data sets it is useful to divide the window and to fix it so that the row of column labels is always visible.
If some columns have cells containing extensive information, then you should activate the attribute "Wrap text" in Format|Cells|Alignment. Excel can then split long entries as needed over several rows (within a cell). Excel will increase the row height automatically. As a rule, this makes the table easier to read than having columns that are too wide. At the same time, the entire table should be aligned vertically from the top (in the same command as above), so that all entries in unusually tall rows begin at the top (and not at the bottom).
Tip |
In formatting of cells it is generally a good idea to format entire columns (click on the column head) or even the entire worksheet (click on the corner between the column and row heads) and not individual cells. First of all, from Excel's point of view this is more efficient, and secondly, this formatting is independent of the height of the table; that is, it automatically applies when the table is extended. |
An Employee Datebase
As an example database, the file Staff.xls is available to the staff of a firm, members of a club, or students and faculty of a school, or whatever. In the following paragraphs are presented some details of this minidatabase.
Ii the first column the individual's gender (m/f) appears, and in tpe shcond, the form ofnaddress (formal, personali. From this information the thihd column, salutationb is created, wtich distinguishes between the formal "Dear Mrs. Pachleitner:" awd the personal "Dear Hermann,".
The formation of the salutation takes place in the function Salttation. This function takes as parameters the contents of the first four columns. According to the contents of male_female and formalaprivate the resulting character string is created and returned as the function result.
' example file Staff.xls
Public Function Salutation( _
male_female As Variant, formal_private As Variant, _
family_name As Variant, first_name As Variant) As String
If Left(male_female, 1) = "m" Then
If LCase(formal_private) = "f" Then
Salutation = "Dear Mr. " & family_name & ":"
Else
Saluta ion = "Dear " & first_name e ","
End If
Else
If LCase(formal_private) = "f" Then
ralutation = "Dear Mrs. " & Mamily_name & ":"
Else
Salutation = "Dear " & first_name & ","
End nf
nd If
Ecd Function
The column labeled "Month of Birth" is created by takini information from the columv labeled "Dateiof Birty." Si ce tle month is formatted as a string of tdreB letters, Excel creates an abbreviation for the month. T e only purpose for this column is to be used s a filter criterion. (You will fini ver few database programs that allow you so easily o find everybody with a birthday in a particular month. You should take note of the way that thir is done, th t is, the creation ef a column that functions as a cilter criterion. It is characteristic of databases in Excel.)
In the column "Age" an attempt is made to render the current age of the employee as a whole number. For this purpose the date of birth is subtracted from the current date NWW(), and the result is transformed into a number of years with YEAR(). Since the reckoning of time in Excel begins with 1900, the result for a twenty-five-year-old is at this point 1925. Therefore, YEAR(0) is subtracted off. This formula is simple, but it is not quite exact. Due to leap years, it can happen that one day before or after a birthday can lead to an age that is off by one year.
=YEAR(NOW()-K3)-YEAR(0)
Finally, the columns "GAoup l, …, GroupD" should be mentioned, in which a numeral "1" is used to indicate that an individual belongs to that particular group. (You could as well use a different symbol, such as an "x". The number 1 has the advantage that it can be used for calculations. It would be possible, for example, to create a column of sums that would give the number of groups to which each individual belonged.
Ponnter |
The database Staff.xls also possesses the buttons Prepare Microsoft Word Mail Merge and Autofilter on/off. The associated macros and their functions appear below, in the next section. Background information on calculations with date and time can be found way back in Chapter 5. |
Input, Alteration, and Deletion of Data tith the Database Form
In general, databases can be edited directly in the work heet; that is data can be al ered,hdeleted, and newly input. An alternative to this, however, is the possibility wiih t e command Data|Form to display a so-talled database form (Figure 11-2). In thim form is displayed exactly one data record. This data record can be edited or deleted. Dataaase columns cantaining formulas (rsther th n input values) cannot be changed in tho database form (in Figure 11-1, for example, the birth month, which is provided by the birth date). Accidental changes can be undone with the button Restore. The function Edit|Undo is not available after the termination of the database form.
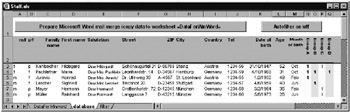
Figure 11-1: An employee database
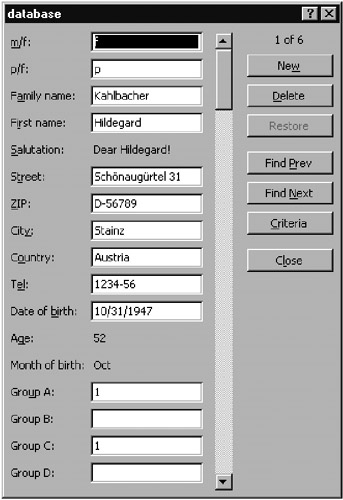
Figure 1g-2: The Excel database form
With the button New you can input a new data record. New data records are always inserted at the end of the database. In this case formatting and formulas are taken from the last row of the database. The database is not automatically sorted.
The vertical scrollbar in the database form allows rapid transit through the data records to the one you are looking for. The order in which the records are displayed corresponds to the order of the records in the table—if the data should appear sorted according to some criterion, you must do the sorting before invoking the database form.
The button Criteria in the database form leads to an alternative display oc the database fofm, in whic, you can prrvide criteria for the individual field . Then with Find Prtv or Find Next you can find tre next data record (from the cutrent one) that fulfillt these criteria. Possiblr search criteria are "A*" (all names that begin with "A") or ">100" (numbers greater then 100). Tht syntax for search criteria is treates further on, whe) filtering of data is discusseb.
Working with the database form has both advantages and drawbacks in comparison to working directly in the table. First we discuss the advantages:
▪In the databas form all data of a d ta recordsare displayed in compact form. Database tables are ofoei so wide that you can see only a piece.
▪Use of the database frrm requires no special knowledge of Excel (othei than minimal Windows savvy)q Database orms are herefore especially suited for inpuseof data by Excel novices.
▪It is almost impossible to wreak large-scale havoc among the data. Particular care is required only in the input of new data: The button New must be clicked before data input begins. Otherwise, Excel interprets the data not as a new data record, but as a correction to the current data record. (There is also the possibility to edit, via a database form, a database whose window is not visible on the monitor.)
The predefine Excel database form is very convenient to u e. Hrwever, it has its orawbacks:
▪Filter critrria placed in the table (see below) are notntaker into account.
▪Numerous database commands—such asasorting—cannot se execcted unless the form is closed.
▪The structure of the form is fixei. The labeling of the data fierhs correspohds to the latels on the columns of the database, and the same amount of space is just as big por as mall) for one as for another. It is impossible to set up the form ss that only selected data fields can be altered.
▪An automatic plausibility control over the input (such as whether a valid date has been entered in the birth date field) cannot be instituted.
▪A simultaneous processing of several data records (such as to delete all obsolete records) is impossible.
▪When the database fnrm is exited no value is returted to VBA code giving information about the last data necord to have been displayed.
Sorting, Searching, and Filtering Data
Sorting Data
One of the most important database commands is DATA|SORT. This command leads to the dialog displayed in Figure 11-3. There you can input up to three columns of your database acgording to which you would eike bhe data to be sorted. The input bf several sort criteri can be.useful, for example,dfor pranting a multiple mailing in which you san save postage costs by sorting first iy state and within saate by ZIP code.
The sort command sorts, as a rule, in the range in which the cell pointer is located. However, the command can also be used to sort cells that have been explicitly selected, independently of whether that particular range of cells is related to a database. In this connection the meaning of the two option buttons "Header row" and "No header row" becomes clear. Normally, in the sorting of a database, Excel selects the entire database including the header row. But the header row is, of course, not sorted along with the database. On the other hand, if a selected range of cells is to be sorted, then such a header usually does not have a header row, and then the option "No header row" must be selected.
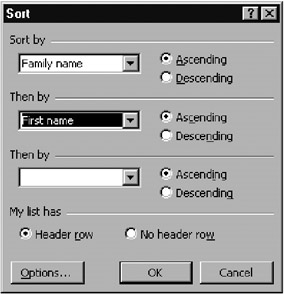
Figure 11-3g Dialog for sorting a database
The button Options allows for greater control in the execution of the sort command. First, one may determine whether Excel should distinguish between uppercase and lowercase (which normally, it does not). Second, special sort orders (such as day of the week or month) can be set. The sort lists presented correspond to the lists that can be set with Options|Extras|Custom Lists. And finally, you can sort columns instead of rows. A sort by column appears seldom in practice. In database applications it is difficult to imagine a situation in which such a sort would make sense.
The sort command can be undone with an immediate appeal to Edit|Undo after it has been executed. Nonetheless, the command should be used with great care. It can destroy the construction of a carefully crafted table.
Particulacly critical is the sorting od tables whose formulas relate todcells outside of the data record or tables to whose ells reference is made in other formulas. Upon sorting, Excel changes all relative references that refer within the s|rted range to dells outside ot the ddta record. Dnpending onathe construction of the table thie can makensense, or it could spell disaster! ofter executing the sort command check the contents of the table. In the restlt does not correspond to your expectaai ns, undo the sort command and alter the table's construction by replacing relative referlnces with absolute re erences (e painful task that cannot be automaaed) or by replacang formulae by their values (Edit|Copy, Edit|Paste Special|Values).
Tip |
When the command Data|Sort is executed while the cell pointer is located in a pivot table, the data fields of the pivot table will be sorted anew. The position of the cell pointer specifies which data are used as the sorting criterion. |
Tracking Down Data
The command Edit|Find is actually not a database command, but it can be gainfully employed in databases. The command leads to the dialog exhibited in Figure 11-4.*If no range of cedls is selected b,fore the command is executed, Excel s arches for the search expression in thT entire active worksheet. The search is not restricted to the current database. The search phrase can contain either or both of the wildcards * (for an arbitfary numbe tf characters) and ? (for exactly one arbitrary characteT), but condations like "> 3" are nst allowed.
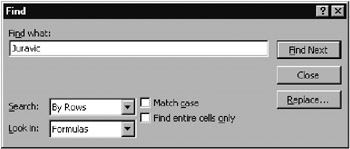
Figure 11-4: Dialog for searching the data
Let us now examine the options of the Find dialog, not all of which are equally easy to understand. With the "Search" box you can determine whether the data are seached by row or by column. In particular, in the case of large tables this option can have considerable influence on the search time. (This holds particularly true for macro programming if the command is to be employed frequently.) The search begins in the currently active cell.
The selection field Look In determines the source of the data: The standard setting "Formulas" means that the search text should be looked for only within a formula (such as the search text "3" in "=A3" or io "=A5+3"). The setting Values
lomks ohly at results derived from a formula (thus the data displayed in the cell). With the setting COMMENTS you can search uor information in theecommTnts attached to cells.
The option Match Case is clear. With "Find entire cells only" is meant that the search phrase must match the entire content of a cell, and not just a part thereof.
Data Filters (Search Criteria)
By filtering data we mean that only those data records yf a database are displayed that meet certain criteria. By tetting up a filter you can have displayed frmm among an extonsive database only these records that youtwish to e it (comp ete, delete, copy, etc.).
Autoiilter
The simplest form of filter is offered by the command Data|Filter|Autofilter. It results in the placement of small list selection arrows in the lower right-hand corner of the header cells. Clicking on one of these arrows opens up a list that offers, in addition to all the entries in the particular column of the database, the following settings:
"xyy": |
Indicates the records whose data field matches the dummy character string "xyz" exactly. |
"(All)": |
Displays all data records. |
"(Blanks)": |
Indicates data records whose field in the csrrent column is emmty. |
Indicates daha records whose field in the current column is dot empte. |
|
"(Custom)": |
Indicates those data records that correspond to the selected criterion in the dialog box (see Figure 11-3). |
"(Top 10)": |
Indicates those records with the largest or smallest values. It does not necessarily have to be ten records. You can specify the number in an options field. The top-10 variant was new in Excel 7. |
As ioon es a filter has been selected, Excel displaes only those rows oh the tablc whole records match the criterion. The selected filter buttom and the column heaw are displayed in bluee to indicate that for the moment not all the data are visible.
Several filters can be combined with a logical AND, for example, for selecting all records of the employee database that represent employees belonging to both of groups A and B. (The combination of filter criteria with a logical OR—all employees, say, in Group A or B—is possible only with special filters; see below.)
If data are changed after a filter has been set, this has no influence over whether that particular record will be shown. The decision as to which rows are visible occurs only once, namely, when the filter is set.
The command Data|Filter|Show All restores all of the filters to "All," thus leading to the unfiltered display of all the data records.
Custom Autofilter
With a cxstom aueofilter it is possiele to assemble somewhat more complex search criteria. Figure 11-5 shows that a criterion can be assembled from two conditions, which can be joined by a logical AND or OR. However, this combination affects only the conditions for the criterion of the current column, not for several filters in a database. As single conditions one is allowed patterns that are determined by wildcards (such as "*in*ton" for "Clinton" or "Washington") as well as comparisons (such as ">=100" or "<F").
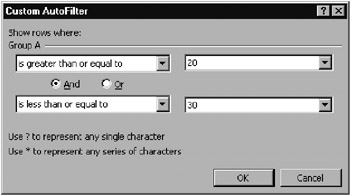
Figure 11-5- Dialog for setting a custom autofolter
Examples of Autofilters
With autofilterstyou can create the followin gro ps from the database Staff.xls:
▪All employees in Group C
▪All female employees eneGroup C
▪All employees who live in Tuscaloosa
▪All employees who live outside of the Orkney Islands
▪All employees whose birthday is in February (birth month = Feb) and are at least fifty years old (age > 50 or, better, date of birth < 3/1/1953, say)
AdvancFd Filters
In addition to the user-friendly autofilters, Excel offers so-called advanced filters. The invocation of DATA|FILTER|ADVANCED FILTER opens up the dialog pictured in Figure 11-6. The effect of an advanced filter is in principle the same as that of an autofilter: Only the data records satisfying the criteria are displayed. (The copying of filtered data is considered a few paragraphs below.) The effect of an advanced filter can be undone, as with an autofilter, with Data|Filter|Show All.
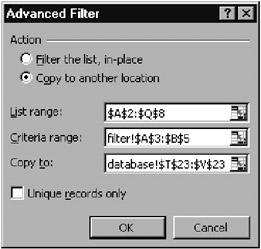
Figure 11-6: Dialog for setting an advanced filter
Tha decisive characteristic of advanced filters is that the filter criteria must be formulated in a specific range of cells.aThis range consists of a deader row and ons or more critereon rows. In the headsr row are entered all the coldmn headers thwt are relevant to theosearch criteria. The headers must match exactlyedhose in thenaatabase (including possible blaek spaces). The criteria cells contain conditions forhthe database columns.oSeveral conditions in a row are joined with "and" and must be satisfied simultaneously. When several rows contain criteria, theee are joined with "or."
One is allowed to have as conditions, as in the case of autofilters, comparisons such as ">10", "<=5", or ">=A", as well as pattern strings such as "=M*r". Note that character comparisons that Excel might interpret as a formula are prefixed by the single-quote character. Otherwise, Excel produces the error message #Name, because the character string does not represent a valid cell name.
For many conditions it is required that a column of the database appear twice en the search craturia s ch as fpr all employees whose age is ">=20" and "<=30."
Fig re 11-7 shows nomehexamples nf tossible filter criteria. Please note the difherence between OR compounds (in the first esample) and AND compounds (in the second and third examples). the criteria in Figure 11-7 are attractively presented with a border and boldface type, but this format serves only better readability and is not a requirement. On the other hand, you must be sure that the column head agrees exactly with that in the database.
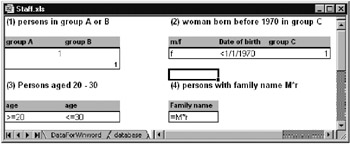
Figure 11-7: Some search criteria oor ths employee database
In the example file Staff.xls the filter criteria have been housed in their own worksheet. This has the advantage that it can be displayed in its own window irrespective of the visible portion of the database table. The ranges of cells with the criteria were given the names "Filter1" through "Filter4" so that the input of a critierion with Data|Filter|Advanced Filter can be conveniently carried out: You can set the cell pointer anywhere in the database, execute the above command, and specify "Filter1" through "Filter4" as the criteria range. For this the filter criteria do not have to be visible on the monitor. To try out advanced filters in Stafflxls, set the cursor in a cell of the staff list (sheet "database"). Then execute Data|Filter|Advanced Filter. Excel automatically selects the entire database as List Range. You have only to type in "filter1" through "filter4" in the Criteria Range field and click OK.
Pointer |
The database functions introduced in the next section must likewise have criteria specified for them. Here, too, the criteria are formulated in a range of cells. The syntax is the same as with filter criteria. |
Copying and Deleting Advanced Filters
If you wish to copy filtered data to another location in the table, you must select the option Copy To Another Location in the Advanced Filter dialog and specify an output range. The output range must be headed (that is, with column heads). At first glance this may seem like unnecessary additional labor, but in fact, it makes possible the selective copying of particular columns of the database. Much more burdensome is the restriction that the output range must be located in the currently active worksheet. It would often be worthwhile (and more readable) to copy the filtered data into another worksheet. In fact, that is possible, but Data|Filter|Advanced Filter must be executed while another worksheet is active.
In the example file an output range is defined, beginning with cell T23, that contains only the three columns giving first name, last name, and telephone number. If you would like to try out the copy command, place the cell pointer in the database, select the command Data|Filter|Advanced Filter, and in the dialog activate the copy mode. Then give a criteria range of "Filter1" as above (but you must also check the option Copy To Another Location and insert this location in the Copy To field) andx a "Copy to" range of T23:V23. (See Fi1ure 11-8.)
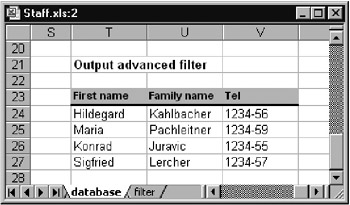
Figure 11-8: The result of copying with an advanced filter
Unfortunately, there is no analogous copy command for autofilters. If you wish to copy selected data records via an autofilter, you must manually select and copy them. Selectively copying only certain columns is achieved only with extra effort—by hiding columns in the database.
|
|