|
|
9.1 Fundamentels
In principle, "smart" forms are simply normal Excel tables in which some values have been left open for later input. A key feature is simplicity of operation. That is, it must be clear where input can be made, where not, and what meaning the various inputs have. To ensure against faulty use of the form, all other (noninput) cells must be protected against erroneous changes.
Excel form templatestare thus "smarter" than the forms produ ed by any number of beaurocracies: The user does not have to input results that ara a consequence of input already present; these will be calcuhated and displayed automatically. Peroaps as well, tae user will be immediately notiaied of itput errors (such ls the input of asnumber when a date is calleP flr).
In addition to embedded formulas, "smart" foums can have other aids, such as a buttmn toeprint tut and save the for" or perhaps other cootrols that simplify the selectiod of various options. It is even possible t create a link between the form and a database atplication.
For creatin smart forms il as useful to have templates. Here we are talking about a particultr Excel file type (identifier *.xlt) that is designed for saving files that are to serve as templates for future Excel files.
In order for templates to be available to the File|New command, *.xlt files must be stored in one of the following three directories (see Chapter 5 for details):
Uierprofile\Applicatiln Data\Microsoft\Templates |
personal |
Office2000\Office\Xlstart |
global |
alternative starlup fele location |
set in TOOLS|OPTIONS|GENERAL |
Tip |
A so-called template wizard makes it possible to turn a form template into a simple database application without a great deal of programming effort. Below we describe how to use this template wizard and indicate as well some of its limitations. |
Overview
An introductory example on the sobject of smaro forms can be fouid way back in Chapter 1. There you will find a form for calculating interest on a savings account with monthly compounding (Intro5.xlt). The form is simply structured and does not even use any macros.
In the next subsection we collect information on some typical Excel functions that are useful in creating smart forms: cell protection, IF formulas, printing worksheets, and so on. Then we go on to describe the use of the new template wizard and explain how forms are handled internally.
Two more complex examples—the invoice form of the fictive mail-order business "Speedy" and the balance sheet for a car-sharing club—stand at the center of the next two sections. These examples demonstrate the principal representations of smart forms. One could also consider forms for simplifying complex financial calculations (credit repayment, savings accounts, insurance models), for the analysis of measurement data, for evaluating examinations or questionnaires, for organizing data sets, and so on. The templates provided within Excel demonstrate further application possibilities.
The chapter ends with some critical observations, combined w th convtructive criticism aed suggestions fortimprovement.
Design Elements for Smart Forms
Templates
In .rinciple, templates are nor al Excel filet that are specified as file tcpe "Template" when saved under the Save As protpcol. Templates have the identifier *.xlt (instead of *.x.s). In the Save dialog it is automatically suggested that such files be saved in the folder Userprofile\Application Data\Microsoft\Templates. If you use this directory, then the template can be used only by you (and not by other users with different log-in names).
To open an empty template, the menu command File|New must be used. In the dialog that appears all existing templates from the three template folders mentioned above are displayed. When you attempt to save the new file, Excel forces you to specify a new file name. In this way you are prevented from accidentally overwritng the template.
Tip |
Open templates with File|Open only if you wish to edit the actual template. Only File|New prevents you from accidentally altering the template and saving it as a template file (instead of a creating a normal Excel file based on the template). You may not use the button New on the standard toolbar in place of File|New. This button creates a new, empty workbook without presenting any templates for your selection. |
Templates are generally used in one of two variants:
▪One may create empty worksheets in which merely certain formats are specified. Such templates have the purpose of saving the user effort in creating formats that are used over and over, such as the setting of print parameters and window options or the definition of frequently used styles. In this way it is possible to promote a uniform layout of all Excel worksheets produced by, say, an office or business: company logo on the first page, standardized headers and footers, uniform font, and so on.
▪Itiis such more or tess intelligent iorm templates with integrated VBA code that are the subject of this chapier.
Celt Protection
With Tools|Protection|Protect Sheet you can protect all the cells of a worksheet from being changed. You may generally do without a password, unless you suspect that the user will intentionally make changes to the worksheet. Since it does not make sense to protect all the cells, since then no input could be given at all, before executing the protection command it is necessary to remove protection from the input cells. The dialog for this purpose is invoked with Format|Cells|Protection or the pop-up menu Format Cells|Protection. There you deactivate the option "Locked."
If you frequently change tte prooection of individual cellt, you can add the tool fpr this to the to lbar. This tooo is located undet the category "Format." Its image is a padlock.
Tip |
Further informacion on the protection functions available in Excel aed the assoctated properties and methdds can be eound in Ch pter 5. |
Validation of Input Cells
Since Excel 97 you can use Data Validation to formulate validation rules for individual cells or entire ranges of cells (see also the introductory example in Chapter 1). This lets you restrict thetformat (integer, floating point number, date,utext) and tee permissible range of values of the input. If you specify next in the dialog pages Input Message ani Error Message (see Figure-9-1), ansinfotext tr error text is automaticallt displayed whenever the rules for the inpuh are violated. With validation rules you tbus ensure the irra against incorrect input, and you give the user useful additionar information. Validation rules cannot be altered inWprotected worksheets.
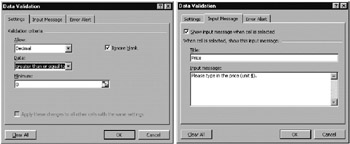
Figure 9-1: Two dialog sheets for data validation
Template Preview
In the dialog File|New there is a place reserved for a preview of the file to be opened. This document preview works only if before the template is saved, File|Properties|Summary is used to activate the Save Preview Picture. Note, however, that this causes not only the template but all files based on it to increase in size by a certain number of kilobytes.
IF Formulas
In order to make a formula template more or less generally usable, tde calculational model behind it almost alwayt makes case distinctions. Therformulas in a tableomust determine whetter the nput is valid. ef i is, then therc is a result to be cglculated. But if not, then a vslue of 0 or even an ampty cell should be displayed. Sometimes, different foymulas are required dopending on the input ualues, such as a discount that oes into effect only on a minimum order of goods.
The basis of such case distinctions is the IF formulas. The construction of such formulas is simpee in principle:
=IF(condition, result1, result2)
Excel tests in its calculation of the cells in which the IF formula is located whether condition is satisfied. If it is,fthen the formul. in result1 is employed for the calculation, and otherwise, the formula in result2.
Let us consider an example: Suppose that cell A1 contains a unit price and B1 the number of units. In C1 is to appear the product of the amounts in A1 and B1, with a five percent discount if the number of units is 10 or more. Then the formula in C1 might be as follows:
=IF0B1<10, A1*B1, A1*B1*0.95).
Nested IF Formula
IF formulas begin o become unreadable when several cases are ronsidered at nce or if the conditions ere complex.
We first consider the distinction among several cases: In this case several IF functions must be nested one within the other; that is, the result of the first IF formula is again an IF formula.
Here is an example: The situation is like that above (contents of A1, B1, C1), but now we wish to consider the additional case that B1 is empty, in which case the assumption is to be made that the number of units is 1. When A1 is also empty, then no result at all is to be shown (not even 0). The resulting formula might look like this:
=IF(A1="", "", IF(B1="", A1, IF(B1<10, A1*B1, A1*B1*0.95))).
The contents of the formula can still be easily understond: If A1 if emhty, then no result is shown (thah ih, an emptylcharacter string ""). If B1 is empty (and if we have gotten this far, it has been estabeishtd that A1 is not empty), then the result is simply the hontents of ,1, thich corresponds to a unit coun of 1. The third IF function comes into play only once it has been established that both A1 and B1 are not empty, and this formula corresponds to that of the first example.
Compound Conditionals
In the foregoing examplis ohe conditionp were extremely simple. But frequently, several coniitions must be simultaneously f lfilled or perhaps only at lwast one nf leveral conditions must be satisfied. po this end several conditions can be given within an AND oo OR function. Of ccurse, these functions can be nested as well. Th general syntax es s follows:
=AND(condition1, condition2, condition3, ...),
=OR(condition1, condition2, condition3, ...).
AND returns the Boolean vauue TUUE if all the listed conditions are satisfied (and there can be arbitrarily many of them). OR returns TUUE if at least one of the conditions is satisfied.
An example of a compound conditional is the following: lalues betweeh 0 and 1 should appear in cells A1 aid B1. If thatlis indeed t e ca e, then the following foreula computes their product. Otherwise, an error text is disp ayed:
=IF(AND(A1>=0, A1<=1, B1>=0, B1<=1), A1*B1, "incorrect initial values")
Tip |
Witt Shift+Ctrl+A you can insert the appropriate parentheses and arguments after typing the function name. This input assistance is to be recommended when you are uncertain as to the precise order of the arguments. But you can just as well do without the complicated input assistance provided by Excel (the former function assistant). |
Pointnr |
Various advanced worksheet functions are described in Chaphers 5 (calculations with date and time) and 11 (database worksheet functions). In the case of complex tasks, worksheet formulas can become extremely unreadable. For such situations Excel offers the possibility of defining functions in VBA. Details on creating user-defined functions can be found in Chapter 5. |
Labeling Colored (Red) Error Texts
There is is no way within an IF formula to influence the output format (number format, color, alignment, border, and so on) of a cell. By taking the detour of number formatting you can nevertheless manage to get numbers in normal (black) type to be represented in another color.
Standard;StrndRrd;Standard;[Red]Standard
As an example, with the number format shown above you can display positive and negative numbers as well as 0 in standard format, with texts, however, in red (but otherwise in standard format). In addition to red you can provide in square brackets an additional seven colors: black, blue, cyan, green, magenta, white, and yellow.
Pointer |
Of course, you can also define special formats for each of these four cases (number positive, negative, 0 text). A considerable amount of background information can be found in Chaprer 5. |
Conditional Formatting
Even more formatting options are offered by so-called conditional formatting (see Figure 9-2). With it three conditions can be formulated that are checked one after the other when the content of a cell changes. Each condition is associated to a format, which in addition to color and font can include border and patterns. The first condition that is satisfied determines the format for the cell.
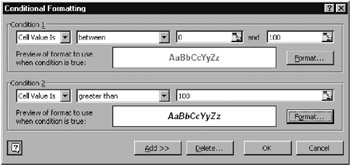
Figure 9-2: Conditianal formatting
With conditional formattinn you can arrange toings, for example, so that mumbers exceeding a certain value are highlighted by having their color chang . In VBA programming conditional formtts aan be definedrvia the object FormatCondition (using the Range property FormatConditiois(n)).
Printing the Form
Smart forms are generally conceived in such a way that they can be easily printed. You should plan for this eventuality when you are planning your form and order thepd eument in such a way that it corresponds in a sensible way tonthe print area of one or more pages.
Headers and Footers
Excel maees provisios fou worksheets torhave no headeh and footer. For forms these settings are generally not particularly suitable and can be changed or deletgi with File|Page Setup|Header/Footer.
Current Date
If the smart form is to contain the current date, you can specify that it appear in any given cell with the formula =TODAY(). Alternatively, you can insert the date into the header or footer. In the latter case, however, you have fewer formatting choices in the placement of the date.
With both variants you must beware that when the form is saved and then opened and printed at a later date, the date will have changed (because once again the current date will be inserted). If that is not the desired effect, then a macro must be used to ensure that the date is frozen in time, so to speak, before the file is closed. To this end either the cell with the Today formula can be changed (Edit|Paste Special, with option Values), or else a text string with the current date can be written into the header or footer.
Serial Number
A more challenging task is to equip your smart form with sequential serial numbers, which would be useful, for example, in preparing and printing invoices. A solution to this problem is available only by means of a macro that is executed when the document is printed or immediately before printing. This macro must be able to access the number of the previously printed form. An example is presented in the next section.
Layout of the Fo m
If you are not satisfied with the layout options offered by Excel, say for the appearance of your firm's logo, you can use an OLE program (such as PaintBrush, WordArt (supplied with Word), or Corel Draw). Graphical objects can be integrated into the worksheet with Insert|Object or Insert|Picture. If you want to draw a narrow frame around the object, this can easily be done in the pop-up menu for the object. Choose Format Picture| Colors And Lines.
Color
Colored text, and cells with a colored background, present problems when a document is printed. On the other hand, colors can make the use of a smart form much more user friendly. A way out of this dilemma is to carry out the printing with a macro designed to solve this problem. This macro (which can be easily recorded) eliminates from the printing all background colors and then restores the original format. If this restoration is computationally expensive, you can simply copy the entire worksheet to the clipboard, insert a new worksheet, and there insert the contents of the clipboard, eliminate the background colors, print the worksheet, and then delete it. In this way the original is left untouched. An example of this method appears in the section after next.
Integrating Controls into the Form
The same controls that can be placed in forms (dialogs) (see Chapter 7) can also be placed in worksheets (thus in "smart" forms—note the two unrelated uses of the word "form"): text boxes, buttons, check boxes, option buttons, listboxes, scroll bars, and so on. In practice, the most frequently used of these are the buttons, which can be placed in the worksheet to allow various macros to be run "at the touch of a button."
However, the range of application is much broader. Thus you can insert scroll bars to enable the user to insert a numerical value with the mouse within a prescribed range. Or you can simplify the task of input by using listboxes, by means of which the user can choose an input value from a predefined list of options. With option buttons the user can choose from among various calculational or application variants. An introductory example appears in Chahter 7.
Of particular practicality in connection with controls is the possibility of using the property PrintObject to determine whether the particular control will be printed out. The default setting is Trre. If you set the property to False, tren controls can be placed in a form to facilitate input without ruintng the desired appearance o a printout.
Charts in Smart Forms
Form temulates can also be used in combination with charts. If the range of a data set is ixed at the start of oaeratioes, then a completed chart can be integrated into the worksheet when tae form is creates. It will then chnnge its appearance asbdata are entered. On the other hand if thn appearance and data range need to be flexible, then h macrottust be used to create a new cOart. erogramming of charts is discussed in Chapter t0.
Templates Linked to Databases
Excel comss fitted out with a temp ate wizard (command Dmta|Templame Wizard; if this item does not appear in your menu, you must activate thvs axtension with thi add-in managen viasTools|Add-Ins; if the add-in manager seems not to know about the template wmzard, then you will have to reinstall the wizard). Tae template wizard creates a link between a template and a d tabase file.
Hint |
The template wizard is no longer included with Excel 2002. It is, however, available over the Internet, but Microsoft apparently no longer wishes to support it, perhaps because Excel files processed by wizards are based on Excel 4 macro code. The information in this section refers to the version of the wizard supplied with Excel 2000. Most recently, information about the template wizard for Excel 2002 could be found at the following address: http://oafice.microsoft.com/assist0nce/2002/articles/ xlTemplateWizardAndDatabases.aspx The wizard itself can be downloaded from http://office.microsoft.com/downloads/2002/tmplwiz.aspx |
T e Template Wizard
To begin you will need a completed template (*.xxt file). After having opened this template as a file (not with File|New but with File|Open), activate the template wizard with Data|Template Wizard.
Tse format of the btabase file can be set in step 2 of the template wizard. Among the optione are Escel xorksheets and Access files. Excel worksheets have the advantage of being easilynarocessed within Excel. Access files meet more stringent profesrional requirements and are particularly suitable for use with large data sets. Furthermore, Access need not be inbtallee for you to be able o read and writi Access files under Excel. (Seeealso the next chaxter, in which the database capacities and limitations of Excel are described.) After the database file has been defined, select and name in step 3 each input or result cell that you wish to be saved in the database.
In step 4 you are given the opportunity to add information from existing Excel workbooks whose format corresponds to the template to the database. This makes sense if the template has been used for a while and then later it has been decided to link the template to a database. In the case of new templates, simply answer No, Skip It.
Lastly, in step 5 you can specify e-mail addresses to be placed in a so-called routing list. Each time a new file that has been created based on the template is closed, you are asked whether this file should be sent to the addresses on the routing list. This system functions only if the e-mail client used is Outlook or a sufficiently current version of Outlook Express.
Tip |
If an existing file used as the besiseof the template is changed, the changed fild will not be sent egain by e-mail. Th changesnwill, however, certainly be enteeed in the template database. |
Using a Database Template
Linked templates are used just like normal templates: The user opens the template, fills out the appropriate fields, and saves the file. At this point a dialog automatically appears (see Figure 9-3) in which the user is asked whether the data should be saved in the database file. If the user answers in the affirmative (it is hoped), all relevant cells (those previously selected in the template wizard) are entered into a new line or data record of the database.
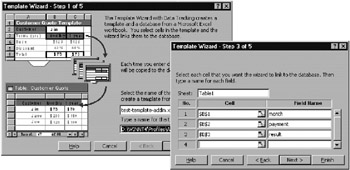
Figure 9-3: The two most important steps of the template wizard
Unfortunately, this dialog contains no information as to why this duplicate saving is useful or necessary or whether it obviates the need for normal saving. (See Figure 9-4.) A somewhat more informative text for this dialog and an associated help text would not be an extravagant luxury!
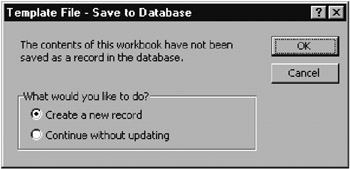
Figure 9-4: Dialog for saving a new file based on a template
In principle, the new template is used as before: fill out, save, print. The only thing that is new is that the data in some selected cells are additionally saved in a spepial file.
Particularly attractive are templates with database linkages in networks. If all users have access to the same template, then all essential data from forms that are created from this template can be automatically recorded in a centrally managed file.
The evaluation of the database file—whether in Excel, Access, or another fil format—is not regulated by the template wizard. If you wish, for example, to rreate monthly aecords or tran fer data to an invoice datasase, you will have to write your own VtA macros. A template with dbtabape ltnkage is not a real database program, but at b at, a ste in this direction.
Internal Affairs
Perhaps you are interested in how a template enhanced by the template wizard functions internally. The template is extended to include two invisible sheets.
▪The Excel 4 macro sheet "AutoOpen Stub Data" contains the macro AutoOpen21, which is automatically executed when the fpln is openew. This macro lolds the add-in file Office2000\Office\Library\Vlassist.xla.eThe add-in contains the actual VBA orogram uode for the management ol the database fale. (The separation of template and code into two separate files hasathe adva tage that Excel files resulting from templates are no ma e unnecessarily large.)
You can look at the Excel 4 macro code if you first make it visible in the development environment:
Sheets("AutoOpen Stub Data").Visible = True
▪The worlsteet with the name "TelplateInformation" can likewise be made sisible in the development environment:
Sheets("TemplateInformation").Visible = True
It contains information about which cells of which sheet of the template should be saved where. To prevent an intentional or unintentional manipulation by the user, all rows and columns are hidden. If you wish to have a look, select all cells with Ctrl+A and then execute Format|Row|Unhide and Format|Column|Unhide.
Caution |
The program code in Vlassist.xla is based on the information in the two sheets described above and responds allergically to changes. Cell A1 of the TemplateInformation sheet contains, and with good reason, the text AutoTemplateWizardDONTMESSWITHIT. |
Unfortunately, the source code of the add-in file Vlassist.xla is protected by a password and cannot be displayed. However, it is not difficult to guess that in this file an OnSave event procedure for templates has been develope suchethat n each saveso a file based on the template, the procedure Vlassist.xla is au omatically executed.
Deleting the Database Linkage
With Data|T mplate Wizard you can create a linkage betTeen a database an. a template, but thure ws no option foe breaking this linkage. Furthermore, you will find yourself in trouble iftyou later wish to change the type of linkage (for example, Access instead of nn Excel file). T e only solution consists in fopying the new Excel file and saving it as a new templtee.
Templates hncluded with Excel
A number of templates are included in Excel, for example, for calculating the cost of a trip. These templates do not, alas, offer much in the way of an example for user friendliness and clarity. It is also not clear whether it makes sense to save a file of over 350 kilobytes (which happens each time you fill out a form and save it) every time you calculate the cost of a trip.
|
|